Creating a Settings Form in your Extension.
In quite a few cases, you will need some settings for your extension. In this example, we will create settings for a URL, a Client ID, a Client Secret and which financial type to use.
This guide will show you how to
- add some settings to your extension
- have a form for those settings
- add the form to the navigation menu
- make some settings in the form mandatory
- validate a setting when the form is submitted.
ehvoorbeeld extension
In this step by step guide the extension is called: ehvoorbeeld.
Enable the setting mixin
Before your start you need to enable setting-admin mixin to your extension.
civix mixin --enable=setting-admin@1
This will add the following:
- Creates a permission
administer ehvoorbeeld. - Creates a url to settings page of your extension:
civicrm/admin/setting/ehvoorbeeld. - Creates a link in menu under Administer > Sytem Settings > EH voorbeeld
- All settings which are added to
ehvoorbeeldsettings page will be shown on the form.
Add Settings to your Extension
First thing is to add a settings folder to your extension and add a file ehvoorbeeld.setting.php in the folder, as you can see in the example below.
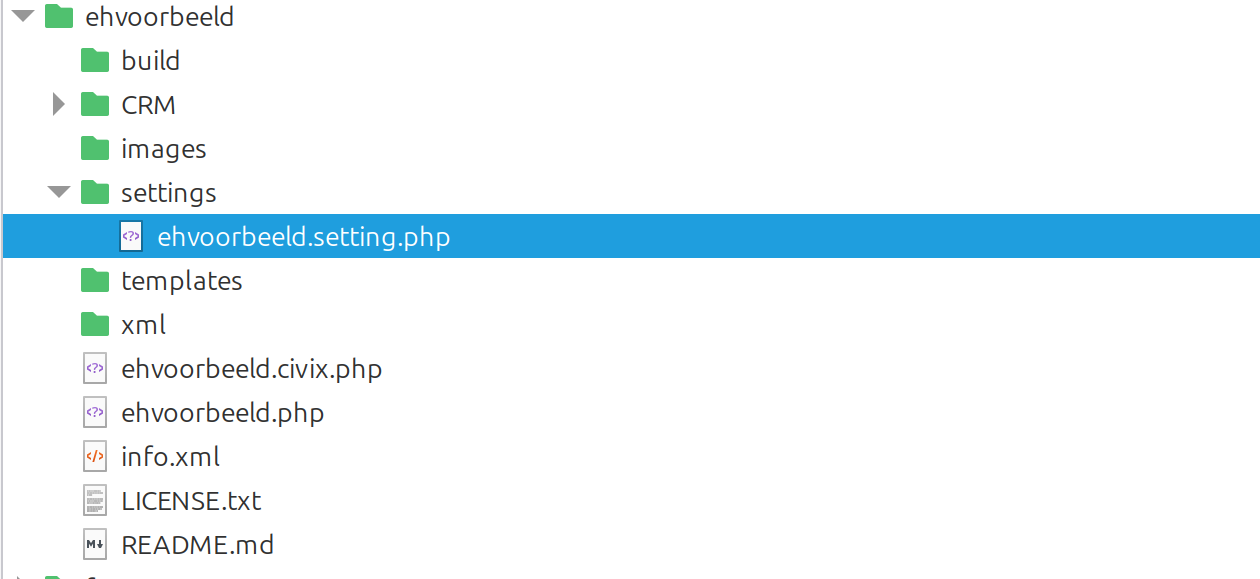
In the myextension.settings.php file, you will define the settings. More information can be found in the Settings part of this Developer Guide.
<?php

use CRM_Ehvoorbeeld_ExtensionUtil as E;


return [
    'ehvoorbeeld_url' => [
        'name' => 'ehvoorbeeld_url',
        'title' => E::ts('URL to connect to My Wonderful Site'),
        'required' => true,
        'type' => 'String',
        'html_type' => 'text',
        'html_attributes' => [
            'class' => 'huge',
        ],
        'is_domain' => 1,
        'is_contact' => 0,
        'help_text' => E::ts('URL to connect to My Wonderful Site'),
        'settings_pages' => ['ehvoorbeeld' => ['weight' => 10]],
    ],
    'ehvoorbeeld_client_id' => [
        'name' => 'ehvoorbeeld_client_id',
        'title' => E::ts('Client ID to connect to My Wonderful Site'),
        'type' => 'String',
        'html_type' => 'text',
        'html_attributes' => [
            'class' => 'huge',
        ],
        'is_domain' => 1,
        'is_contact' => 0,
        'help_text' => E::ts('Client ID to connect to My Wonderful Site'),
        'settings_pages' => ['ehvoorbeeld' => ['weight' => 15]],
    ],
    'ehvoorbeeld_client_secret' => [
        'name' => 'ehvoorbeeld_client_secret',
        'title' => E::ts('Client Secret to connect to My Wonderful Site'),
        'type' => 'String',
        'html_type' => 'text',
        'html_attributes' => [
            'class' => 'huge',
        ],
        'is_domain' => 1,
        'is_contact' => 0,
        'help_text' => E::ts('Client Secret to connect to My Wonderful Site'),
        'settings_pages' => ['ehvoorbeeld' => ['weight' => 20]],
    ],
];
As you can see, the name of the extension is included for each setting.
You will also have to make sure that your info.xml file contains the relevant mixin for settings. If you have used civix to generate your extension it probably already is. But check :-)
For example, this would be the required definition if it was just one mixin. You probably already have a mixins element in your info.xml but if not, you can just add the settings mixin and settings-admin mixin.
  <mixins>
    <mixin>setting-php@1.0.0</mixin>
    <mixin>setting-admin@1.0.1</mixin>
  </mixins>
Change the position in the navigation menu
The settings form can be found under Administer > System Settings > EH Voorbeeld. That could be fine. But probably you want to put in a more logical place. So lets place our settings form under Administer > Customize Data and Screens.
We use the navigationMenu hook (see Navigation Menu Hook for this hook or Hooks for a more generic explanation of hooks).
Go to the yourextensionname.php file (so in this case ehvoorbeeld.php) in the extension folder and add the following code:
/**
 * Implements hook_civicrm_navigationMenu().
 *
 * @link https://docs.civicrm.org/dev/en/latest/hooks/hook_civicrm_navigationMenu/
 */
function ehvoorbeeld_civicrm_navigationMenu(&$menu) {
    _ehvoorbeeld_civix_insert_navigation_menu($menu, 'Administer/Customize Data and Screens', [
        'label' => 'Settings for the Developer Documentation Settings How To',
        'name' => '"ehvoorbeeld_setting_admin"',
        'url' => 'civicrm/admin/setting/ehvoorbeeld',
        'permission' => 'administer ehvoorbeeld',
        'operator' => 'OR',
        'separator' => 0,
    ]);
}
In the code above make sure the url is civicrm/admin/setting/ehvoorbeeld. If it isn't then a menu item ehvoorbeeld will stay under Administer > System Settings
Change the title of your settings form
If you do not like title of your settings, which is default to the shortname of your extension: ehvoorbeeld Settings, you can add the following line to your info.xml:
<civix><setting-page-title>Settings for the Developer Documentation Settings How To</setting-page-title></civix>
Change the form for your settings
Next we will see how we can now change manage settings form. If you don't do this your settings page will use the CRM_Admin_Form_Generic core form class.
To change this
- create a folder called Menu within the xml folder of your extension
- add a file called yourextensionname.xml
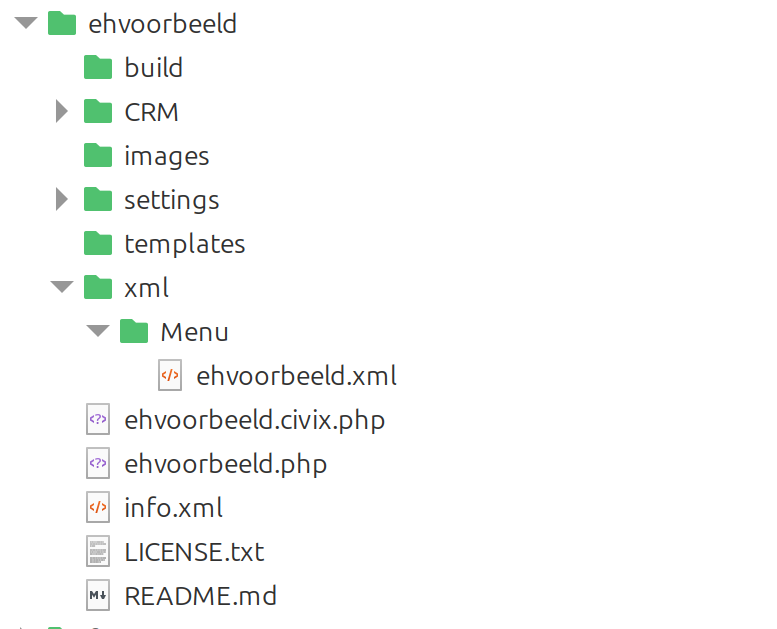
As you can see, there is a file called ehvoorbeeld.xml within my xml/Menu folder and it will contain this:
<?xml version="1.0"?>
<menu>
  <item>
    <path>civicrm/admin/setting/ehvoorbeeld</path>
    <title>Settings for the Developer Documentation Settings How To</title>
    <page_callback>CRM_Ehvoorbeeld_Form_Settings</page_callback>
  </item>
</menu>
You also need to enable the menu-xml mixin.
civix mixin --enable=menu-xml@1
In your extenstion create a form class in CRM\Ehvoorbeeld\Form\Settings.php:
<?php

use CRM_Ehvoorbeeld_ExtensionUtil as E;

class CRM_Ehvoorbeeld_Form_Settings extends CRM_Admin_Form_Generic {

  public function preProcess() {
    $this->sections['default']['title'] = E::ts("Default Section Title");
    $this->sections['default']['description'] = E::ts("Some description");
    parent::preProcess();
  }

}
You also need to add smarty template to templates/CRM/Admin/Form/Settings.tpl with the following contents:
{include file="CRM/Admin/Form/Generic.tpl"}
That is it. Now clear your civicrm caches and you settings form has section title and a description.
Validate a Setting when the Form is Submitted
On this settings form, we have asked the user to enter a URL and it would be a good idea to check if the URL that was entered is actually a valid URL.
We can do this with the Validate Form hook.
First we add a listener for the validateForm hook to our myextensionname.php file (as we have done in the section above for the buildForm hook):
/**
 * Implements hook_civicrm_config().
 *
 * @link https://docs.civicrm.org/dev/en/latest/hooks/hook_civicrm_config/
 */
function ehvoorbeeld_civicrm_config(&$config): void {
    Civi::dispatcher()->addListener('hook_civicrm_validateForm', ['Civi\Ehvoorbeeld\HookHandler', 'validateUrl']);
    _ehvoorbeeld_civix_civicrm_config($config);
}
And then we add the validateUrl function to the HookHandler class in the HookHandler.php file we created in the section above for the required fields:
     *
     * @param GenericHookEvent $event
     * @return void
     */
    public static function validateUrl(GenericHookEvent $event): void {
        if ($event->formName === "CRM_Admin_Form_Generic") {
            if (isset($event->fields['ehvoorbeeld_url'])) {
                if (!filter_var($event->fields['ehvoorbeeld_url'], FILTER_VALIDATE_URL)) {
                    $event->errors['ehvoorbeeld_url'] = E::ts("This URL is not valid.");
                }
            }

        }
    }
And done!