Manual event registration
This chapter covers how office staff can register people for events through the admin interface. It will show how to register an individual participant manually, how to register multiple participants and how to import registrations from an external source.
Registering a Participant Manually
Although CiviCRM helps alleviate data entry for event registration by allowing your constituents to register directly through your website, it also provides the ability to manually register contacts. Useful, for example, if people want to register by phone or mail, or if you want to register people on their behalf.
For example, when a person calls the office to register for an event, the staff person who takes the call can:
- Enter the person's name in the Quick search box.
- Select the contact from the results.
- Click the Events tab on the caller's contact record.
- Add the person to the event.
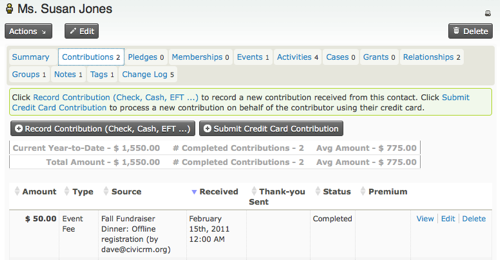
The Events tab on a contact record, shown in the following screenshot, displays a summary list of the contact's past event attendance and provides a link for registering the contact for a new event.
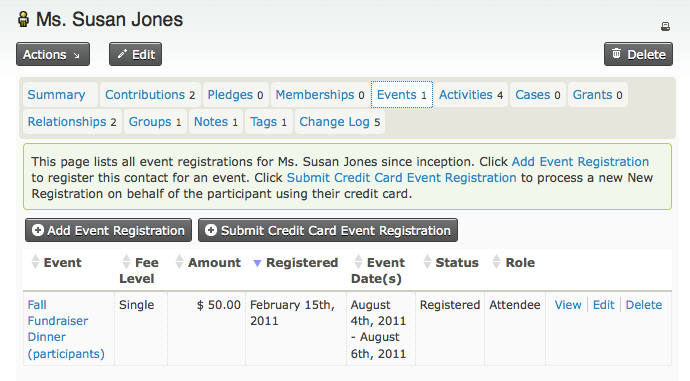
There are two options for registering the contact:
- Add Event Registration: for people who pay later, such as by sending a check or paying when they arrive at the event.
- Submit Credit Card Event Registration: for people paying immediately with a credit card. This option is available only if you've configured a payment processor that allows direct payments through your web site. If you are taking a registration over the phone you can ask them for their credit card information and enter it manually.
The interface for both options is very similar, with the exception of those fields that record payment details.
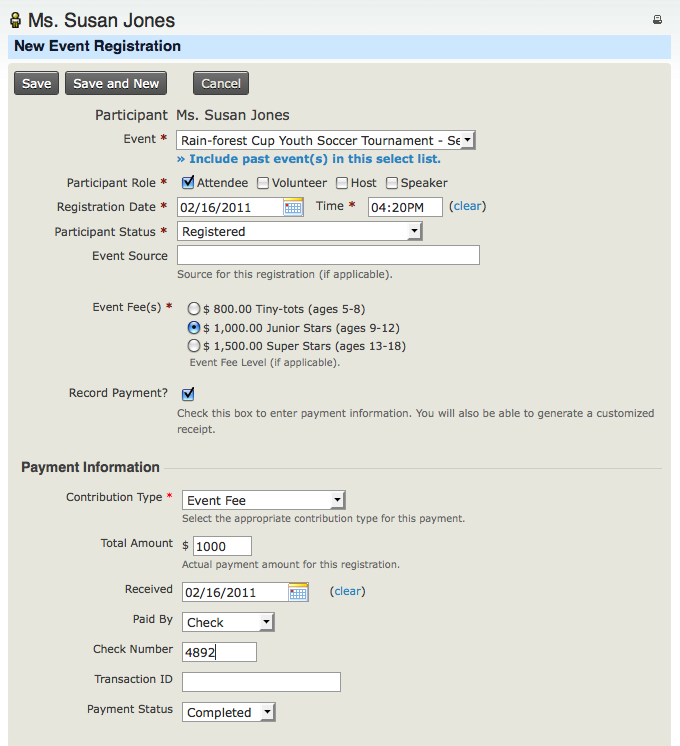
As you work through this form, certain sections of the page change to reflect choices you have made. For example, when you choose the event you are registering the contact for and select a participant role, the form will automatically load predefined custom data fields that pertain to those selections.
If the event selected is a paid event, you will see an event fees section which has been defined in the event configuration details, and an option to record the financial transaction details (Record Payment) will be visible. This leads us to an important concept central to CiviEvent (as well as other modules): event registration records in CiviCRM are independent of, but can be related to, a financial transaction. While this may seem confusing to organizations accustomed to viewing event registrations as essentially a financial transaction, it offers an important and valuable distinction.
An event registration communicates the contact's participation in the organization's event. A corresponding financial transaction indicates the monetary value associated with that participation. While related, the two are distinct.
The distinction is best understood by considering the common scenario of an organization waiving fees for a V.I.P., a speaker, or someone who participating in the event in a limited way. In such cases, you want to register the individuals but may not want to create an associated financial transaction.CiviCRM respects this distinction by recording the event registration record under the Events tab, recording the financial record under the Contributions tab, and then creating a link between the two records.
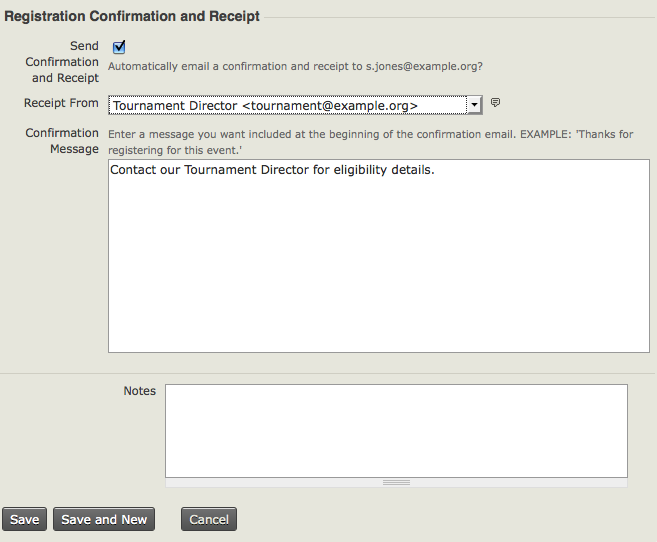
If the event is a paid event, click the Record Payment checkbox and enter information in the transaction fields that are displayed. This process essentially links together the event registration and the contribution record for this contact. After recording the registration, you will be able to view the event registration record and see the related contribution record at the bottom (see screenshot). If you do not select the Record Payment check box, only a registration record will be created.
Registering a participant paying only a deposit (partial payment)
If you are registering a participant manually, you can enter a payment amount less than the event fees, then make one or more additional payments later on until the fee is paid in full.
During the manual registration you enter the the amount actually being paid at this time in the Total Amount field in the Payment Information region. This sets both the Event status and the status for the linked contribution to Partially paid.
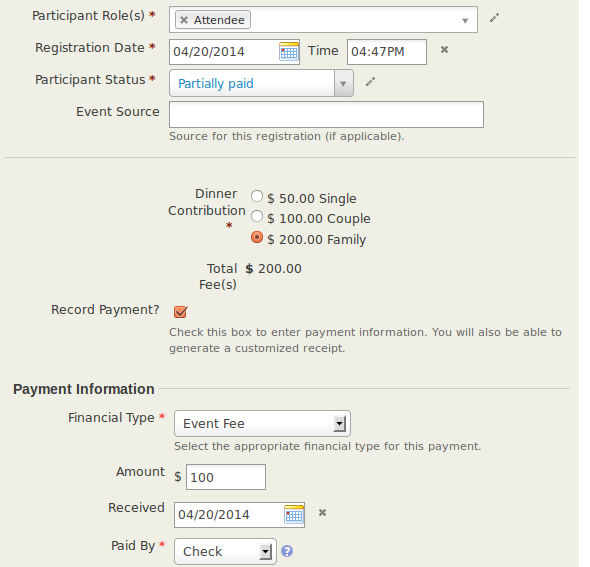
The expectation is that additional payment(s) will be made until the full event fee has been paid, so a Partially paid registration is included in the participant total in the same way as a Pending from pay later registration.
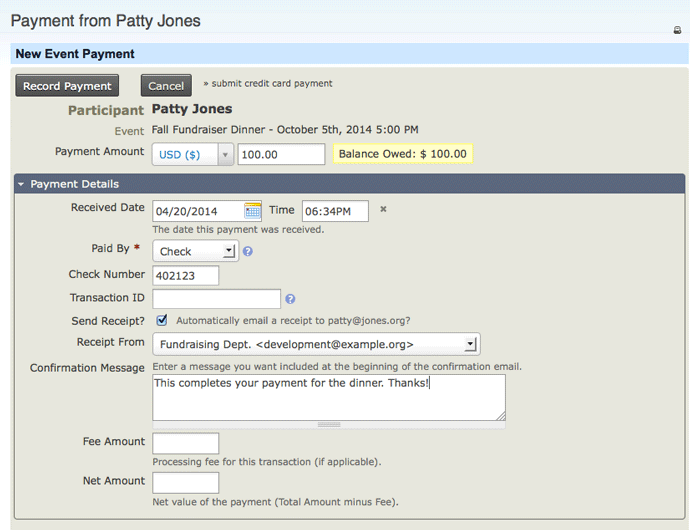
To make an additional payment on this registration:
- Go to the registrant's contact record.
- Click on the Events tab on that record.
- Click on more on the far right of the partially paid event record.
- Select Record Payment.
- For a payment using a credit card select submit credit card payment, otherwise complete the payment details as required.
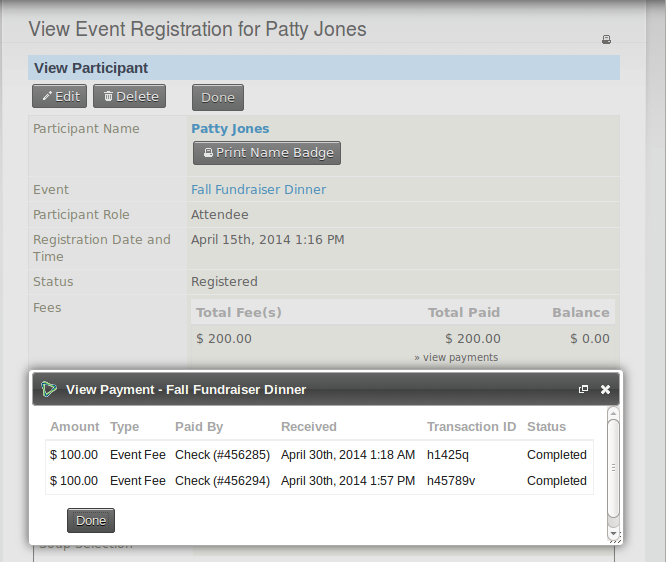
You can make more than one additional payment. When the event fee has been paid in full the Event status will automatically change to Registered (although you can override this by choosing a different status option when you make the last payment) and the status of the linked contribution will automatically change to Completed.
Looking at this from an accounting perspective, when the registration is created, the event fee is added to accounts receivable. Each partial payment is then added as a separate line item until the fee is paid in full.
Note that on the event registration and the linked contribution the displayed amount will always be the full event fee. You can see how much is owing by choosing to view the event registration. Selecting ›› view payments (under the Total Paid amount) will display a summary of each payment.
Mass Registrations
CiviEvent offers the time-saving feature of registering multiple contacts for an event at one time (or as a "batch"). Returning to the youth leadership workshop scenario, Arts in Action anticipate a high rate of attendance from participants at the previous workshop. The staff perform a search to find previous participants and mass register them, setting each individual's participate status to "pending". The list of pending contacts is then used to call or email people to see if they are coming. If the person says they will attend, the event organizer can change the person's status from "pending" to "registered".
Steps for Mass registration:
- Search for the set of contacts you are interested in (Arts in Action would navigate to Search > Find Participants to search for all participants at the previous workshop).
- On the search results page, either choose select all or put a check mark next to each contact you are interested in. A sample search results page appears in the following screen-shot.

- From the actions list just above the search results, choose Add Contacts to Event then click Go.
- Choose the event you would like to register participants for. Note that you cannot currently register participants en masse for past events.
- Complete the registration form, choosing the appropriate action choices for this set of people, such as setting the Participant Status to pending. Choices made here will be applied to all contacts in this set.
- Click Save.
Limitations of mass registrations
The action choices you make (in Step 3) are applied uniformly to the entire set of selected contacts. To work around this limitation, do a mass registration several times, each time choosing the desired action choices for that set of contacts. For example, you might mark one set of contacts you plan to call and invite with a Participant Status of "pending", then add another set of contacts to the event, such as event leaders you know will attend, with a Participant Status of "registered".
You cannot do mass registration of participants for events in the past.
You cannot apply contribution information, such as a pay later contribution or a credit card transaction, in a batch action. Therefore, mass registration is best for free events or for contacts who are not required to pay a fee at this point. You can always add payment details for individual contacts later on.
Importing Registrations
Importing registration information is a quick way to add a bunch of registrations to the event. The data to be imported must be available in a comma-separated values (CSV) file. If the majority of the contacts are already in CiviCRM, it may be faster to do a mass registration action as mentioned earlier in this chapter.
The import tool for participants is similar to that of contacts, but there are some pre-requisites which must be met before running the import. Firstly, participants cannot be imported unless the Individuals already exist in the database as contacts. If you need to import participants for contacts that are not yet available, run a contact import first, preferably including a unique external identifier (most often an ID assigned by the database or application you are importing records from). There are two ways to match a participant to a contact:
- Use the external ID of the contact by including the ID in a column of the CSV file (if this ID was not imported with contacts, but you have them on record, a second contact import could be run to update this field, after which you may import participants).
- Alternatively, you can match participants to contacts based on your contact de-dupe rules, e.g. through including the first name, last name and email address of the individual against each contact in the file. If a contact matches these three fields, the event participation will be assigned to it.
Preparing your data
When preparing your data import it is helpful to know what fields are required for Import. You'll want to be sure that these fields are included in your CSV import file. Below is a list of the required fields. Please note that you only need one of the fields marked (Match to Contact), you do not need all of them.
- Contact ID (Match to Contact)
- Email (Match to Contact)
- Event ID
- External Identifier (Match to Contact)
- Participant Status
Steps for importing registrations
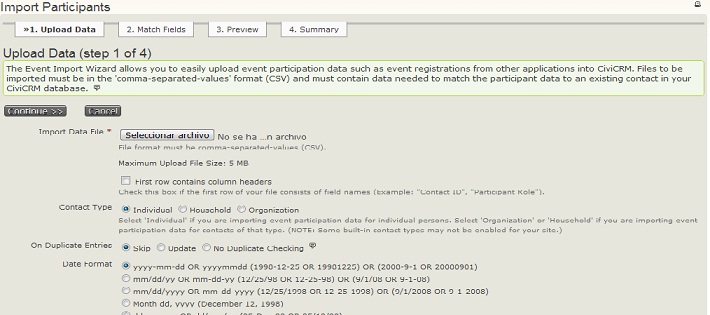
- From the navigation menu, go to Events > Import Participants.
- Browse to the data file on your local computer.
- Select the appropriate contact type, date format and other options, and click Continue.
- Match the fields of your CSV file to the CiviCRM fields.
- If this is something you may repeat in the future, check the Save this field mapping box.
- Preview and Save.