Everyday Tasks
This chapter describes a list of everyday tasks that you might perform using CiviCase, and how to go about them.
Viewing the Case Dashboard
The Case Dashboard gives you an easy way to keep track of case-related tasks. It provides:
- a summary of cases in the system (Summary of Case Involvement)
- a list of your cases with upcoming activities (scheduled in the next 14 days)
- a list of your cases with recently performed activities (completed in the last 14 days).
If you have permission to view cases other than ones that you are working on, you also have the option to see:
- a list of all cases with upcoming activities
- a list of all cases with recently performed activities.
You can switch between viewing Your Cases and All Cases by clicking on the link at the top right of the content area.
Click the Edit icon next to the Next Sched. activity name to work on that task. In the case shown in the following screenshot, the Next Sched. activity is Medical evalution. You can view this activity in a pop-up window by clicking directly on the title. If you're ready to work on that activity, click the edit pencil to the right of the activity title.

Click on the triangular expand icon (►) to the left of the client name to see the complete list of activities for that case. From this list you can view or edit any activity in that case. Click Manage Case when you want to work on a number of tasks within a case or to change the status of the case, print a case report, or view case roles.
To add a new case from the Case Dashboard, click the Add Case button at the top left of the content area.
Finding cases
If you know the Case ID, you can quickly find the case by using full-text search, either from Search > Custom Search > Fulltext Search or from the fulltext search block if you have enabled it.
You can search for cases by going to Search > Find Cases or under Cases in the menu bar at the top of the CiviCRM screen. The Cases search form gives you a number of options. You can search by each option individually, or combine them for further filtering.
You can search by:
- client's name or email address: type characters from the name or email address into the Client name or email input field
- type or types of cases: checking the case types that you would like to filter by
- case status: selecting a status from the dropdown menu
- all cases or your cases (if unselected, the default is to filter by your cases)
- deleted cases: click the Deleted cases checkbox.
If you make selections in multiple criteria (e.g. adding a client name, checking off a case type, and selecting "all cases") the search criteria will be combined so that the results must fulfill at least one requirement in each set of criteria (the cases found will contain the client name AND case type). In contrast, making multiple selections within one set of criteria (e.g., checking two case types) will ensure that the returned results fulfill at least one of the selections in the criteria set (in this example, cases must match at least one of the case types).
Opening a new case
You can open a new case with either an existing contact or a new contact not yet in your system.
Creating a case from an existing contact's summary screen or actions menu automatically links the case to that contact. To open a case on an existing contact, follow these steps:
- Go to the contact's summary screen.
- Select Add Case from the Actions dropdown menu, or alternatively click on the Cases tab.
- Fill in the required fields in the Add Case form.
- Click Save.
If you open a new case for a new contact, the contact's record in CiviCRM is created at the same time as you create the case. Follow these steps:
- Go to Cases > New Case or select the Create New > Case dropdown button. This button is provided as a block in Drupal or on the left hand side in Joomla!.
-
If you've opted to create a new case without navigating to an existing contact first, you may want to check whether the contact already exists in the database. Type the name or email of the contact you are looking for in the Select Contact field, and you will see a list of potential matches (as illustrated by the following screenshot).

-
If you don't find the contact, you can create it immediately by selecting the type of contact from the create new contact list. This opens a pop-up window (shown in the following screenshot) that allows you to fill out the new contact's name and other information while opening the case. The fields in this pop-up window are controlled by the fields in the Add Individual profile. This means you can easily add or modify the fields provided. You can read more about profiles in the Profiles chapter.
Use the Medium and Location fields to record information about where and how this case came to your attention. For example, you might select In Person for Medium and At the Annual Gala for Location. You can manage Encounter Mediums by selecting the edit icon.

Use the Details text area to add information pertaining to the overall case, but not to a specific activity of the case. An example might be "Jane is concerned about some illegal land use that she has witnessed in her neighbourhood, and would like us to see what can be done about it. I told her that the best person to look into this was Tom, and she asked whether her husband could be included on any correspondence."
The Subject field is displayed in search results and in other listings of cases, next to the name of the case client. Keep this in mind when entering the subject text: a brief and unique description of the case will be more helpful than using the client's name as the subject.
The Case Type selector allows you to choose the type of case that you are creating. Many case types have specific activities and timelines, so it is important to choose the appropriate case type at this point. You can change to a different case type at a later point by clicking Manage Case next to the case when it's displayed in the CiviCase Dashboard, or from the contact's record Case tab. Then select Change Case Type from the New Activity dropdown menu. Changing an ongoing case may require you to then update or re-enter some data.
The Case Status selector allows you to indicate the current status of the case. Generally you will use a status such as Ongoing or Urgent, but if you are adding a case that has already been completed (for tracking purposes) select Resolved.
The Case Start Date field defaults to the current day. If you are creating a case that has already been completed or entering data for upcoming cases (not yet started), adjust the case start date accordingly.
The Duration field records the time spent collecting the data needed to fill out the create case form, not the amount of time it took to fill the form out. Fill out the number in minutes. For example, you might use this field to record the number of minutes spent on the phone with a constituent as they described the case.
-
After you complete the fields in the pop-up window, clicking the Save button saves the case and loads the Manage Case page, where you can then modify activities, add attachments and assign case roles. Alternatively, clicking Save and New saves the case and resets the form so that you can add further new cases uninterrupted (this is particularly useful if you are doing data entry). Clicking Cancel discards the case data you have entered and sends you back to the CiviCRM dashboard.
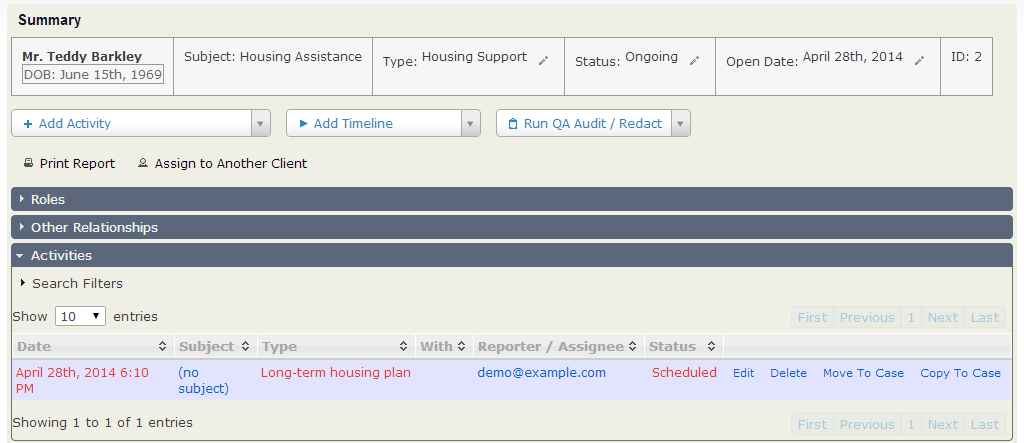
Manage Case Page
The manage case page gives users the ability to manage all aspects of a particular case on a single screen, including:
- View summary case information
- Change case status or reassign
- Create/manage activities
- Create/manage timelines
- Create/assign case roles
- Identify/manage client relationships
- Run case audits (reports)
Assigning case roles
You can assign case roles to contacts who are working on the case or need to stay informed about case activities. Users who have access to CiviCase and are assigned a role in the case will then see that case in their My Cases view. The phone number and email address of each person with a case role will be displayed on the case, making it easy to communicate with them (see screenshot).
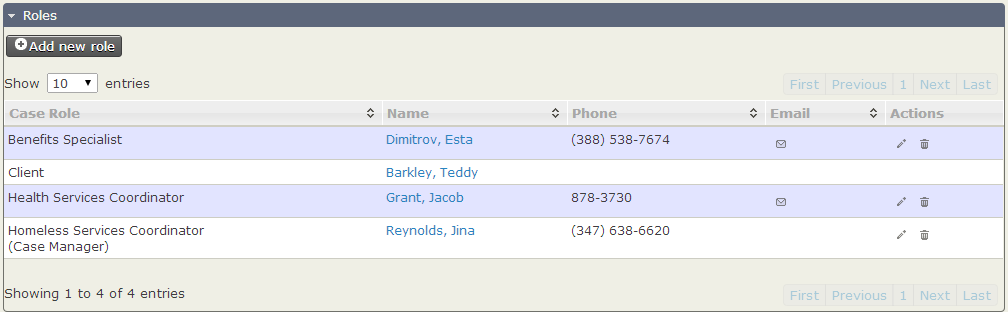
Within a case, you can assign a case role to a contact:
- Click the Case Roles area to open it.
- Case roles that have not been assigned display (not assigned) in the Name column. Click the edit icon to assign someone to that role.
- The Assign Case Role pop-up window will appear. Begin typing the last name of the contact until you see the name in the dropdown list.
- Select the contact you want to assign to the role and click OK.
Where you need to have more than one contact assigned to a given case role you can do this using the Add New Role button. Clicking this brings up a pop-window where you can select any of the roles defined in your case configuration, and select a contact from within your database to whom the role will be applied. The new role relationship will then be listed in the Roles pane of the case management screen.
Generally, anyone who might be assigned to a case should already be in the database, but if you can't find the person you're looking for, you must add her/him as a contact first (navigate to Contacts > New Individual).
Each assigned case role has mail, edit and delete icons under the Email and Actions columns. You can email contacts with roles in the case, or modify their relationships to the case. Change the case role by clicking the edit icon, or delete a case role by clicking the delete icon. Emails that you send from here are automatically added to the list of case activities in the proper sequence. This provides an audit trail of case-related communications, and ensures that the case story is complete.
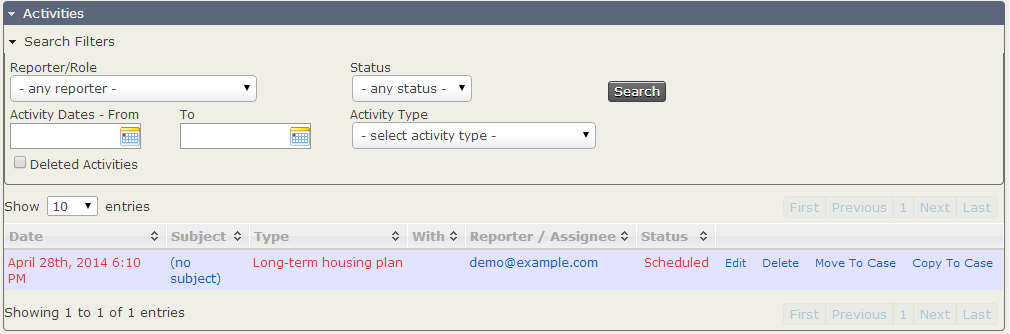
Finding activities within a case
You may need to find a specific activity within a case, for reference or modification. To view the activities in the case, scroll down to the Case Activities section and click it to open it. In the default view, scheduled activities are listed first, sorted by date, followed by completed activities. Click on the column headers to sort by a specific column (for example, by activity type).
If there are many activities, you can filter them to see a smaller subset. You may want to view activities of a certain type (for example, to see all of the Follow up activities that have been performed for this case). Click the Search Filters button, which opens a form that allows you to filter by:
- Reporter/Role
- Activity Status
- Activity Dates (enter a range by filling in both date fields, or search for activities performed on a specific date by filling out the first date only)
- Activity Type (for instance, to find all follow-up activities, select Follow up from the list)
- Deleted Activities (available to people with permission to view deleted activities).
Once you have selected your search criteria, click the Search button to the right and the table will automatically filter out all of the activities not matching your criteria.
Adding and managing activities
Several tasks are commonly performed on activities. After performing the necessary work, click the Save button to save the activity and be sent back to the case page, or Cancel to discard your work.
To add a single new activity to a case
- Navigate to the case (either using Find Cases or via the Cases Dashboard).
- Choose an activity type from the select list labeled New Activity in the Case Summary.
- Click Go.
- Fill out the activity form. The Client field will be pre-populated with the case's client data.
Note: the drop-down list of activities is configurable. Refer to the instructions for Activity Lists in the set-up chapter
Adding a set of activities
When the case is created, the Standard Timeline is added. You may add additional set of activities when appropriate.
- Navigate to the case (either using Find Cases or via the Cases Dashboard).
- Choose a Timeline or Sequence from the select list labeled New Timelinein the Case Summary.
- A dialog box will pop-up. Confirm that you wish to add the activities by clicking "OK"
The set of activities will be added to case.
To send a copy of the activity to anyone with a case role for the case
- Open the Send a Copy area.
- Check the contacts or case roles whom you would like to be alerted about this activity.
To schedule a follow up activity
- Open the Schedule Follow-up area.
- Select the follow-up activity type, the number of days until the follow-up should occur, and subject of the follow-up (e.g. "confirm that Jane's problem is fixed").
- Click Go.
- Complete the form and click Save.
To add an attachment to the activity
- Open the Attachments area.
- Click a Choose file button.
- Up to five files can be attached to an activity. Select an attachment from your file browser.
- Click Choose. The name of the attachment will appear to the right of the Choose file button.
The attachment will not be saved into CiviCRM until you have saved the activity.
Editing an activity in a case
To edit an activity in a case:
- Navigate to the case from the Case Dashboard, the Find Cases search form, or the contact's Cases tab.
- Click Edit at the far right side of the activities table at the bottom of the case form.
- This brings you to the activity form, which you can edit in the same way as when creating an activity for a case. The only difference is that many of the fields will already be filled in.
To assign a scheduled task to a staff member while adding or editing a case:
- Start typing the staff member's name into the Assigned to field; a list of possible contacts will appear.
- Select from the list of suggestions and make sure the staff member's full name shows up in the Assigned to field.
You can assign multiple contacts to an activity. If you accidentally select the wrong contact, click the X by the contact's name to remove him from the list.
Updating the status of case activities
You can quickly update the status of an activity from the Activities table (without opening the activity edit form):
- Navigate to the case from the Case Dashboard, the Find Cases search form, or the contact's Cases tab.
-
Click on the status text (i.e. "Scheduled") in the activity table row.
-
This brings up a pop-up form where you can select a new status. Click Ok to save your update.
Changing the status of a case
The case status lets you quickly determine how a case is progressing. Sample status values include Ongoing, Resolved, Not Assigned, and Urgent.
To change the status of a case:
- Navigate to the case from the Case Dashboard, the Find Cases search form, or the contact's Cases tab.
- Click Manage Case.
- Click the Edit icon next to the current status column in the Case Summary table.
- This will open the Change Case Status form (an activity with an additional field called Case Status).
- Set the case status to the new status.
- Modify the other the fields as you would when editing an activity in a case. Make sure to set the Status field. It is required, but not set by default.
- Click Save to return to the case page, with a message stating that the Change Case Status Activity has been created.
An activity is recorded because when a case status changes, it changed because something happened. It is usually equally as important to record the who and the why as well as the what. This behaviour is consistent throughout CiviCase.