Garder la trace des événements et des participants
Après avoir créé votre événement et fourni le formulaire d’inscription aux visiteurs du site Web, vous pouvez gérer les participants à votre événement grâce aux outils d’administration CiviEvent. Ces tâches varient selon le type d’événement que vous organisez. Ce chapitre explique comment visualiser vos événements et participants et décrit comment CiviCRM soutient une variété de tâches administratives associées.
Tableau de bord
Le tableau de bord CiviEvent (Événements > Tableau de bord) rassemble tous vos événements et informations sur les participants en un seul endroit (voir capture d’écran). Il affiche un tableau récapitulatif des événements, fournissant un résumé des dix prochains événements. Cliquez sur le nom de l’événement pour afficher l’événement tel qu’il sera visible pour les visiteurs du site. Cliquez sur le nombre de participants pour voir la liste des participants.

Pour effectuer vos propres recherches personnalisées, cliquez sur Rechercher d'autres participants... à la fin de la page. Vous pouvez effectuer une recherche par nom de participant, événement, intervalle de dates, statut, etc.
À partir du tableau de bord, vous pouvez également :
- cliquer sur Gestion des événements pour trouver et gérer des événements spécifiques
- cliquer sur Nouvel événement pour créer une nouvelle page d’événement
- utiliser les icônes des flux RSS et des calendriers pour utiliser les données dans des applications externes.
Trouver et afficher des événements
Une autre façon d’accéder à vos événements est d'ouvrir le menu Événements > Gérer les événements. Cet écran vous donne une liste de tous les événements CiviEvents qui ont été créés. Les filtres de recherche en haut de la page vous permettent de rechercher des événements par nom, par type d’événement spécifique ou par date. À droite de la page, vous trouverez quatre liens pour chaque événement :
- Configurer - pour modifier les paramètres de l’événement, y compris les informations et les paramètres, le lieu, les tarifs, l’inscription en ligne, programmer un rappel et recommander à un ami
- Participants - liens rapides vers les listes des participants qui sont inscrits ou qui assistent à l’événement, ou des participants qui n’y assistent pas (annulé, etc.)
- Liens événement - liens rapides vers les pages Inscription du participant, la fiche de l’événement et l’inscription en ligne.
Finding and administering participants
This section describes some common tasks and searches associated with event participants. Note that these tasks all refer to existing event participants. If you are looking for how to add participants, please see the Manual event registration chapter.
Overview of participants for all upcoming events
- Navigate to Events > Dashboard
- Click the Counted: link to see all the contacts for an event.
If any count is zero, the associated text will not be a hyperlink. Some participant roles may not count for the event total, such as someone who is on the clean-up duty.
Find participants for any event with a variety of criteria
- Navigate to Events > Find Participants.
- In the event name field, start typing to see a list of events. Click on the event you want. Set additional search choices for the fields you want to see.
- Click Search.
When the search returns results, you have the opportunity to select all of the resulting participants or a subset, and perform an action on them. Available Actions include:
-
Cancel registration for the selected participants.
-
Delete participants from event: Deleting participants does not delete the contact record; it will delete all transactions and activities associated with the participant for this event. Note that this action cannot be undone.
-
Email - send now CiviCRM also lets you generate an email on the fly to your search result list. For example, you may want to let recipients know details about the event in advance, such as parking options or changes to the programme.
-
Export participants: This allows you to export a predefined set of fields (export mapping) or create yourexport mapping that can be saved for reuse. The software exports to CSV format, which can be easily opened in standard spreadsheet software or directly used for mail merges.
-
Group - add contacts to an existing group or one you create during this action.
-
Group - create smart group: Smart groups are saved search results based on defined criteria, similar to a query. The advantage of a smart group is that the system will rerun the query using the criteria you have defined each time you open the smart group. This is particularly helpful for complex search criteria that you need to view on a regular basis.
-
Name badges - print: Select the type of badge you require and a printable PDF will be generated with the names of the selected participants (see Event Badges subsection in this chapter).
-
PDF letter - print for participants
-
Participant status - change (emails sent) When using this feature emails will be sent to participants when the status is changed from one which belongs to the pending class (eg Pending (pay later), Pending from approval) to either Registered or Attended (positive class). Emails will also be sent if the status is changed to Expired or Cancelled.
-
Print selected rows This prints that are shown on the screen for the rows you have selected.
-
Update multiple participants: This feature is useful if you wish to edit multiple fields for multiple participants in a table grid layout. Note that you must create the profile set you wish to use before implementing this action. If you are not familiar with how Profiles work, please see the Profiles chapter in the Organising your Data section.
List participant's individual fees
- Navigate to Search > Custom Searches.
- Click on Event Aggregate.
- Choose your search criteria, and click Search.
Changing event registration selections for an existing participant
Sometimes the details of an existing registration needs to be changed. Some examples are:
- A volunteer for an event has been asked to register online selecting a pay later option for the event fees. Back-office staff want to change the person's role from attendee to volunteer and select a zero fee option from an admin-only price field.
- A conference participant decides they no longer want to attend the conference dinner and requests a refund of the dinner fee.
- A participant decides after registering online that they do want to attend the pre-conference workshop and contacts the registration office with that request giving their credit card details for the extra charge.
- A child registered for a holiday program decides she want to do archery rather than pottery one afternoon. Although there is no difference in fees, back-office staff need to change her event registration so that they know where the child should be for that session.
All of these situations can be managed by back-office staff editing the participant's event registration as follows:
- Navigate to the participant"s event registration (One way to do this is via Events > Find Participants)
-
Select View or Edit (towards the right of the event record)
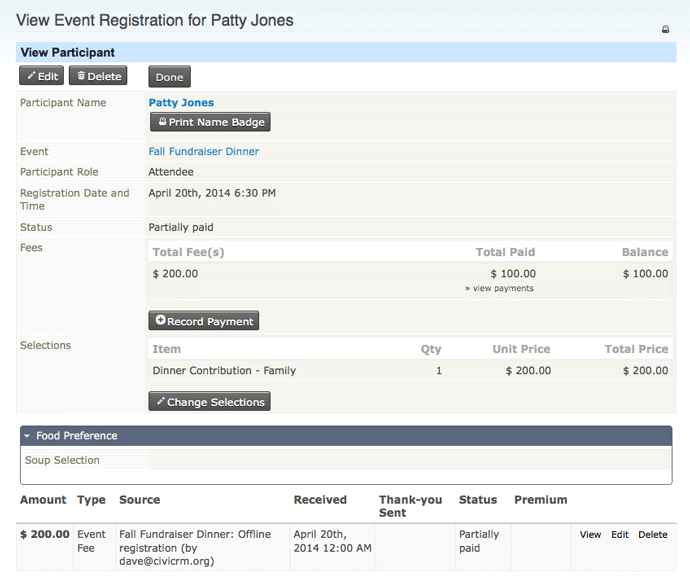
-
Click on Change Selections.
-
Make the required adjustments. The event fee will be adjusted appropriately and the event status will be set to partially paid, registered or pending refund based on the difference between the new event fee and the contribution(s) already processed.
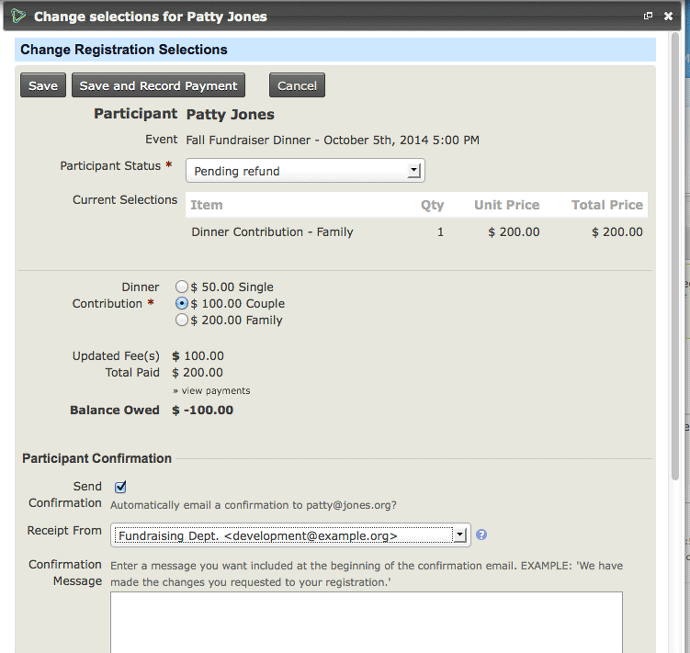
Additional payments (credit card or offline methods) or a refund (offline methods only) will need to be entered via the record payment link associated with the event registration record as described in the section on partial payments.
Badges d’événement
Vous pouvez créer des badges personnalisés pour votre événement.
Naviguez jusqu’à Administer > CiviEvent > Formats de badge nominatif > New Badge Layout et vous verrez l’écran de configuration suivant :
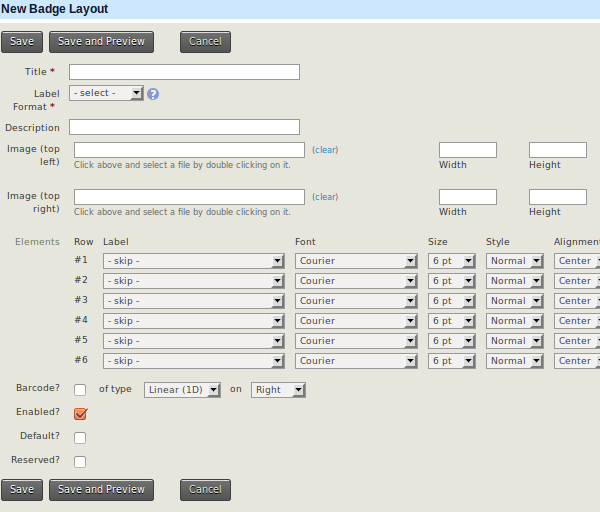
Les points à considérer sont les suivants :
Format du libellé : question options sont disponibles
- Avery 5395 - 2-1/3" x 3-3/8"
- A6 Badge Portrait 150x106
- Fattorini Name Badge 100x65
- Hanging Badge 3-3/4''x4-3/4''
Image (top left) et/ou Image (top right) : Vous pouvez sélectionner une image existante ou en télécharger une nouvelle. Les images peuvent être positionnées à droite et à gauche, p.ex. votre logo et celui de votre sponsor principal.
Elements - Rows : La plupart des champs standards ou personnalisés de contact, d’événement et de participant peuvent être sélectionnés pour afficher jusqu’à 6 lignes sur les étiquettes ou vous pouvez sélectionner - spacer - pour améliorer la mise en page. Les champs typiques à inclure sont le nom affiché, l’employeur actuel, le pays et/ou le rôle du participant. Si vous avez configuré les champs personnalisés appropriés, vous pouvez également inclure les séances auxquelles le participant s’est inscrit et l’option de repas qu’il a choisie.
Barcode? : Un code-barres ou un code QR peut être ajouté au bas du badge.
Enabled? : Cette option doit être cochée pour pouvoir utiliser ce badge. Si vous avez modèle spécifique pour votre conférence annuelle, vous pouvez décocher cette case pendant la majeure partie de l’année pour éviter une utilisation accidentelle.
Reserved? : Sélectionnez cette option afin de vous assurer que les utilisateurs administrateurs ne suppriment pas accidentellement ce modèle de badge.
Remarque : Vous ne pourrez pas prévisualiser la mise en page du badge à moins qu’au moins un événement ait été créé et qu’au moins un participant ait été inscrit.
Impression des badges nominatifs
Une fois la liste des participants finalisée, vous pouvez imprimer les badges nominatifs de l’événement comme suit :
- Cliquez sur Événements > Rechercher des participants.
- Sélectionnez les participants pertinents.
- Choisissez Badges nominatifs - impression dans le menu déroulant Actions.
- Sélectionnez la disposition de l’insigne nominatif pour cet événement.
- Cliquez sur Préparer les badges nominatifs
Un fichier PDF sera créé et vous pourrez l’imprimer sur les étiquettes de taille appropriée.