Complex event fees
The regular fees layout form outlined in Creating an event chapter of this section is a very simple structure that allows the registrant to select one fee option from the list. Often this single-option format does not meet the complex demands of your event registration structure. This chapter describes how price sets and discounts can be used in CiviEvent to compose more complex pricing options.
Price sets
Price Sets allow you to break event fees into smaller pieces, and set a fee for each piece. Using a price set, you can offer optional programmes and features (e.g. an optional post-conference dinner or a book) at extra cost.
Here's an example of how a price set looks to a person who is registering for a Conference that includes optional pre-conference training sessions, meals and lodging:

Creating a New Price Set
To create a new price set:
- Navigate toCiviEvent > New Price Sets
- In the Price Set form, enter the name of your price set, and check Used For > Event
- Select the financial type to be used (in this case it will be Event Fee)
- It may be helpful to also add some pre or post form help: some help text for the user
- Check the Is this price set active box
- Press Save
- A form appears for you to create the first field in your price set.
Creating a New Price Field
Begin by entering a name for the event item in the Field Label.
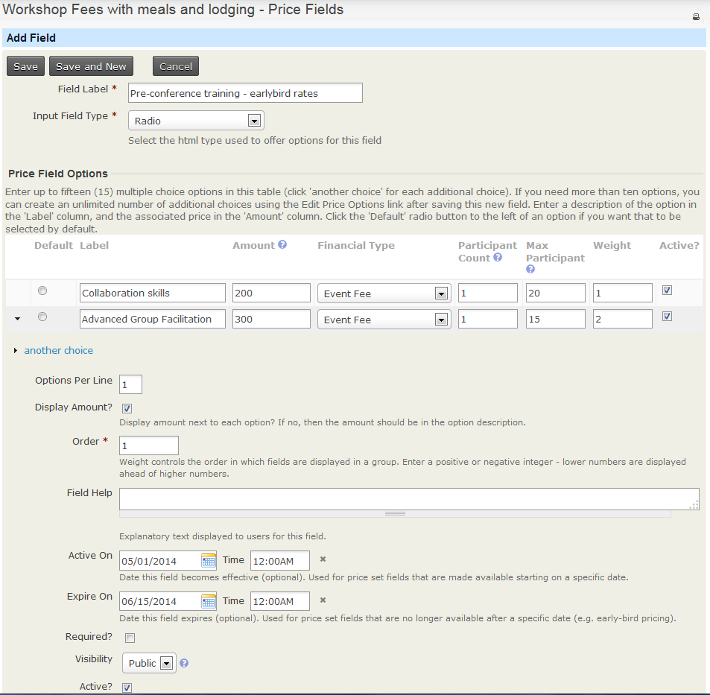
The Input Field Type has a structure similar to custom data fields, with some unique qualities and usage relevant to fee structures.
- Text/Numeric Quantity: allows you to set a unit price. When the form is presented to the registrant to fill it, it displays a text box where the registrant enters a quantity. The quantity entered is multiplied by the unit value to calculate the fee.
- Select: displays a dropdown box where the registrant selects one option from the list.
- Radio: displays multiple options in a list, allowing the registrant to select one fee choice.
- Checkbox: displays fields in a list where the registrant can select or unselect any number of options.
You can combine these field types to create virtually any fee structure.
Enter a number in the Participant Count field if you want to increment the number of registered participants per unit against the maximum number of participants allowed for this event. For example, if this price field is for a table at a fundraiser which seats eight people, you would set Participant Count to 8.
For Text/Numeric Quantity fields, enter an amount in the Price field. For Select, Radio and Checkbox types you will enter a price for each option in the table of options (shown in the screenshot above).
If you want to display the price next to the event item, check the Display Amount? box.
As when creating other custom data, you can enter a description for the Field Help, decide whether the event item is required, select whether the event item is visible to the public or only to the administrator in the Visibility field, and indicate whether the event item is Active. These fields are described in the Custom fields chapter in Organising your data.
In addition you can choose the dates when this price field is active. This means you can have a series of price fields offering, for example, discounted rates for people who register very early for your event, the standard rates for people who register up to two weeks before the event and premium rates for people who register in the last two weeks before the event.
Next, you can either press Save to finish configuring this event item, or Save and New to create another price field for this price set.
Once you finish configuring your price set, you add it to your event on the Fees tab. Select the name of your price set in the Price Set field as shown in the following screenshot.

As with custom data fields, it is to your advantage to give thought to the structure of your registration fees and build the price set before creating the event. However, if you begin the event creation process and determine that you needed to construct a price set, you can complete the process, create the price set, and then return to the event configuration page to assign the price set.
Price sets can be reused in multiple events. This is particularly helpful for organizations that run multiple events in a series, such as a regional training seminar program.
Managing price sets
To manage and administer existing CiviEvent price sets:
- navigate to Manage Price Sets and choosing the Events link OR
- navigating to CiviEvent > Manage Price Sets and choose Administer
Discounts
CiviEvent also lets you offer early bird discounts (discounts determined by sign-up date), if you use a simple fee structure. These will override regular event fees during the period you specify. To set up an early bird discount check the Discounts by sign up date box underneath your regular fees in the fees section of your event configuration. Create the discount set and add it to the fee table. To help you create a discount set, a new fee table will appear toward the bottom of your page, duplicating the original fee table shown in the screenshot below. You can now edit the labels and fees to correspond to the discounts offered for each of the original fee options.
You can create multiple date-based discount sets for an event. This may be useful if you have a series of early bird dates that progressively increase the cost of registration as the date of the event gets closer.
Discount sets and discounts via price sets are out-of-the-box CiviCRM that allow you to do offer discounts based on sign up dates. If you want to get more sophisticated, you can install the CiviDiscount extension. This allows you to give a variety of discounts, using things like Discount codes, discounts based on membership status, and so on. See CiviDiscount documentation for more detailed information.