Relationships
CiviCRM allows you to represent connections between contacts by creating relationships. For example, if a mother and son are both in your database, it can be useful to be able to look at either record and see that they are related to each other.
You can also track relationships between organisations, or between individuals and organisations. For example, entering an organisation in the Current Employer field of an individual contact's record automatically creates an "Employee of" relationship from the individual to the organisation, and an "Employer of" relationship from the organisation to the individual.
Creating relationships between contacts
- Navigate to one of the records that you want to relate.
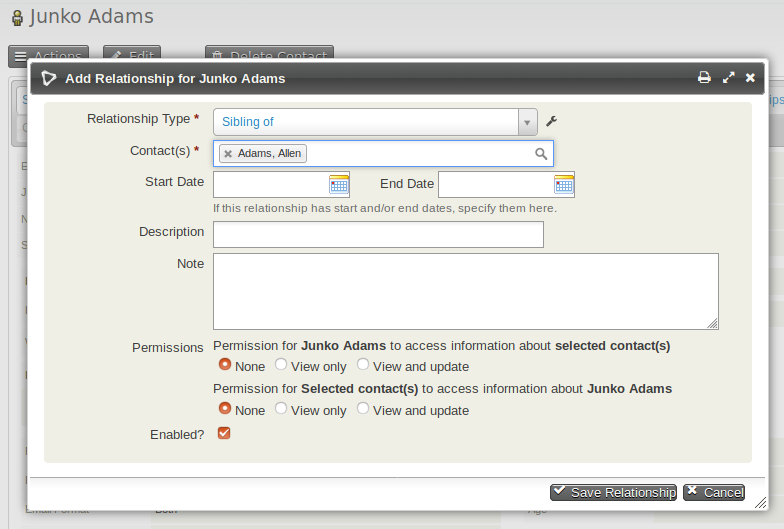
- Click on Add Relationship from the Actions button on the contact summary, or from the Relationships tab
- Select the Relationship Type. In this case it would be "Sibling of".
- Begin to type the last name of the related person(s). If you discover that a contact you want to connect is not yet in the database, you can create a new contact from this screen.
- Optionally enter further information:
- Start Date and End Date if the relationship is time limited.
- Description - short text that shows on the relationship summary screen.
- Notes - longer text shown when viewing the relationship.
- Permissions - allows other users of the database to view or update the related contact.
- Enabled - shows the relationship is active.
- When you have made the changes you want, click Save Relationship.
Relationship permissions
If a relationship is created between two contacts User 1 and User 2 and the Permissions box is set to allow User 1 'View' access to User 2, then when User 1 is logged in they can view details about User 2 using a profile in View mode. If the permission is set to 'View and Update' then User 1 can also update details about User 2 with a profile in Edit mode.
This functionality can be extended using the Related Permissions extension.
Connecting employees and employers
A quick way to connect employees (which are stored in CiviCRM as individuals) to employers (stored as organisations) is to use the Current Employer field within an individual's record. This will set the current employer field in the contact record and create a relationship between the contacts.
- Navigate to the record of the individual who you want to connect to an organisation.
- Click the Edit button to edit the individual's record.
- Begin typing the organisation name into the Current Employer field. As you type, matching names of organisations that already exist as contacts in CiviCRM will appear in a dropdown autocomplete list below the Current Employer field. If the organisation is already a contact in CiviCRM you can select it from the dropdown list by pressing the down arrow key or by clicking on it. If the organisation does not already exist as a CiviCRM contact, simply enter the full organisation name.
- After the organisation's full name is entered in the Current Employer field either press the Enter key or click the Save button. If the organisation is a pre-existing contact, an Employee/Employer relationship will be created between the individual and the organisation. If the organisation does not already exist, a new organisation contact will be created and the relationship will be created between the individual and the organisation. You can click on the Relationships tab to view your newly created relationship Employee of and see any existing relationships.
Adding contacts to organisations
- Select the desired contacts from your search results as described above.
- Select Add relationship - to organization from the dropdown from the Actions menu.
- On the Add Contacts to Organization screen, select the Relationship Type from the dropdown menu.
- Enter part of the desired organisation name in the Find Target Organization field, then click Search.
- Organisations that match your search will appear in the Mark Target Contact(s) for this Relationship section below the Search and Cancel buttons. If the organisation you're looking for appears in this list, click the radio button next to that organisation and then click the Add to Organization button below. If the organisation you're looking for does not appear in this list, try entering something different into the Find Target Organization field and clicking Search again. If you are still unable to find your desired organisation it may not exist; click Cancel, add a new organisation, and try again.
- After you've successfully chosen an organisation and clicked the Add to Organization button, you should see a message stating that the number of participants that you selected have been added to the organisation.
- Click Done to return to your search results.
Adding contacts to households
- Select the desired contacts from your search results as described above.
- Select Add relationship - to household from the dropdown Actions menu.
- Select the Relationship Type from the dropdown menu. Note that while CiviCRM will not stop you from adding multiple contacts as Head of Household for a single household, this may cause problems later on in any situation where you are expecting Head of Household to refer to only one individual per household. Therefore, the Household Member of option may be the better choice in most situations.
- Enter part of the name of the household to which you are adding contacts (such as a last name shared by household members) in the Find Target Household field, then click Search.
- Households that match your search will appear in the Mark Target Contact(s) for this Relationship section below the Search and Cancel buttons. If the household you're looking for appears in this list, click the radio button next to that household and then click the Add to Household button below. If the household you're looking for does not appear in this list, try entering something different into the Find Target Household field and clicking Search again. If you are still unable to find your desired household it may not exist; click the Cancel button, add a new household, and try again.
- After you've successfully chosen a household and clicked the Add to Household button, you should see a message stating that the number of participants that you selected have been added to the household.
- Click Done to return to your search results.
Creating new relationship types
CiviCRM comes with a set of common relationship types that can be used to indicate relationships between contacts. If you need to track different types of relationships between your contacts, you can create your own custom relationship types.
- In the navigation menu, go to: Administer > Customize Data and Screens > Relationship Types.
- Review the list of existing relationship types to ensure that you are not creating a duplicate.
- If the relationship type you need does not already exist, click the New Relationship Type button.
- Enter descriptive labels for the relationship type you are creating
in the Relationship Label-A to B and Relationship Label-B to A
fields. The Relationship Label-A to B field describes the
relationship between Contact A and Contact B; the Relationship
Label-B to A field describes the relationship between Contact B and
Contact A.
- Some relationships can be described by the same label in both directions; in these cases you can enter the Relationship Label once in the Relationship Label-A to B field. For example, when describing the relationship between two domestic partners named Sylvia and Audre, you can say that Sylvia is the "Partner of" Audre and Audre is the "Partner of" Sylvia. Therefore you would enter the "Partner of" label only in Relationship Label-A to B field, leaving the Relationship Label-B to A field blank.
- In other situations one Relationship Label cannot be applied in both directions; in these cases you need to enter different Relationship Labels in each of the Relationship Label fields. For example, you can say that Kiyoshi is the "Grandparent of" Yuki but you cannot say that Yuki is the "Grandparent of" Kiyoshi. Therefore you would enter the "Grandparent of" label in the Relationship Label-A to B field and either "Grandchild of" or "Grandparent is" in the Relationship Label-B to A field.
- Use the Contact Type A and Contact Type B fields to designate which contact types are being linked by your relationship. Remember to check that the contact types you select for Contact A and Contact B make sense when corresponded to your Relationship Labels.
- Optionally enter Description for this relationship type. This is especially useful if the intended purpose of this relationship type may not be obvious to other users.
- Leave the Enabled box checked unless you intend to create this relationship type but not allow users to utilise it until a future date.
- Click Save. You will see a message telling you that the relationship type has been saved and you will see your new Relationship Type in the list below.
Creating custom fields on relationships
CiviCRM provides a number of standard relationship fields, described above. You may decide there is other information you want to store, either on all relationships, or just on given relationship types. Additionally, custom fields can be used as a tool to further distinguish relationships without creating inordinate numbers of types (e.g. you could track which department an employee works in using a custom field, rather than creating a new relationship type for each). You can add custom fields that display on the relationship types of your choosing. See creating custom fields for detailed instructions.
Disabling or deleting unneeded relationship types
If an existing relationship type is no longer useful or relevant for your organisation you can either disable or delete it so it is no longer presented as an option for new relationships. Disabling rather than deleting the relationship type has two significant advantages: you will still be able to see existing data on relationships of this type, and you can easily enable the relationship type again should you find you need it later.
- In the navigation menu, go to: Administer > Option Lists > Relationship Types.
- Click the More link in the row of the relationship type that you'd like to disable or delete.
- Select either Disable or Delete from the pop-up menu.
- If you select Disable, a pop-up confirmation bubble will appear. If you select Delete, you will be directed to an additional screen that provides a more serious warning and requests confirmation. Review the information provided in either confirmation message and if you are sure you'd like to complete this action, click the Delete button otherwise Cancel.
- If you have chosen to disable the relationship type it will appear in red in the Relationship Types list and relationships of this type will still be visible when viewing contacts. If you have chosen to delete the relationship type it will no longer appear in the Relationship Types list or in contact relationships data. In either case users will no longer be able to create new relationships of this type.
- To enable a previously disabled relationship type, follow steps 1 and 2 above and select Enable from the more pop-up menu.