Manual entry of contributions
When your organisation receives a contribution from a contact, you can add it to their record. This will be done automatically if the payment is made through CiviCRM (for example, a membership or event fee made with an online registration) but offline payments (cash, cheques etc) will need to be manually recorded to ensure that reports generated from CiviCRM are accurate.
Adding contributions manually one by one
If the donor does not already exist in the database, you need to first create a new contact record for them; see Contacts for information on how to do this. Once the record is created, you can then enter the contribution.
To manually enter a contribution for a contact in your database:
- Find the contact's record using one of the contact search tools, for example Search > Find Contacts.
- Select the contact's Contributions tab.
- Click Record Contribution (Check, Cash, EFT...). Alternatively, if you have set up a payment processor that allows credit card transactions directly on your site, you may select the Submit Credit Card Contribution option and process the payment immediately.
-
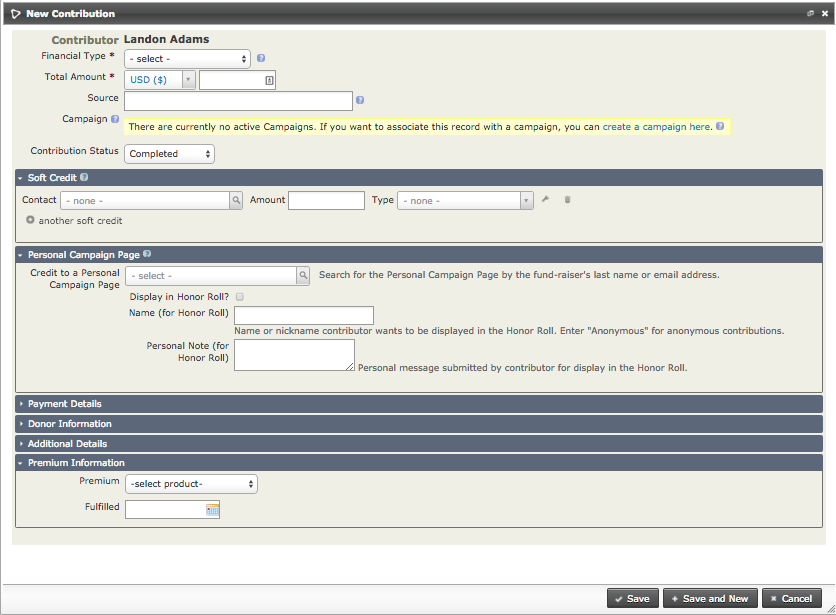
Complete the new contribution form. The following screenshot shows the offline contribution (i.e. contributions via check, cash, EFT, etc.) form. If you selected to record a credit card contribution, the credit card form is almost identical except for the payment-related fields.
-
Record the Financial Type, amount, received date (the default is the current day), receipt date (shown on the receipt generated by the system), and status (the default is Completed). Any custom fields for contributions will also appear on this form.
- The Soft Credit To field works with personal campaign pages (PCPs) that harness your contacts' help for campaigns. When you enter a donation manually on the contribution form for the contributor, you can assign a soft credit to the owner of the PCP. There is more information about PCPs and campaign fundraising pages in the Set-up chapter of the CiviContribute section.
- The Additional Details section near the bottom of the screen offers other options including adding a note about the contribution and entering the date when a thank-you letter was sent.
- The last two sections allow you to enter whether the contribution was in honor of someone else (Honoree Information) and whether there is a premium associated with the contribution (Premium Information).
- Click Save, or Save and New if you are entering further contributions.
If you find that you are entering more than a few contributions at the same time, consider using the Batch Data Entry method.
Batch entry of contribution, membership or pledge payments
The Batch Data Entry feature allows you to enter off-line contribution, membership or pledge payments you have received using a batch entry grid input screen where you can use the ‘autocopy’ icons at the top of each column to quickly fill in field values. It eases data entry when you have a lot of payments to record at one time. It also lets you verify the total amount and count of items in the batch against the payments recorded on your deposit slip(s).
Each batch contains either contribution payments or membership payments or pledge payments. During the batch data entry you can create new contacts on the fly. You can save the batch and return later to continue entering payments. If you have the appropriate permissions, you can also edit the total amount and count of items in the definition of the batch if needed.
Here’s a simple workflow for bulk data entry:
- Create a new batch for data entry.
- Enter Contribution, Membership or Pledge Payments (check, cash, EFT, etc.).
- Validate and Process the Batch Totals or Save the Batch.
The details for each step are listed below.
1. Create a new batch for data entry
Create a new batch to hold the multiple payments you want to record:
From the menu, click on Contributions > Batch Data Entry or Membership > Batch Data Entry.
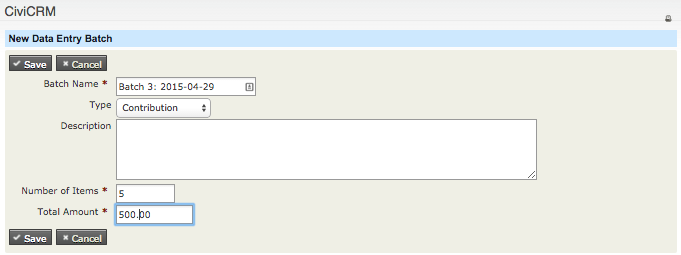
Enter the following information:
- Batch Name: CiviCRM will create a default batch name ("Batch N" + open date), which you can edit (required field)
- Type: select the type of payment, e.g. Contribution, Membership or Pledge Payment. This selects the appropriate reserved profile to view in the batch entry grid screen (Contribution Batch Entry profile, Membership Batch Entry profile or Pledge Payment Batch Entry profile)
- Status: the default will be “Open”
- Number of items: total of payment items in the batch (required field)
- Total amount: total amount of all the payment items in the batch (required field)
Note
Once a batch has a “closed status”, the batch will no longer be editable
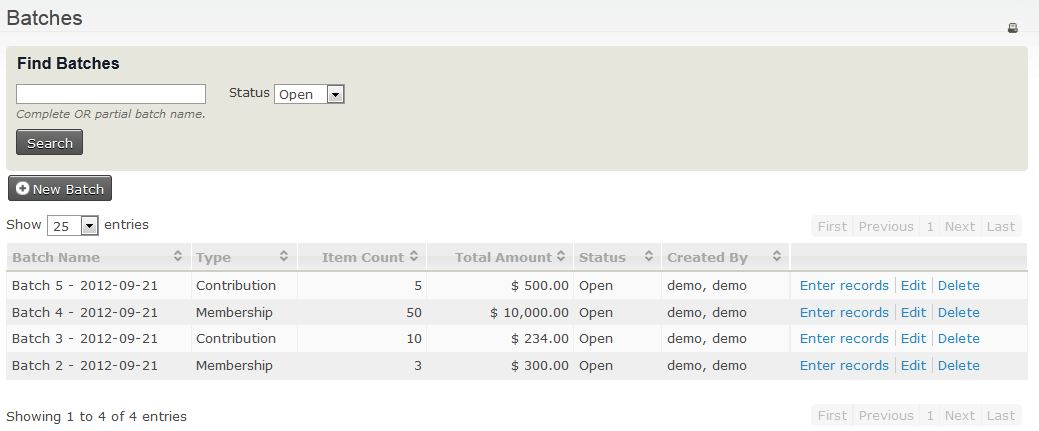
You can edit or delete Batch information later on by going back to the Bulk Data Entry screen, then clicking on Edit or Delete next to the batch you want.
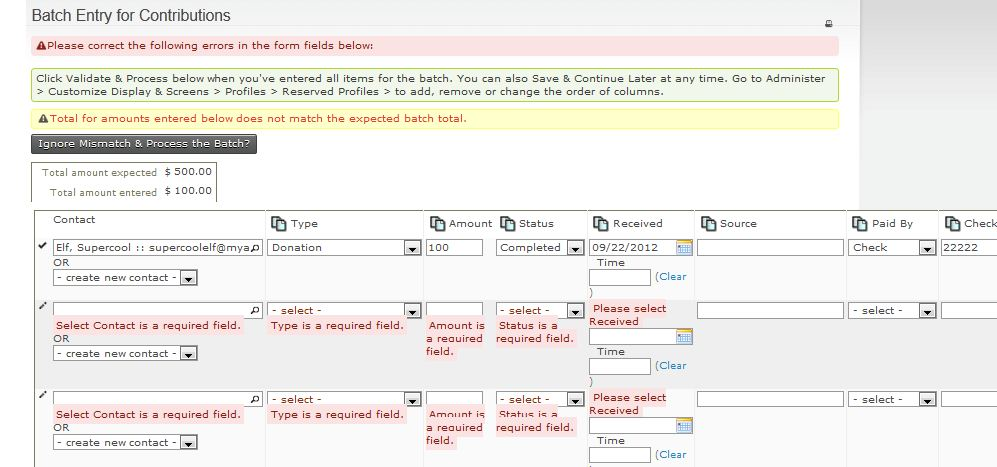
2. Enter Contribution, Membership or Pledge Payments (check, cash, EFT, etc.)
Once you enter information about the batch, you can begin entering payments on each line.
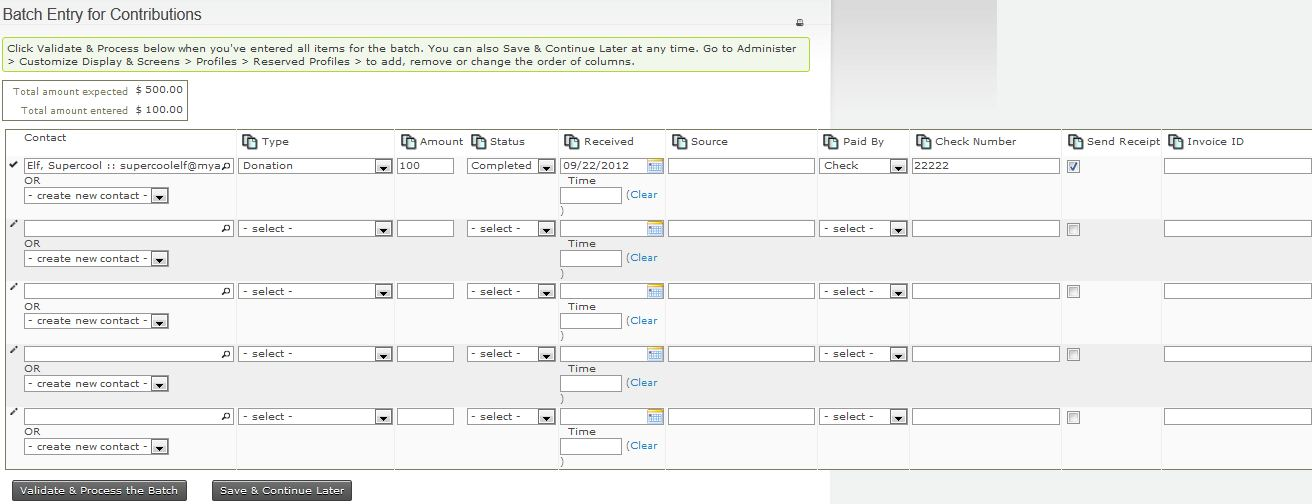
There are eight fields that appear for all batches:
-
Contact. In this column you can:
- Start entering the name of an existing contact and CiviCRM will return a list of potential contact names for you to select, OR
- Create a new contact by clicking the drop-down box for “-create new contact-“ and selecting the type of contact you want to create: New Individual, New Organization, or New Household and enter the information about the contact here.
Note
If contact information such as phone number or email address are included in the grid profile, those values will be populated for an existing contact and can be updated as needed.
-
Financial Type
- Amount
- (Payment) Status
- Received – Date and Time
- Send Receipt: check the box if you want to send a receipt via email
- Soft Credit
- Soft Credit Type
When batch entering contribution payments the additional fields in the standard profile are:
- Source : enter text that describes the source of the payment
- Paid by: enter the type of payment vehicle, e.g. cash, check, EFT, etc.
- Check Number: if paid by check
- Invoice ID
When batch entering membership payments you can choose to add a new membership or renew an existing membership. The extra fields in the standard profile are:
- Type: For a new membership you will select the organisation and type of membership. For the renewal you can change the membership type.
- Member Since: When you open the batch entry form, this is populated with the current date If you choose to renew a membership it will change to display the start date for that membership. It can be edited as needed.
- Start Date(reserved): This is blank. You only need to fill in this field if you want the start date to be other than the default.
- End Date(reserved): If this is left empty, CiviCRM will use the membership rules to set it to the correct date.
- Source: Enter text that describes the source of the payment.
- Paid by: Enter the type of payment vehicle, e.g. cash, check, EFT, etc.
- Check Number: Enter if paid by check.
- Invoice ID
When batch entering pledge payments you can assign the payment to any of the pending pledges for that contact. If you have the appropriate permissions, you can also alter the amount or schedule for the pledge payment. (Click on adjust payment amount next to the Amount field.)The extra fields in the standard profile are:
- Source: enter text that describes the source of the payment
- Paid by: enter the type of payment vehicle, e.g. cash, check, EFT, etc.
- Check Number: if paid by check
- Invoice ID
3. Validate and Process the Batch Totals or Save the Batch
You can enter all transactions for the batch in one session, or simply save the batch and complete the data entry at a later time.
If you want to continue entering information into this batch at a later time, click Save & Continue Later.
To find and add/edit more transactions into the batch later:
- From the menu, click on Contributions > Batch Data Entry or click on Membership > Batch Data Entry, then click onEnter Records next to the batch you want
Then continue entering more transactions in the batch
Once you are finished entering payments into a batch, click Validate & Process the Batch. The status of the batch will be set to “Closed” and will available for searches and reporting later.
If the total amount or count of items do not match the values you entered when you created the Batch, you will be alerted when closing if the count or total don't match. In this case, you either:
- You can override the entered count and total by clicking Ignore Mismatch & Process the Batch? button, in which case the batch values are updated to match the transactions in the batch, and then the status of the batch will be set to “Closed”, OR
- You can continue entering or editing the payments for the batch, then Validate & Process the Batch again.
Search for contribution, membership or pledge payments in verified and processed batches
You can search for contribution or membership payments in verified and processed batches in a several ways:
- From the menu, click on Searches > Find Contributions , enter criteria for the contributions, and under Batch Name, select the batch you want;
- From the menu, click on Searches > Advanced Search, enter criteria about the contact, then open the Contributions area and enter any contribution criteria, and under Batch Name, select the batch you want;
- From the menu, click on Contributions > Batches , then select Closed in the Statusfield;
- From the menu, click on Memberships > Batches , then select Closed in the Status field;
- From the menu, click on Pledge Payments > Batches, then select Closed in the Status field;
- From the menu, click Reports > Create Reports from Templates, then click Contribution Report Detail, enter your report criteria and under Set Filters area, next to Batch Name, select “is one of” or “is not one of” and select the name(s) of the batch(es) you want.
Configuring Profiles for Batch Entry of Contribution, Membership and Pledge Payments
To alter the profile used when you want to create a new contact for an Individual, Household, or Organization while recording the contribution, update the reserved profiles called New Individual, New Household, or New Organization accordingly. To change the fields of information you want to collect for these contacts:
- Go to the menu and click Administer > Customize Data and Screens > Profiles, then click on Reserved Profiles tab. Click on Fields next to called New Individual, New Household, or New Organization.
- You can then add, edit or rearrange the fields as you want to see them in the batch entry input grid. See Profiles to learn more about profiles, generally.
Tip
Reserved profiles for New Individual, New Organization, and New Household, are used in other areas of CiviCRM. Be aware that if you alter these profiles for use with Batches, these same changes you’ve made will also appear on other screens where you have the option to create a new contact inline.
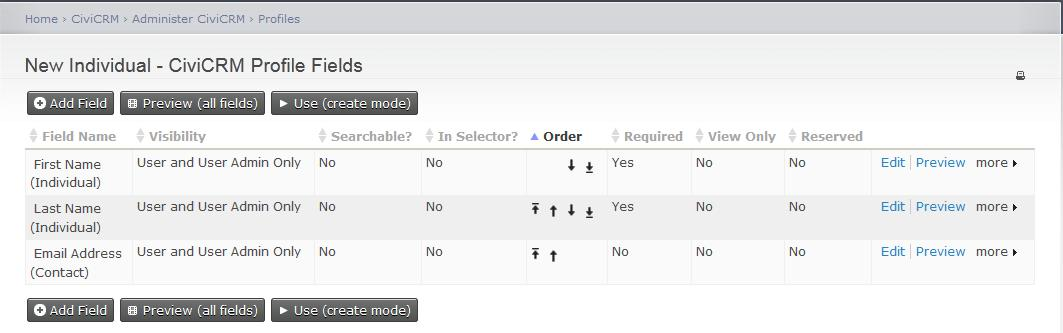
The screenshot above is CiviCRM’s default configuration of the New Individual profile, which is used when you select to create a new contact for an individual during batch entry of contributions or membership payments.
To alter the profile of fields of information you want to collect for contributions or membership payments, you will need to update the reserved profiles called Contribution Batch Entry or Membership Batch Entry:
- Go to the menu and click Administer > Customize Data and Screens > Profiles, then click on Reserved Profiles tab. Click on Fields next to Contribution Batch Entry profile or the Membership Batch Entry profile.
- You can then add, edit , or rearrange the fields in this profile, e.g. you may have other custom contribution fields you would like to display and collect information, and display in the batch entry input grid. To find out more read Profiles.
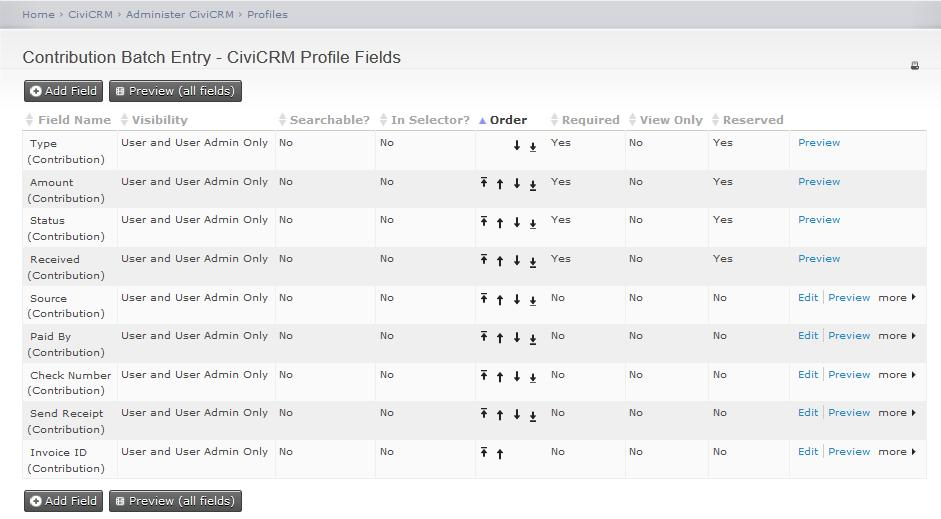
Above is CiviCRM’s default configuration for the Contribution Batch Entry profile, which is used when you record information about a contact’s contribution or pledge payment.
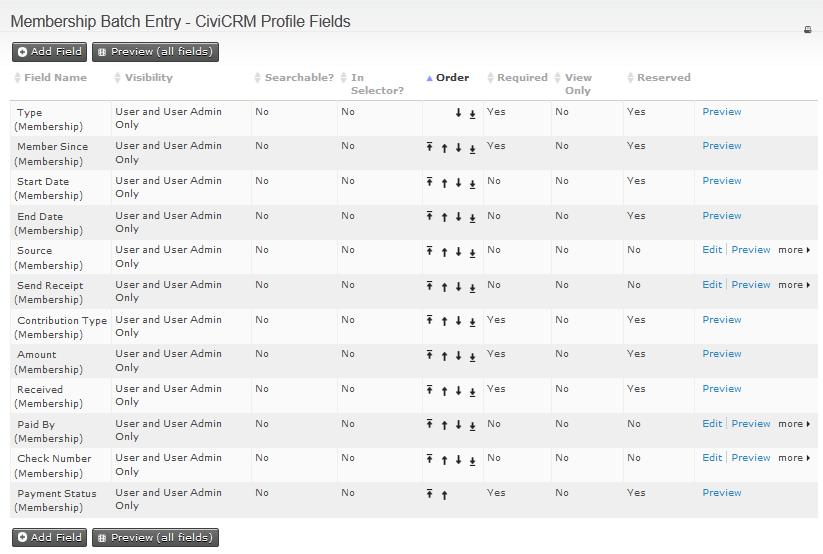
Above is CiviCRM’s default configuration for the Membership Batch Entry profile, which is used when you record information about a contact’s membership payment.
Importing contributions
If you have not imported data before, please read Importing data into civicrm.
Required fields
When preparing your data import it is helpful to know what fields are required for Import. You'll want to be sure that these fields are included in your CSV import file. The required fields are:
- Financial Type
- Total Amount
- One of the following:
- Contact ID (Match to Contact) OR
- Email (Match to Contact) OR
- External Identifier (Match to Contact) Note: Financial Type is the full text of the Financial Type Name, not the Financial Type ID.
Matching contributions to contacts
The import tool for contributions is similar to that of contacts, but contributions cannot be imported unless the contributors already exist in the database as contacts. If you need to import contributions for contacts that are not yet available, run a contact import first, preferably including a unique external identifier (most often an ID assigned by the database or application you are importing records from). There are two ways to match a contribution to a contact:
- Use the external ID of the contact by including the ID in a column of the CSV file (if this ID was not imported with contacts, but you have them on record, a second contact import could be run to update this field, after which you may import contributions).
- Alternatively, you can match contributions to contacts based on your contact de-dupe rules, e.g. through including the first name, last name and email address of the donor against each contribution in the file. If a contact matches these three fields, the contribution will be assigned to it.
Things to remember
CSV files must be less than 2MB in size. If the file size exceeds this, create multiple CSV files and distribute the data between them.