Message Templates
Overview
Message templates help to streamline your communications by allowing you to reuse entire emails or parts of emails in both mass mailings and when using the Send Email activity.
There are two categories of Message Templates in CiviCRM:
- User-driven Messages - These are messages created by your staff to communicate with constituents that you want to be able to re-use. Examples include thank-you letters, meeting announcements, etc.
- System Workflow Messages - These are pre-configured messages used by CiviCRM "features". Examples include contribution receipts, event registration confirmations.
Creating user-driven templates
The easiest way to create a new message template is to check the Save as New Template box on the message creation screen. This is available both when using the Send Email activity and when sending a mass mailing.
You can also create message templates from scratch or edit existing templates by going to Mailings > Message Templates OR Administer > Communications > Message Templates.
- Click on Add Message Template.
- Enter a Message Title and a Message Subject. You can choose to use tokens to personalize your subject line.
- Scroll down to the HTML Format section and create your template. There are online resources, not specific to CiviCRM, that offer instructions on creating an HTML email templates. One suggestion is to find and copy an email template from a website that offers samples.
- In the WYSIWYG editor toolbar, there is an icon called "Source" (the appearance and labelling of this icon changes depending on whether you are using Drupal, Joomla, or WordPress). When you click on it, the template changes the view to show the HTML code that is being used. If you want to paste in HTML from a template you found externally, or if you want to write HTML directly into your template or modify the HTML that you've created with the WYSIWYG editor, you need to switch to this view.
Message templates are available even when CiviMail is disabled.
Tips for creating templates
HTML code allowed in emails is more restricted than HTML used for web pages. For instance, it needs to use tables for layout, inline CSS, and must not include background images. Here are some tips for creating a template that will look good in all mail clients:
- Table border: The HTML
element includes an optional border attribute. Since the default value is 0, it doesn't appear unless you choose to use it. Adding it (or editing it if it is available) and setting it to 1 (e.g.
<table border="1">) allows you to see the edges of your table and helps identify potential places to fix problems. Please note that HTML email templates usually have multiple tables and nested tables (tables inside tables). Make changes one at a time and switch to the HTML view to see the results. A table usually has more than one parameter, so make sure to place spaces between parameters.- Table cellpadding and cellspacing: these table parameters are very useful when trying to improve the readability of your email. Play with these settings in different tables and see what works for you.
- Width: Do not send an email that is wider than 600 pixels, to ensure maximum compatibility across email clients. Make sure your outermost table does not exceed 600 pixels. Do the same for any other tables inside your main table. Also make sure that the total width of each image does not exceed 600 pixels. Images have a width parameter, but they can also have a horizontal padding parameter that, if set, can increase the width of the image.
- Images: these need to be online and accessible in order for you to use them. First edit your image so that its width and height is appropriate for your email template. Next, save it so that its file size is as small as possible. If you do not have image editing software, or do not know how to use it, there are free online resources that can help you resize your image.
- HTML editor: CiviCRM comes with two WYSIWYG editors (CKEditor and TinyMCE) and Textarea, a plain text editor. If you have another editor configured as part of your Drupal, Joomla, or WordPress installation, you can choose to use that instead. go to: Administer > Customize Data and Screens > Display Preferences > and select a different WYSIWYG Editor.
Plain text and HTML formats
All messages can be sent either in plain text or in HTML. Today the vast majority of people use email clients that can read messages received in HTML. However, the best practice is to offer the option to send a plain text email version to ensure all recipients can view the message. Plain text email readers may display HTML email as blank. HTML email may also present accessibility issues to people using screen readers.
However, there is a risk that if users modify an email based on a template that contains both plain text and HTML, they will forget to modify the plain text version of this message. This will mean that people using plain text-only email clients will receive an incorrect or incomplete message.
One solution to this problem is to either use plain text emails only or to set templates without the plain text option and ask users to create a plain text version before sending their mailings.
To create a plain text version of a message from HTML:
- Copy and paste the text from HTML Format field into the Plain Text Format field. When you do this, make sure you are not in the Source view; you don't want all the code, just the text. When you copy from the WYSIWYG view, the plain text field will automatically strip out the formatting and any other elements that do not work in plain text.
- Copy the URLs of all links to the appropriate places in the Plain Text Format field.
- If the HTML version contained tables, modify the layout of your text manually to ensure the text version is readable.
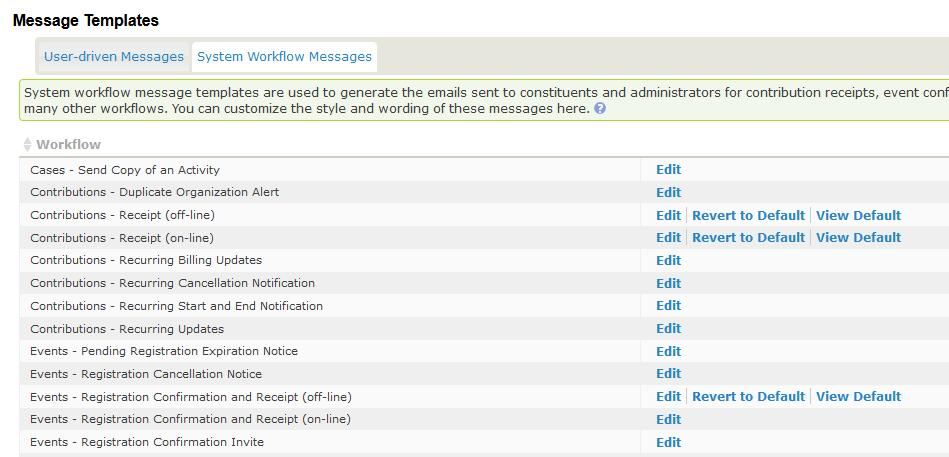
Modifying System Workflow Message Templates
The content and layout of these messages are pre-configured and include program logic to display all the data being sent to your constituents (e.g. contribution amount, payment method, event fees, etc.). Navigate to Administer > Communication > Message Templates and click the System Workflow Message tab to see the list of messages you can modify. Both HTML and Text formats are provided. Your organization may want to modify or add text to these emails, or add branding such as a logo to the HTML versions.
Your changes here can complicate CiviCRM upgrades
Occasionally, CiviCRM also makes changes to these system workflow message templates during version upgrades. If you customize a template, CiviCRM will stop applying updates to it. This is good because it preserves your customizations but bad because you might miss out on important template updates as new functionality becomes available.
The System Administrator Guide provides instructions for merging conflicting edits to these templates (for cases where you have customized the templates and a CiviCRM upgrade would have also made changes to the same template) — but the process is not that easy! So you can save yourself (or your system administrator) some time by avoiding the temptation to edit these templates.
Don't break anything
Don't modify the program logic within these templates. Be sure to test the workflow and review the emails sent after making any changes. In most cases, you can restrict your changes to the the top row in the HTML layout. If you find that your changes have caused problems, errors or missing information, you can always revert to the system default for that workflow.
After you have customized system workflow message templates, you can always revert to CiviCRM's version of the template by clicking the "Revert to Default" link which appears next to the template.
Configure Message Templates
To configure message templates, begin at the Administer CiviCRM page.
In the Communications section, choose Message Templates.
You will see a list of existing templates. If no templates exist, you will see the message:
There are no Message Templates entered. You can add one.
Click add one to create a new template.
You can create NEW message templates or Edit , Preview , Disable or Delete EXISTING message templates using the links to the right of each template.
NEW
To create a NEW message template, choose >>New Message Template
You will be taken to the New Message Template page.
Create a Message Title for the template. This title is used to organize your messages and will not appear in the email.
Tokens
The next three fields can all use tokens to help personalize your messages with things like names, dates and amounts of gifts, etc.
Here is a list of the tokens you can use
Create the Message Subject for your email. Use tokens if desired.
Create your Text Message and HTML Message. Include tokens to personalize your messages.
Choose *Enabled?" to enable the message template for use.
Click Save to save the template or Cancel to cancel.
If successful, you will see the message:
"The Message Template "Membership Renewal Initial Message" has been saved."
EXISTING
For EXISTING templates you can Edit , Disable or Delete each template using the links to the right of each template.
EDIT
Select Edit to view the Edit Template page where you can change the values for each option. Here you can also enable/disable the template by checking or unchecking the box labeled Enabled? at the bottom of the page. Click Save to save the template.
If successful, you will see the message:
The Message Template "Membership Renewal Initial Message" has been saved.
DISABLE
Select Disable to temporarily disable an Existing Template. You will see the warning:
"Are you sure you want to disable this Message Template? "
Click OK to continue or Cancel to cancel disabling the template.
To re-enable the template, simply click on Enable.
DELETE
Select Delete to delete the template. You will be given this warning:
Do you want to delete this message template?
Click Delete to continue or Cancel to cancel the deletion.