Inscripcions en línia d'esdeveniments (untraslated)
The ability for end-users to register themselves for events is beneficial for both your constituents - they can register at a time and in a place that is convenient for them - and for your organization - reducing administration. This chapter details the steps involved in offering online registration for events.
The standard flow for registering for an event is as follows:
- Event information
- Event registration
- Confirmation
- Thank you

The event information lists the event date, the location, the map link, contact information, and description. It also includes a link to the registration page.
In the event registration step, the registrant completes the form, including event fees, profile fields, and credit card or pay later fields.
The confirmation details the event fee options and data fields completed by the registrant. It proceeds to the credit card transaction.
Then the thank you message informs the registrant that he will receive a receipt by email.
Setting up online registration
To offer online registration, check Allow Online Registration in the Online Registration step of event creation and use the options on this form to configure this feature.
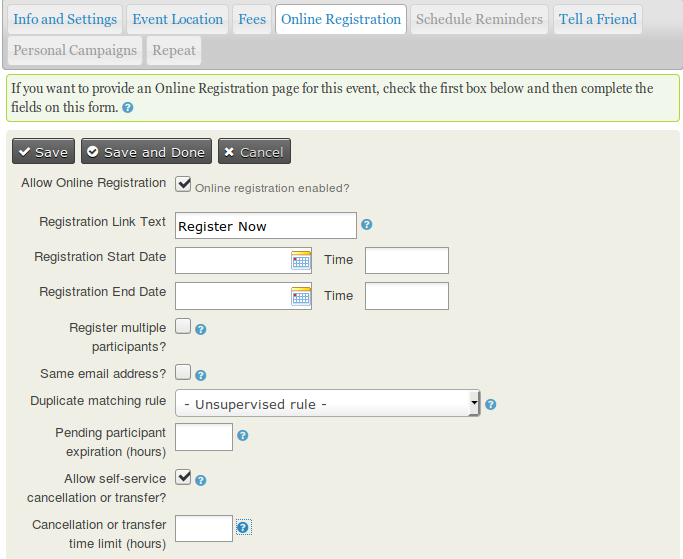
Define the text to be used as the link from the event information page to the registration form, and set the starting and ending dates for registration. The link text is used in the event information page, and is most commonly "Register Now" or similar. The start and end dates define when web site visitors may register for the event. The registration end date may be different from the start date of the event, as you may want to close registration in advance of the event in order to prepare name tags or perform other administrative functions.
Enabling Register multiple participants lets individuals register as many people as they choose for the event and pay the fees with a single transaction. For example, an organisation may be sending multiple people to a conference, or an individual may bring their partner and wish to register and pay for both in a single process. By default, this option requires a different name and email address for each person registered.
Checking same email address provides the same capabilities, but without requiring distinct email addresses for each registrant. In either case, CiviCRM uses a separate contact record (an existing one if the contact is already in the system, otherwise a new one is created) for each individual registered.
This setting also allows administrators to register the same contact multiple times to the same event. For example, if the person purchased a ticket to a concert, then wanted to purchase another ticket later on.
Information on the Duplicate matching rule is provided in the Contact matching and duplicate management sub-section of this chapter (below).
Pending participant expiration (hours) is the time for confirming/finishing registration by participants with any of the statuses classed as Pending. It works in conjunction with the scheduled job Update Participant Statuses (see Administer > System Setting > Scheduled jobs). If these are both set, pending registration must be finalized within the set time or the registration will be cancelled and the would-be registrant notified by email of the cancellation. This feature is very useful when combined with scheduled reminders for automatically managing Pending from pay later registrations if you have allowed that payment option on your online registration page. (See the Email section for more details on scheduled reminders)
Allow self-service cancellation or transfer: When selected, event participants will receive a "self-service" link in their confirmation email. By clicking this link, they can opt to transfer and/or cancel their event registration.

Cancellation or transfer time limit (hours): When set, self-service cancellations and transfers will be disabled the selected number of hours prior to the start time of the event.
The next step is to define the text and the fields for collecting information that will be displayed on your online registration page.

The introductory text comes at the top of the page and the footer text at the bottom. In between will come some, or all, of: profile, fee selection, credit card details, additional profile(s) in that order.
Collecting participant information with profiles
The best way to collect information during online registration is to include one or more profiles in your event configuration.You can include one profile immediately after the introductory message and one or more profiles under any fees and payment details you need to collect. (If you are not sure what a profile is and why you would use them see the Profiles chapter of Organising you data.)
By default, when creating an online registration form the profile "Your Registration Info" will be selected as the 'top' profile. This consists of three fields: first name, last name and email address. However, CiviCRM only requires either first name and last name or email address for each contact. So you can modify 'Your Registration Info' or create a new profile with fewer fields. If you choose not to collect email addresses, be sure to uncheck the option "Send confirmation email?" at the bottom!
Warning
If you modify an existing profile whilst configuring your Online Registration page, the changes you make will apply everywhere that profile is being used. So unless an existing profile exactly matches your requirements you should copy the profile, then rename and edit the copy as required.
If the profile you require does not already exist, you can create it without leaving the Online Registration configuration page. The drag and drop profile interface also allows you to create custom fields to include in the profile if you have not already done so. Custom fields can be created for all events or all participants, or only specific Event Types or Participant Roles (see the chapter Custom data on events in this section for more details on where you should store what custom data).
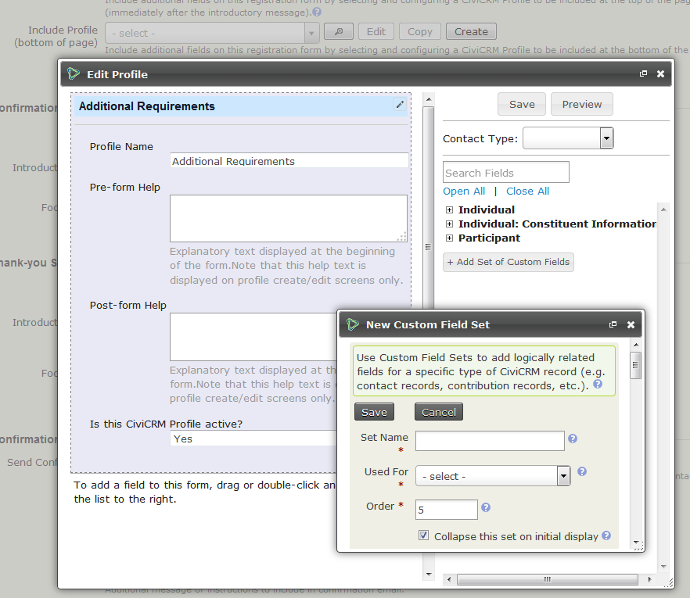
Each profile appears on the registration form as a fieldset with a legend header. The legend will be the profile Public Title if that is set, or else the Profile Name. A good practice is to give profiles names that are useful for identifying profiles in a list and to give profiles public titles that make a good header for the form section.
For example, if you make a copy of the Your Registration Info profile to add fields specifically for workshops, you could name the profile "Workshop Registration" and give it a Public Title "Your Registration Info". That way, you'll be able to easily identify it when setting up new workshop registration forms, but the form will have the same header as others.
A number of the Advanced Settings for profiles take effect when a profile is included in event online registration. You cannot edit these from the editing interface within the online registration settings; you must go to the main profile settings form to make changes.
- Adding contacts to a group. Note that many registrants do not wish or expect to join a mailing list merely because they have signed up for an event.
- CMS User account registration options. A participant can be presented with the option or requirement to log in or create a user account while registering for the event.
- Including ReCAPTCHA. A CAPTCHA can be added to make it more difficult for both bots and people to register for the event.
Other advanced settings, such as what to do upon duplicate match, are ignored on contribution pages.
For more information read Profiles.
Registration confirmation
Once you registration page is configured you need to enter the text to be displayed on the Confirmation page, Thank-you page, and emailed confirmations/receipts (if enabled).
For free events, the Confirmation step is skipped. For paid events the payment is processed between the Confirmation and Thank you pages.
For most events you'll want to enable the Send Confirmation Email feature (see following screenshot). For paid events, the confirmation email also acts as a receipt. Make sure that the Confirm From Email address entered is a valid email account on your mail server.

Please note that the contents of the Text field will be included in both TEXT and HTML versions of receipt emails so we do not recommend including HTML tags / formatting here.
Email alerts for event registrations
Add one or more staff emails to the CC Confirmation To or BCC Confirmation To fields if you want real-time updates on who is registering for your event. Enter one or more email addresses separated by comma.
Warning
Make sure that the email addresses entered into the CC Receipt To and BCC Receipt To fields are correct and do not bounce or return an error email. Any return emails received by CiviCRM will be interpreted as a bounce for the CiviCRM Contact that the receipt was sent too and not as a bounce for the CC/BCC email address. This can have the adverse impact that the CiviCRM Contact's email address is put On Hold and cause future emails to not be sent. For more details see this issue report.
Optional event registration features
The following features may be useful to enhance your online event registration process.
Waitlists
Your organization may have limits on attendance, such as a 25-person limit for a training workshop or a 200-person limit for a fund-raising dinner. CiviEvent lets you set the maximum number of people allowed to register for your event. When registrations reach that number, CiviEvent will not allow other people to register, but will instead send an automatic message saying, "The event is currently full." This message can be customized by the organization when creating a new event, and you can let people add themselves on a first-come-first-served basis to a waitlist.
The waiting list works in the following way:
- As space becomes available on your event, for example, if one or more people cancels, then On waitlist participants will be moved to 'Pending from waitlist' status and will be sent an email with a link to complete their registration (including paying event fees - if any).
- People will remain pending for a certain amount of time defined in Pending participant expiration (hours). This gives them a window of opportunity to register. You can set the amount of time, measured in hours, that you set on the Online registration tab under Pending participant expiration hours. If you want, you can set this to 0 for no limit.
- After this period of time, they will be moved to expired and other people on the waitlist will be given the opportunity to register.
If you'd like to enable the Waitlist feature, you must first enable the related participant statuses On waitlist and Pending from waitlist. You can do this in Administer > CiviEvent > Participant statuses. You can then check the Offer Waitlist checkbox on the Info and settings tab, and set the message you want displayed on the event information page when the event is full.

Note that in order for the status processing to happen, you need to have the Update Participant Statuses scheduled job running (see Administer > System Setting > Scheduled jobs).
Participant approval
Many events are open to everyone, but there may be times when your organization invites only specific people to the event. For example, you could invite volunteers who have donated 100 or more volunteer hours to an appreciation dinner. The people invited may talk about the event to their friends, and possibly forward the information. With CiviEvent, you can check who has registered and approve only the people invited.
If you'd like to enable the 'Participant approval' feature, you must first enable the related participant statuses Awaiting approval, Pending from approval and Rejected. This is similar to what you do for waiting lists and you can do it in Administer > CiviEvent > Participant Statuses. You can then check the Require participant approval? checkbox on the Online Registration tab, and set the message you want displayed in the approval message. You can also limit the amount of time participants have to complete their registration after approval by entering the time in hours in the Pending participant expiration field. For example, if you want to give participants 3 days to complete their registration, enter "72" in that field.
Now, when a person registers for the event, they will get a reply that says, "Your registration has been submitted. Once your registration has been reviewed, you will receive an email with a link to a web page where you can complete the registration process." This reply can be customized to your organisation's needs.
Participants will be placed in 'Awaiting Approval' status. You can review and approve participants from 'Find Participants' - select the 'Change Participant Status' task. Approved participants will move to 'Pending from approval' status, and will be sent an email with a link to complete their registration (including paying event fees - if any).
Note that in order for the status processing to happen, you need to have the Update Participant Statuses scheduled job running (see Administer > System Setting > Scheduled jobs).
Personal Campaign Pages
If you enable Personal Campaign Pages (PCPs), you offer completed event registrants the ability to create and customize a page of their own to either:
-
promote the event for which they registered
-
promote an online contribution page
For more information see Contributions > Personal Campaign Pages in this book. This is the last step in creating an event. Click Save and Done.
Contact matching and duplicate management
Whenever we allow people to interact with our database from 'the outside' we run the risk of creating duplicate contacts. There are various ways to deal with this. For example, some websites require you to be logged in at all times when doing important things and we can do the same for CiviCRM using permissions (just take away the register for events permission from anonymous users and give it to logged in users, or a specific role). Depending on the type of event that you are running, this might not be a good idea. Lets say you are running a conference, or AGM and you want as many people as possible to register. Requiring them to log in wil decrease the amount of registrations.
Lets say, we don't require people to log in to register for an event. Consider the following situation. James Martin registers for an event. James Martin is already in our database. How do we match up the James who is registering with the one that is in the database. What about if there are two James Martins in our database. One that lives in London, and one that lives in Paris. How do we know that we have found the right one? The answer is duplicate rules.
You can read more general and more detailed information about duplicates and merging in the Deduping and merging chapter and we recommend that you get familiar with that chapter at some point. This section just covers contact matching and duplicate management in the context of CiviEvent.
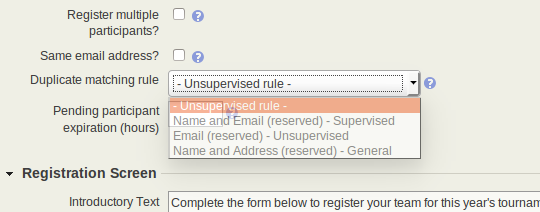
By default, CiviEvent uses the Unsupervised rule to do matching. When you configure an event for online registration, you can override the default by selecting a different duplicate matching rule for matching participants for this particular event. The rule you select takes effect for the primary participant and any additional participants.
The Online Registration tab checks for whether the included profiles have enough fields to have a chance at matching participants to existing contacts. It reviews the possible combinations of matching fields that would satisfy the matching rule in effect for the event, and it checks to see if any of those combinations is present among the fields in the included profiles. The warning "Duplicate Matching Impossible" appears if there's no way to match duplicate contacts using the rule, while the warning "Duplicate Contacts Possible" appears if enough fields are there but not all of them are required.
Registration permissions
If you've enabled online registration for events on your site you need to review the Drupal user permissions to ensure that visitors are able to view event information and complete the registration forms. Navigate to Administer > Users > Permissions.
Most organizations allow anonymous users (users who have not logged in) to view and register for events. If you want to allow this, you must assign the following CiviCRM module permissions for the anonymous user role:
- access all custom data - required if you are collecting information in custom fields from registrants
- profile create - required if you've included any profiles in your online registration forms
- register for events
- view event info
- view event participants - required if you want to display a listing of registered participants.
If you want to exclude anonymous visitors from viewing or registering online for events, assign these permissions to an authenticated user role.
CiviCRM has an additional permissioning system known as Access Control Lists (ACLs) ACLs allow you control access to CiviCRM data. Note that a CiviCRM ACL Role is not related to the Drupal Role. Refer to the Permissions and access control chapter for more information.
If you need to limit access control for specific events, you can use the Manage Access Control feature to assign access to specific groups of contacts.
Testing the registration process
Before revealing your event to the public, you should always test the event registration process. This can be done as follows:
- Navigate to Events > Manage Events.
- From Event Links, select Test-drive to test the registration page. Test-drive mode will use the sandbox options for your payment processor, if available, and will create a registrant record with a test indication so that it can be reviewed and easily removed.
- Fill out the registration form and complete the registration process.
- In order to find the new test participant record, navigate to Events > Find Participants.
- In the search criteria, check the box Find Test Participants.
- If you need to adjust the event settings, navigate to Events > Manage Events and click the Configure link for this event.
- If you discover elements that you need to edit and adjust, select Configure to return to the list of event setting pages.
- If you have events where anonymous users register for events, you should also test the registration when not logged in. Refer to the Event Permissions information later in this chapter for details.
Once you are satisfied with the event information and registration form, it's time to display it on your website. Below are details of how to do this.