Scheduled reminders
Scheduled reminders allow you to automatically send messages (through email or SMS) to contacts when certain criteria are met. For example: you can set up a reminder SMS to be automatically sent to participants the day before they attend a training course; or you can send a series of emails to contacts asking them to renew their membership as they approach their membership end date.
There are several components (Entities) of CiviCRM that support scheduled reminders:
- contacts
- activities
- memberships
- events
- contributions
You can create scheduled reminders for all these components at Administer > Communications > Schedule Reminders.
Scheduled reminders for events can also be set up on the event configuration pages.
Tokens available to scheduled reminders
In addition to the standard tokens that are available in CiviMail, messages sent via scheduled reminders can also contain tokens representing information about events, activities, contributions and memberships that the scheduled reminder pertains to. This allows you to use one scheduled reminder template for various events, membership, contribution or activity types.
In event messages, tokens such as event location will be replaced with the specific location of the event. In membership messages, you have access to each individuals expiry date, and so on. Membership and event ID tokens are also available and can be used to create links to specific pages (such as the membership renewal page).
Note that you also have access to the checksum token which allows you to authenticate people to specific pages without them needing to log in, and show forms with details already filled in.
Creating and managing scheduled reminders
Scheduled reminders can be created from the administration page at Administer > Communications > Schedule Reminders or during the creation of an event.
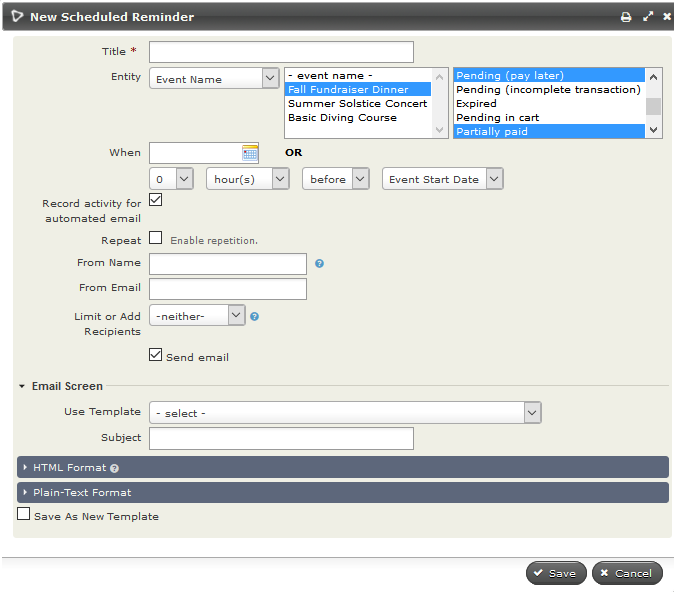
When you click on Add Reminder under Administer > Communications > Schedule Reminders. The exact options that are visible depend on the Entity chosen but all scheduled reminders are fairly similar. The general process is:
-
Give your reminder a name that will help you or others identify it.
-
Select the required Entity. The options you can base your scheduled reminder on will be displayed in the adjacent window. This a multi-select field, so you could choose to include more than one option in this field. Depending or your selection in this middle field a third set of option will appear in the right box. Again this is usually a multi-select field.
- Choose when to send the reminder. This can be a set date or an amount of time before or after the start or end of your chosen entity.
- Check the Repeat box if you want to send this reminder more than once to the same group of people. This gives you choices about the interval of repetition and when the repetition should end.
- Check Record activity for automated email if you want a record of the contacts who received this reminder.
- Fill in From Name and/or From Email if you don't want this reminder to come from the default name and email address for your site.
- Limit or add to your recipient list. For more about your choices, see Limiting or adding to your recipient list in this chapter.
-
Choose to send your reminder as an email, an SMS or either depending on the preferred method(s) of communications for the contact.
Note
The SMS option will only be available if you have set up an SMS Gateway
-
Compose your message. You can use Message Templates or write the message from scratch.
- Click Save when you are are done.
Reminders can be edited, disabled, or deleted from Administer > Communications > Schedule Reminders.
Warning
Your system administrator will need to ensure that the Send Scheduled Reminders scheduled job is enabled and runs at least once a day. Refer to the Scheduled Jobs section for configuration details.
Using scheduled reminders for contacts
These can be based on:
- Birth Date
- date the contact record was created (Created Date)
- date the contact record was modified (Modified Date)
- custom contact date fields (such as marriage date or the date a qualification expires.)
Configuration options for Contact reminders:
- Send a reminder ever year on the same date (anniversary - particularly suitable for celebration dates such as birthdays or marriages) or only once in relation to the actual date (appropriate for non-repeating events such as expiring qualifications).
By default, reminders created from this screen apply to all contacts with dates set for the specified field. If you don't want everyone to receive the reminder (eg. send birthday greetings to children but not to adults), you will need to limit the recipients. (See Limiting or adding to your recipient list in this chapter.)
Using scheduled reminders for activities
Scheduled reminders can be based on any combination of core and custom activity types.
Options include:
- sending to contacts with the specified activity types and any combination of activity statuses. (e.g., scheduled and/or completed and/or cancelled)
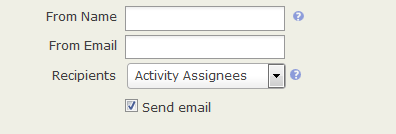
- sending only to the Activity Assignees (those in the Assigned To field) or only to the Activity Targets (those in the With Contact field) or only to Activity Sources (the logged-in user who added the Activity) for the specified activity type(s) and statuses. (See Limiting or adding to your recipient list in this chapter for more information.)
Here are some ways you might want to use reminders for activities:
- Log calls with major donors via the Phone Call activity and automatically send emails to your executive director containing the Activity Details.
- Send reminders to your staff about the interviews they are assigned to conduct.
- Send notifications to the person who scheduled an activity that it has been completed.
- Send thank-you notes to people who met with you.
Using scheduled reminders for contributions
You can set up emails to be sent out to your contributors based on the page they donated through or the contribution/financial type of their donation.
Options include:
- sending to contacts who contributed through the selected contribution page(s) with any combination of contribution statuses.
- sending to contacts who made a contribution of the selected financial type(s) with any combination of contribution statuses.
Using scheduled reminders for memberships
You can set up messages to be sent out to members based on various characteristics of their membership, including the membership type and status. For example, you can send renewal reminder emails based on membership expiry date for current members 1 month before their membership end date or 'sorry you are leaving' emails 1 week after their membership end date. You could also send membership engagement letters 2 weeks after the membership start date to remind them of the benefits of their membership. Note that as well as sending emails based on membership, you can also send emails based on the membership related activities like Membership Signup (which is what we use in the 'Chasing members who have not sent membership payments' example below).
Below are a couple of examples of ways you can use scheduled reminders for memberships.
Renewal reminders
To send a renewal reminder email to members 5 days before their membership expires:
- Select Entity Type = Membership
- Select one or more Membership Types
- If the selected membership types allow auto-renewal, you may want to only send this reminder to memberships that do NOT renew automatically.
- Set 'When' to be 5 days before Membership End Date
- Do not select Repeat.
- Check 'Send Email' and choose the Template (or create and save one).
What information you should include in a renewal email will be discussed in Renewals in the CiviMember section.
Note
If a member renews, they will receive their next reminder 5 days before their new Membership End Date.
Chasing members who have not sent membership payments
To send scheduled reminders to contacts who have memberships that are pending because payment has not been received:
- Create a smart group for contacts with a membership status of pending.
- In scheduled reminders set Entity Type = Activity, Membership Signup, Completed. Note that we are using the Activity entity, not the membership entity.
- Restrict Recipients to the membership pending smart group. This is important as if we don't set this, all members (even those that have already paid) will receive the message.
Using scheduled reminders for events
Event reminders can be set up via the Scheduled Reminders administration screen (as detailed above) or from the Schedule Reminders screen in the event configuration workflow. (To get there, either click the Schedule Reminders tab when setting up an Event, or Configure > Schedule Reminders next to your event on the Manage Events screen.) The steps to configure the reminder are the same as from the administration screen (see above).
Any reminder set up from the event configuration screen applies only to that specific event. If you would like to send out reminders for all events of a certain type (for example, evaluation forms after workshops), you should use the Scheduled Reminders administration screen.
The configuration options specifically for Event reminders consist of:
- Sending only to participants in specific event(s) or sending to participants in all events of a given type(s) (conference, meeting etc.)
- Sending to all participants in the chosen events or only to participants with specified participant statuses (e.g. registered and attended, or cancelled and no-show)
- Sending to all participant roles with the appropriate statuses or only to specified participant roles (e.g., volunteer and host, or attendee or speaker)
Since you have so many configuration options, you could set up an event reminder for almost any purpose you can think of. Here are a few examples:
- Send an email to the volunteers for your annual fundraising dinner the day before the event reminding them what time to arrive.
- Send fundraising emails to the attendees of all your training courses the day after the courses are held.
- Ask for feedback from event attendees.
- Send a thank-you email to your event speakers and hosts.
- Email people who registered but didn't show up for your event to gather information about why.
Limiting or adding to your recipient list.
As already outlined, you select the recipients of your scheduled reminders based on entity specific characteristics such as event type and participant status, membership type and auto-renew options, activity type and status, or a entry in a contact date field.
For scheduled reminders based on activities you can further limit who receives the reminder using the Recipient field by electing to send it only to Activity Assignees or Activity Source or Activity Targets or to send it to a predefined group (Select a group) or to a list of contacts that you manually specify (Choose recipient(s)). It is important to remember that groups or manual recipients selected will only receive the scheduled reminder if they meet the all other criteria for that reminder.
For Event, Contact and Membership scheduled reminders you can limit recipients to members of a group, to a particular participant role (Event reminders only) or to a list of contacts you have manually selected. This is done by setting Limit or Add Recipients to Limit to and choosing either Select a group or Choose recipient(s) or Participant Role (Event reminders only) from the adjacent option list. You could use this feature to, say, only send birthday greetings to your members who are less than 12 years old.
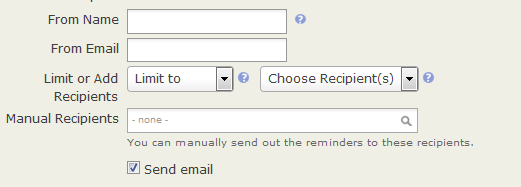
As with activity reminders, it is important to remember that groups, manual recipients or roles selected with the Limit to option will only receive the scheduled reminder if they meet all other criteria for that reminder.
If you want to send a scheduled reminder to contact(s) who do not meet the general criteria for that reminder you should set Limit or Add Recipients to Also include. You can then select a group of contacts or an individual who will receive the reminder even if they don't meet the other criteria.
For example if you send an event reminder to registrants 2 days before an event, you can also send it to Bob Adams, your office manager, so that he will remember to check that the event room is set up in the appropriate configuration with any equipment required.
Scheduled reminders and privacy options
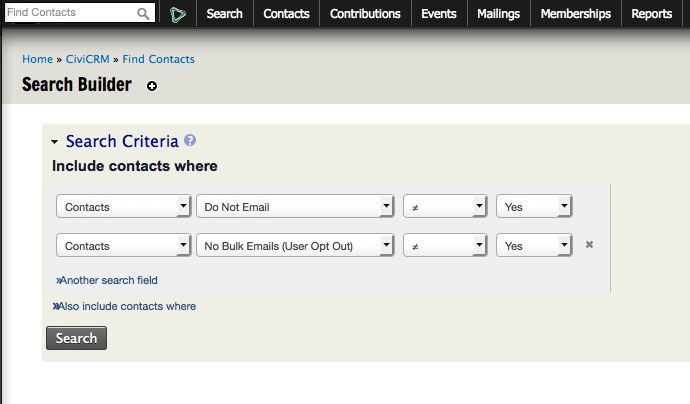
Scheduled reminders are still sent to contacts who have opted out of bulk emails and those who have selected the privacy option Do not email. In some cases this is appropriate as these contacts will still want to be reminded when an event they have registered for is approaching or when their membership is due to be renewed. In other situations it is not appropriate.
If you want to exclude contacts who have opted out of bulk emails from a scheduled reminder you should:
- Find all contacts who have not selected the privacy options Do not email or NO BULK EMAIL. (You can do this using the Search Builder found at Search > Search Builder and updating the settings as indicated in the example below)
- Create a smart group from the search results.
- Select this smart group as the Recipients of the scheduled reminder.