Manual entry of memberships
Although CiviCRM provides a tool set allowing website contacts to self-serve and become members without intervention required on the part of office staff (which can be very powerful and save organisations a lot of administration time), there are many situations when memberships need to be processed manually. This chapter describes the various ways in which office staff (or any appropriately permissioned users) can manually create and process memberships, including:
- Creating new membership records one by one (including gift memberships where the payment comes from a different contact)
- Batch data entry of members
- Importing Memberships
CiviMember Access Control
As with other CiviCRM functions, Administer > User & Permissions > Permissions allows you to control access to various CiviMember features.
- For users who need to find and view memberships - assign the access CiviMember permission, the view contributions permission if payments are involved and make sure the user has view contact permissions for the associated record.
- For users who need to create and/or edit membership records - assign the edit memberships permission, the edit contributions permission if payments are involved and make sure the user has edit contact permission for the associated contact record.
More details on permissions can be found at http://wiki.civicrm.org/confluence/display/CRMDOC/Default+Permissions+and+Roles .
Creating a New Membership Record
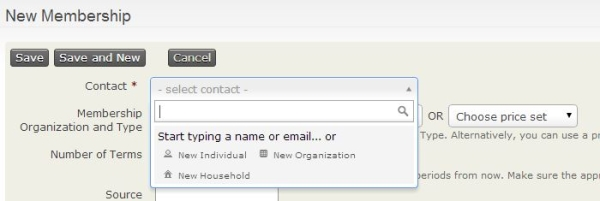
You can create a new membership record in a couple ways, by looking at an existing contact's record, or through the Memberships menu. Using the membership menu is useful because you can create a new contact at the same time as adding the new membership record.
An advantage of creating a new membership record directly from an existing contact's record is that if you have set up a payment processor that allows credit card transactions directly on your site, you may select the Submit Credit Card Membership option and process the membership payment immediately.
When you use the Memberships menu to create a new membership, you do not have the option to submit credit card information, but can still have the option to record other types of payments like checks and cash.
Via an existing contact record
- From a contact's record, click the Memberships tab then click Add Membership. If you have set up a payment processor that allows credit card transactions directly on your site, you can select the Submit Credit Card Membership option and process the payment immediately.
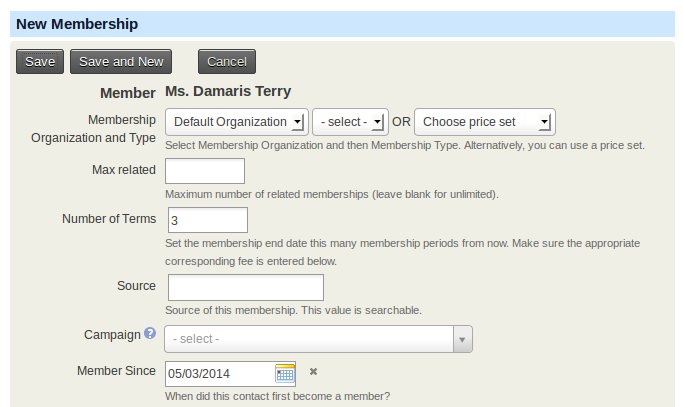
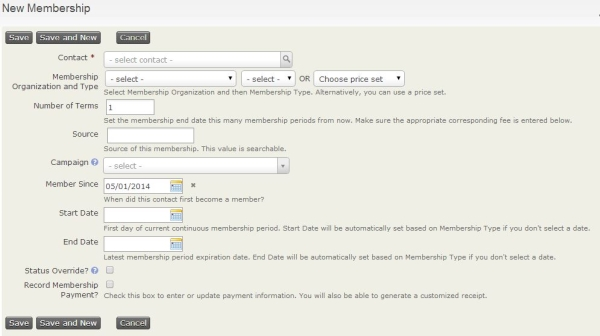
Many of the fields on "New Membership" form will be auto-completed if left blank. Fields include:
-
Membership Organization and Type*: select the name of the organization that the contact has a membership with and the type of membership *OR
-
Choose Price Set: If you have various fee structures for different classes of memberships, you can use Membership Price Sets by selecting Choose Price Set (rather than Membership Organization and Type).
-
Number of Terms: enter the number of membership periods or terms associated with this membership record. The membership end date will then be set to an end date for this number of terms (this option is hidden when using membership price sets)
-
Source: if left blank the system will complete details regarding the record, including whether it was an offline or online transaction and who completed the record.
-
Campaign: if the membership is connected with a larger campaign, select the name of the campaign. To learn more, see the Campaign section.
-
Member Since: the date the membership record was created will be auto-filled, but can be overridden if necessary.
-
Start Date: if the membership type is a rolling membership, the current date will be auto-filled. If the membership type is a fixed period, CiviCRM will determine the appropriate start date based on the membership type configuration. This can be overridden if necessary.
-
End Date: this field is automatically calculated from the start date and filled in based on the membership type settings. This can be overridden if necessary.
-
Auto-renew: this field is only shown if you have chosen a Membership Type that has auto-renew functionality set in the Membership Type and are using the Submit Credit Card Membership option to create the Membership.
-
Status Override?: check this box to manually define a status for the membership record. As indicated by the title, it overrides the status automatically provided.
Caution
This setting will stop the status from automatically updating based on the membership status rules you have set up when defining your memberships.
-
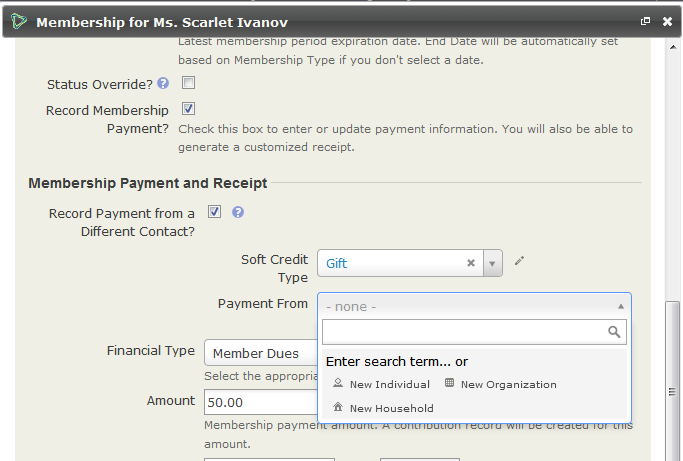
Record Membership Payment?: by checking the box and completing the transaction fields displayed, you will record the money paid for the membership. This creates a contribution record in addition to your membership record. After recording the membership, you will be able to view the membership record and see the related contribution record at the bottom.
- Record Payment from a Different Contact?: this is often used for Gift memberships.
- Financial Type: select the appropriate financial type for this payment.
- Amount: enter the amount of the membership payment.
- Received Date and Time: enter the date and time the payment was received.
- Paid By: select the payment instrument in which this payment was received, such as cash or check. You can learn more about configuring Payment Instruments in the Contributions section.
- Check Number: if the payment was received by check, enter the check number.
- Transaction ID: if you have a payment processor, CiviCRM will store an auto-generated transaction id. For manual transactions, you can enter a bank transfer ID or other identifier as applicable.
- Payment Status: select the status of the membership payment received. You can learn more about configuring Payment Instruments in the Contributions section.
-
Send Confirmation and Receipt?: check this box to send an email to the contact that their membership is confirmed
- Receipt From: select the email address the confirmation receipt is from. If the email address you want to use is not listed, you can add it by going to Mailings > From Email Addresses.
- Receipt Message: you can enter text here to send a special message to the member. If you don't enter text, the default confirmation and receipt message will be used.
Auto-renew Memberships via a contact record
To manually create a membership that will auto-renew go to the contact's summary screen, select the Memberships tab and click on Submit Credit Card Membership. If you select a Membership Type that is set up for recurring, a checkbox labelled Membership renewed automatically will be exposed.
If you check Auto-renew, a recurring payment (subscription) request will be submitted to the selected payment processor. If the request is successful, this membership will be automatically renewed on the last day of the membership period until the recurring payment is cancelled. Membership payment receipt emails will include a link for the member to cancel the auto-renewal.
Via the Memberships menu
- Navigate to Memberships > New Membership, then select the contact or create a new contact.
- Fill out the New Member form with the appropriate membership and payment information as in Via an existing contact record above.
Gift Memberships
When you enter a membership manually you can select Record Payment from a Different Contact? to record the membership as a gift from someone else. The person paying for the membership (gifter) can be an existing or a new contact created during the process. The payment will be recorded on the gifter's record with a soft credit for the membership on the gift recipient's record. The receipt will be sent to the gifter. You will need to send a separate email or letter to tell the gift recipient about their membership.
Entering batches of membership payments
CiviCRM offers a Batch Data Entry feature (found in the Memberships menu) that can be used for entering batches of membership payments that have been received into the office on paper forms, or similar. It can be used for new and existing contacts and includes verification of the total amount and count of items against the payments you’ve recorded on your deposit slip(s).
This feature has a batch entry grid input screen, which has a couple of tools that you can use to speed up processing when you have a lot of memberships to process at the same time. It includes a copy feature to set all fields to the same value, and allows you to create new contacts without leaving the batch entry screen.
The fields of information that you want to collect in the batch entry input grid for Batches are determined by several CiviCRM reserved profiles. If you want to collect other kinds of information that are not currently included in these profiles, you will need to alter these profiles to reflect the fields you want to display.
You can read more details about the [Batch Entry of Contributions or Membership Payments](../contributions/manual-entry-of-contributions.md#batch-entry-of-contribution-membership-or-pledge-payments.
Importing Memberships
The Importing Memberships feature is very useful if you have a large set of membership records that comes from a source outside of CiviCRM. This feature can also be used to update large numbers of existing memberships with new information.
See also
The Importing Data page explains the import process generally, and also has a section specifically on importing memberships.
- Contact records must exist before you import membership data. If you want to import membership data for contacts that do not yet exist in CiviCRM, you will first need to import the Contact data. Make sure the contact data has an External ID so you can include this External ID with your membership data to associate these records with the related contacts. If you are importing membership data for contacts that already exist, then you will need the Internal Contact ID or the fields from your Unsupervised Duplicate Matching Rule to associate the related membership data with the correct contact.
- Your import membership data file MUST contain both Membership Type and Start Date. The membership types listed must exactly match the membership types set up by your CiviCRM Administrator. The start date should use the date format specified for your CiviCRM installation. If your import file does not contain these fields then you will not be able to import it.
- You must import membership data for different contact types separately. Importing files with more than one contact type will not work. (You must import new memberships and renewals separately also.)
Now you are ready to import your membership data:
-
Navigate to Memberships > Import Memberships.
-
On the Upload Data screen:
- Select your import data file. It must be a CSV file.
- Select the checkbox if your source data contains column headers.
- Specify the contact type you are importing.
- Indicate what date format you are using.
- Click Continue >>.
-
On the Match Fields screen, map your membership data with the appropriate CiviCRM fields under the Matching CiviCRM Field column. Note that you can Save this field mapping so you can re-use this mapping for future imports.
-
On the Preview screen, you will see the preview of the results of your import. There is a table that lists the Total Rows in the uploaded file, the number if rows with errors and the number of valid rows. If you continue with the import, the rows with errors will be skipped. You can download a file with just these problem records and continue with the import. You can then edit the errors and do another import with them. Alternatively, you can fix the errors in your original CSV file and start the import again.
-
If there are no errors or you don't want to correct the found errors, click Import Now>>. You will be shown the progress of the import until it is complete. When the import is complete, you will see a summary of the import activity and its results.