Membership price sets
This chapter describes how to configure membership price sets so that your contacts can:
- Sign up for multiple membership terms at the same time.
- Sign up for more than one membership in a single transaction (e.g. National and local memberships).
- Select non-membership options such as information booklets when they sign up for a membership.
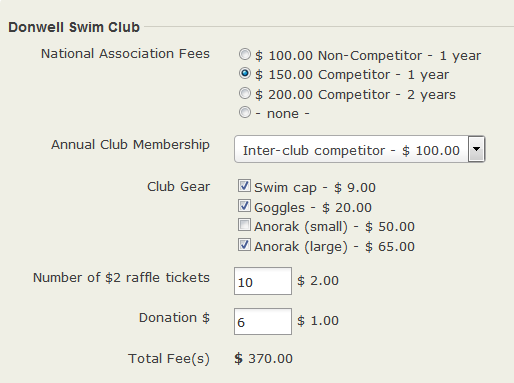
Here's an example of how a membership price set that offers all these options could look:
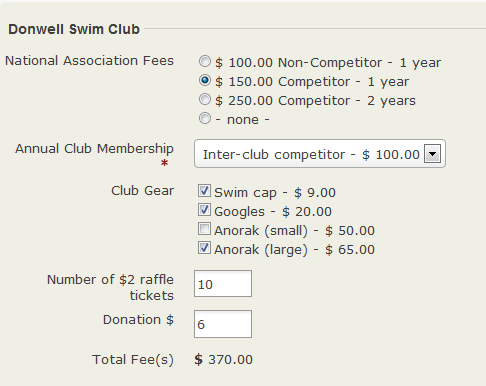
The Donwell Swim Club price set consists of five price fields: National Association Fees, Annual Club membership, Club Gear, raffle tickets and donation.
It offers two membership types:
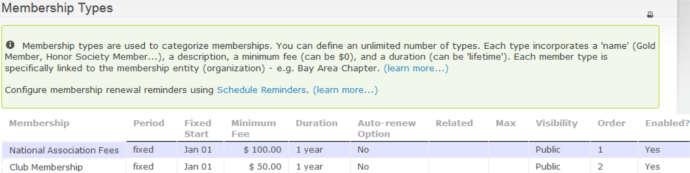
These membership types must be defined before you create the price set. (Refer to Defining Memberships.)
You must also have defined all the financial types you will need before you can create the price set.
Membership price sets can be used in online join up or renewal pages or for new member sign ups processed manually through the CiviCRM back office system. However, they cannot be used for renewals that are processed manually. Each membership must be renewed individually (see the Renewals chapter) and in addition you may need to create a contribution price set consisting of the non-membership items you offer. Also, you cannot combine memberships that can be auto-renewed with memberships that do not offer auto-renewal or with non-membership items.
Price sets can be configured in many ways and you should always test a price set thoroughly before using it on your live site to make sure that you have configured it in the way that fits your situation best.
Creating a New Price Set
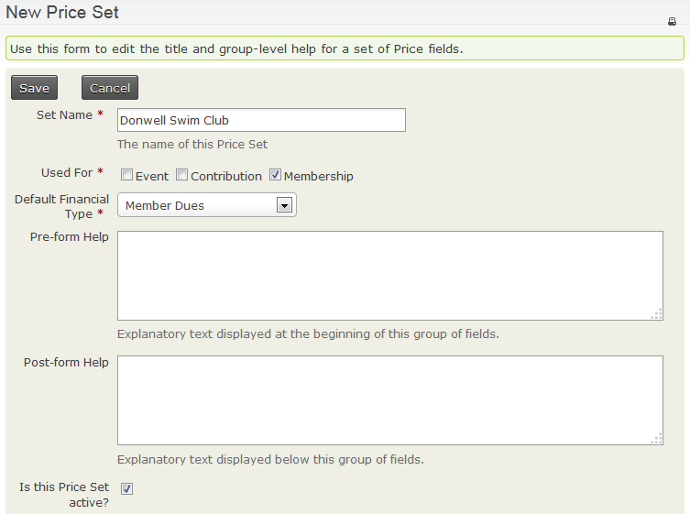
- Navigate to Memberships > New Price Set or Administer > CiviMember > New Price Set.
- Enter the price set name. This name will be displayed both to the public as part of the price set and to admin staff when they need to choose between price sets, so make sure it is descriptive enough for both purposes.
- Tick Membership
- Set the Default Financial Type. The choice you make has accounting implications and you should refer to the Contributions section for more information.
- Add pre- or post-form help text if you want to.
- Make sure the price set is active and Save.
You will be taken to a form to create the first price field for your price set.
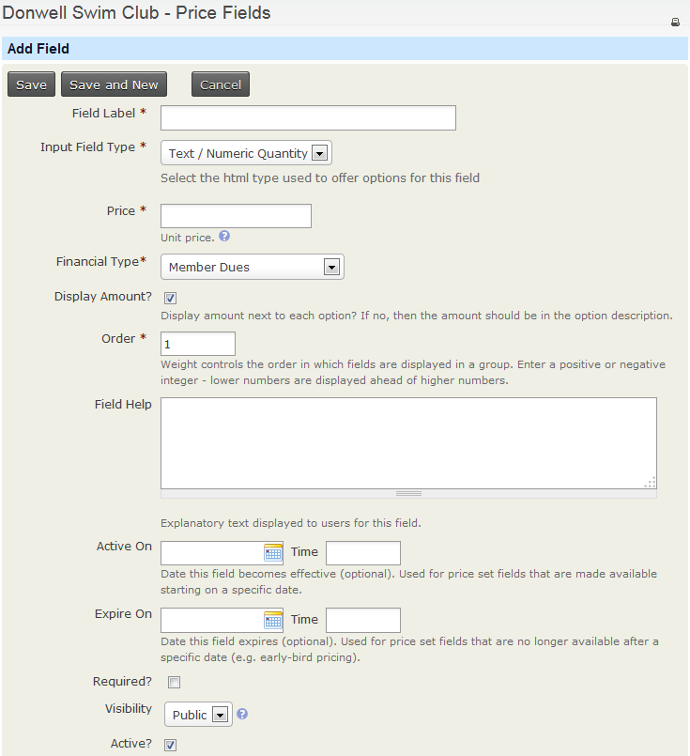
Creating a New Price Field
-
Enter a name in the Field Label. This name will be displayed to the public.
-
Select the Input Field Type. There are 4 input types available for price sets:
-
Text/Numeric Quantity: allows you to set a unit Price. When the price set is displayed it shows a text box where a quantity can be entered. The quantity entered is multiplied by the unit price to calculate the amount.
-
Select: displays a dropdown box where one option can be selected.
-
Radio: displays multiple options in a list; up to one option can be selected.
-
Checkbox: displays multiple options in a list; multiple selections are allowed.
Each of the input types will be used in an example in this chapter.
-
-
Financial Type will be set to the Default Financial Type chosen when this price set was created. You can override this value if required.
-
Display Amount? displays the price of the option next to the label. If your field label includes the option price then this can be unticked. Otherwise it should stay ticked.
-
Order, Field Help, Required and Active are either self-explanatory or have adequate help provided on the form.
-
Active On and Expire On can be set so that the price field is not visible until the Active On date, not visible after the Expire On date or is only visible between the Active On and Expire On dates. For example you could use these fields to bring in a price rise at 12:00am on 1 January 2019 by setting the price field with the old prices to Expire On 1/12/2019 12:00am and the price field with the new prices to be Active On 1/12/2019 12:00am.
-
Visibility can be set to Public (visible on your website to those who can see the membership sign up page) or Admin (visible only through the back end and then only to users with appropriate permissions).
Multiple membership terms
The configuration for the National Membership price field illustrates how you can allow contacts to sign up for multiple membership terms at the same time and shows the Radio input field type.
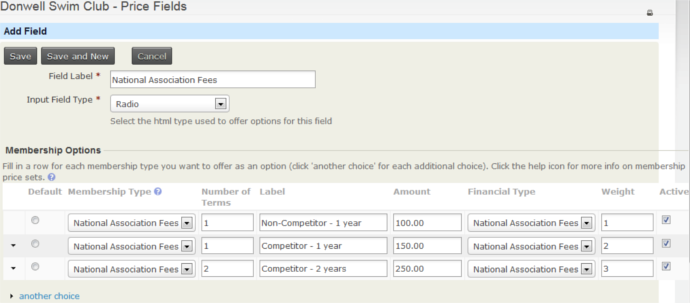
In the Membership Type field you select the option you want from a dropdown list of all the membership types you have configured. When you select a specific membership type the Number of terms auto-fills with 1 and the Label, Amount and Financial Type are auto-filled based on the definition of that membership type. All those values can be changed as needed. The National Association Fees membership type has a duration of 1 year with a minimum fee of $100. Setting the number of terms to 2 will give 2 years of membership. The Label will need to be changed if you have more than one option as each option must have a different Label. The Amount can be can be increased to any value you want. This lets you offer a concession and standard fee for for the same number of terms.
As we have not included the price of each option in its Label we would need to have Display Amount? ticked.
Defining a price field in this way will reduce the number of membership types you need to create. You only need a 1 year National Association membership type with a minimum fee of $100 for this price field instead of three membership types. However you need to be aware that your members will not be able to auto-renew if you use this type of multi-term configuration.
Membership of more than one organisation
In addition to the National Association Fees, contacts are required to sign up for a membership with the swim club. The Select input field type has been chosen for this field.
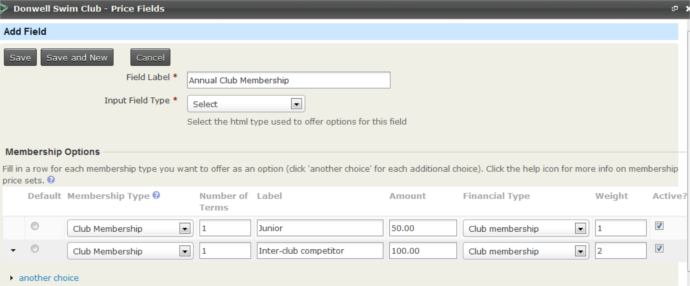
Again, when you select a specific membership type from the drop down list the Number of terms auto-fills with 1 and the Label, Amount and Financial Type are auto-filled based on the definition of that membership type. You can change any of these values as desired.
As we have not included the price of each option in its Label we would need to have Display Amount? ticked.
The combination of the two price fields described so far will let someone sign up for a minimum of 1 and a maximum of 2 memberships. Remember the two memberships will need to be linked to two different organisations as a contact can only have one active membership with a specific organisation. See Defining Memberships for more information.
Non-membership Price fields
You can also configure price set fields to offer additional services, subscriptions or other non-membership options.
There are three non-membership price fields in our example. The first offers a selection of club branded swimming gear. The checkbox field type lets people choose more than one item from the options offered.
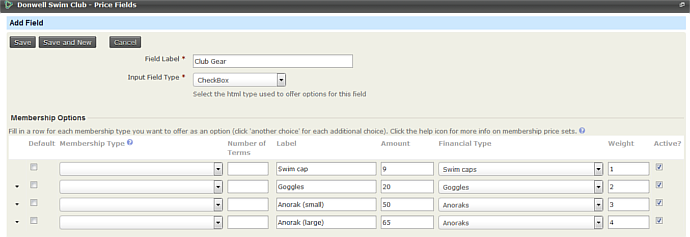
As these are products rather than memberships the Membership Type and Number of Terms fields are left empty. You set the Label, Amount and Financial Type for each option.
As we have not included the price of each option in its Label we would need to have Display Amount? ticked.
If you look back at the screen shots of the three price fields discussed so far you should notice that they all contain the same fields even though they are for three different input field types. Radio and Select input types are interchangeable, both allow you to choose just one option and can be used for membership or non-membership options. Checkboxes must be used if your contacts are allowed to choose more than one option from a single price field. They also can be used for either membership or non-membership options.
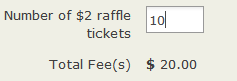
The fourth input field type is Text/Numeric Quantity and it can only be used for non-membership options. With this field type you usually include the unit price of the item on offer in the field label as shown in the following example or in the field help. This means that Display Amount? should not be ticked.
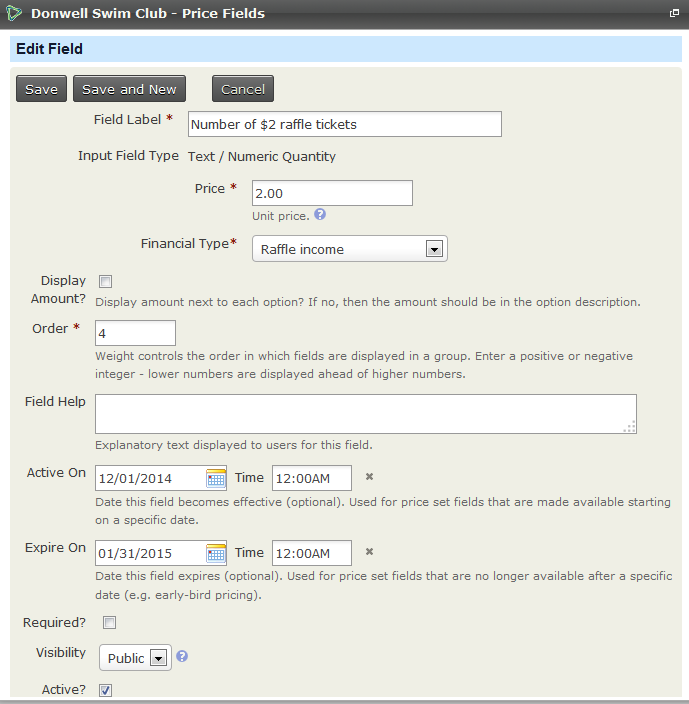
This will display as:
This price field will only be visible between the Active On and Expire On dates and lets us make sure that the raffle tickets can only be purchased during the selling period authorised by the relevant licensing authority.
The final price field is configured to allow people to give a donation. Notice that the unit price is 1 and it is not included in in the field label although the currency symbol is. The Display Amount? is not ticked. This is the best configuration to allow "any amount" donations.

For review, here again is how all of these fields look on the final screen: