Integrating with Drupal
Of all the three CMS that integrate with CiviCRM, Drupal has received the most attention, and offers the most options when it comes to integration. This is in part due to the fact that the Drupal community is largely a developer community.
When thinking about website integration with Drupal, it is important to understand the concept of Drupal modules. It might help you to think of a module as an application which provides a certain bit of functionality. For example the calendar module allows you to display calendars on your website. The Drupal distribution of CiviCRM comes with a number of Drupal modules which give you the ability to integrate CiviCRM with Drupal in various different ways.
Drupal Roles and permissions
When you create a new Drupal site User and CiviCRM is installed a corresponding CiviCRM Contact is also created. Both users and contacts have a separate identification or index number.
See also the permissions and access control chapter in initial set up for a general discussion of access control.
Your Drupal website allows you to create a series of Roles. Your website administrator give roles to site users and grant each role the permission to perform a certain series of tasks (view, edit, delete, and administer contacts) or access a certain set of information (CiviCRM Contacts, CiviMail, CiviEvents, Drupal Users, specific content types, etc.)
For more information on Drupal Roles, please read the documentation on Drupal Roles at Drupal.org:
Drupal permission settings allow you to decide what tasks a specific Role can perform or what information a certain Role has access to. Drupal permissions determine how much access a certain type of user has to configure modules, view, create, edit, or change types of content, users, or CiviCRM Contact information.
For more information on Drupal Permission settings, please read the documentation on Drupal Permissions at Drupal.org:
- User: Access and management settings
- Assigning permissions and users to roles
- Adjusting permissions after adding modules
- Permissions reference
- Views module permissions
Drupal roles are global and will override relevant access controls (see chapter Initial Setup> Permissions and Access Control) setup in CiviCRM. For example you can setup Access Control in CiviCRM to restrict access to contacts but if the Drupal permission 'Access All Contacts' is set anyone with that role will be able to see all contacts regardless.
Drupal Taxonomies, Content Access, or other Role-based User Access Modules
There are several Drupal Modules that determine what Drupal Roles have access to which types of content in your Drupal website. This can be based on Drupal taxonomies, by selecting access to specific nodes, settings on a specific views, pages, or panels, or based on certain contexts or rules. A few of the most common modules used for controlling access to content or include options for controlling content based on Drupal Roles are:
Drupal Views
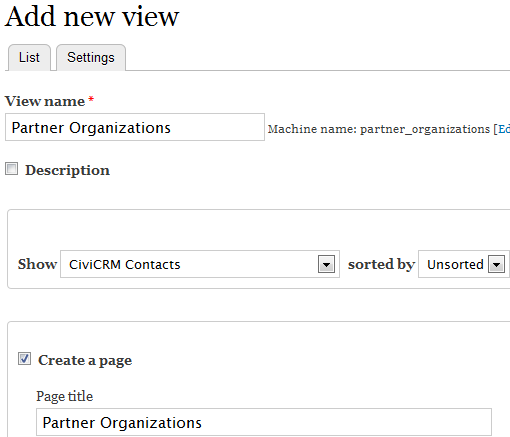
Views is a powerful Drupal module that allows you to display website content e.g. a list of latest news for the home page. CiviCRM integrates with Drupal Views and allows CiviCRM data to be shown on your website. For instance, if you wanted to create a page called 'Partner Organizations' and display it publicly you could:
- Select criteria for what Contact data will be displayed such as:
- Organization contacts only
- That are tagged 'Partner' in CiviCRM
- That have a membership of status 'New' or 'Current'
- Choose which data will be shown such as:
- Organization name
- State/Province
- Website
- Phone number
- Choose to show the data in either table or paragraph format
- Allow the public to filter the results themselves by State/Province
This is just a simple example, the possibilities of Drupal Views and CiviCRM are far reaching.
Configuration
If you have your Drupal and CiviCRM in separate databases adding CiviCRM support to Views takes a small bit of configuration. Views must be told where to look for CiviCRM data. Administer > System Settings > CMS Database Integration shows some code that must be copied and pasted into the Drupal settings.php file after (but not replacing) the existing database connection code. If you have trouble consider asking for help in the forums or hiring a consultant. If you are using Custom Data sets in CiviCRM, anytime you add a new data set (not just a field) you must repeat this process.
Creating Views Using CiviCRM Data
Views are located in the Structure section of the Drupal administrative menu. When you create a View, give it a name and select what kind of data you wish to show.
Generally speaking if your view is focused on Contacts (which most are) you will select Show: CiviCRM Contacts. If you wish to display details about other CiviCRM data such as events, relationships, contributions or activities there are additional options that might provide more data fields for those types.
After the View is created, edit the fields, filters, display and other configurations to show the data exactly how you'd prefer. Views does take some experimentation and/or training to get it right. Feel free to ask questions on the forums or hire a consultant if you become stuck.
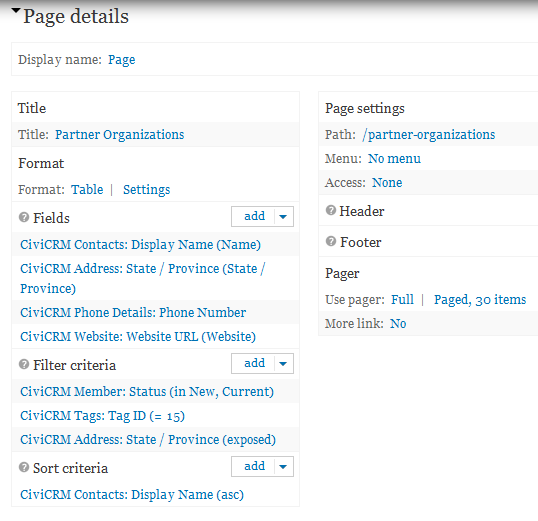
This is a sample configuration using Views 3 in a Drupal 7 environment. Your View will probably be slightly different, but this gives you some examples to get started with.
Other Things Views and CiviCRM Can Do
- Lists of upcoming events
- Building reports on contributions, activities or event registrants
- Honor roll listing of recent donors
- Staff, board of directors or committee lists
- A list of current members
- ...and more!
Webform CiviCRM Integration
Just as Views can output data in virtually any way imaginable, this module allows you to have data input exactly the way you want. The webform CiviCRM integration is extensive and offers many different options for things that can happen as part of the form submission.
You can create and update contacts, group subscriptions, tags, relationships, cases, custom data, activities, memberships, event participants and take payments online via webforms. They can offer greater flexibility when compared to standard CiviCRM Profiles.
For example, you can create a form which adds a family with all relationships / you can add a new member form with a multi-page form which includes question logic / you can create a new activity when someone submits the form. Webform CiviCRM has extensive online documentation which you should read to make the most out of its functionality.
For more information see: http://wiki.civicrm.org/confluence/display/CRMDOC/Webform+CiviCRM+Integration.
CiviCRM Organic Groups Sync
The Organic Groups CiviCRM module integrates Organic Groups from a Drupal site with CiviCRM groups. This is useful for groups that require Organic Group functionality on their website but also need to be tracked within CiviCRM. Once an Organic Group of Drupal users are integrated into CiviCRM, the Drupal group can be used for mailings, tracking address information, tracking activities or anything else normally done with CiviCRM contacts.
Once the Organic Groups CiviCRM module is installed and enabled in Drupal it automatically creates two CiviCRM groups for each existing Drupal Organic Group:
- A normal group containing a contact record for each corresponding user who is part of an Organic Group. This group is assigned the same name as the linked Organic Group.
- An access control group containing the contact record of the administrator of the corresponding Organic Group. This gives the OG group admin the ability to view and edit members of their group in CiviCRM.
The groups are synchronised one way only, from the Drupal Organic Groups to CiviCRM groups. When a new user is added to or signs up for an Organic Group, they are automatically added to the corresponding CiviCRM group. If they leave the Organic Group then they are removed from the CiviCRM group. If an Organic Group is deleted, the CiviCRM group is also deleted. However, the reverse of each of this situations is not true; a contact added to the CiviCRM group will not appear in the Drupal Organic Group, a contact removed from the CiviCRM group will still remain in the Drupal Organic Group, and if you delete the CiviCRM group, the Drupal Organic Group will still remain. Therefore, this integration is meant to be used when you administer the group from the Drupal side.
CiviGroup Roles Sync
The CiviGroup Roles Sync module allows administrators of Drupal Websites to streamline the user experience for donors and staff. The CiviGroup Roles Sync module allows you to:
- Allow board members, committees, staff, and volunteers to access specific content or perform specific tasks.
- Provide customized experiences for users of specific groups when they access your website. For example, when a major donor logs into the website display a letter from the President thanking the donor for his contribution and participation, or provide a major donors with pre-registration access to upcoming events and exclusive news or resources.
You should spend some time assessing the different ways that different sorts of users interact with your website, being sure to ask yourself whether or not the user experience is dependent on specific organized groups, teams, committees, or task forces or on whether or not a contact meets a specific set of criteria, or if you should apply roles to users manually.
In essence, it allows you to synchronize Drupal users that have a certain role with CiviCRM contacts in a certain group.
Preparation
Before using CiviGroup Roles Sync module you should have the following prepared:
- your organization's Groups should be created.
- the roles you will need for each use case should be created in Drupal.
- if you are using additional modules to fine-tune access, you should have all modules you need installed and configured
When determining what Groups and what Drupal Roles you should create it is important to remember that multiple Group Types may grant the same Drupal Role and each Group can be used to grant multiple Drupal roles.
You should enable the module from the Drupal module administration screen.
Syncing CiviCRM Groups to Drupal Roles
- Navigate to the CiviGroup Role Sync configuration screen.
- Click on Add Association Rule.
- Under CiviCRM Group select the Group that you want a user to have in order to be granted a specific Drupal Role.
- Under Drupal Role select the Drupal Role that should be granted.
- Click on Add Association Rule when you are finished configuring your new association rule.
You can always edit or delete existing association rules from the same configuration screen.
CiviMember Roles Sync
The CiviMember Roles Sync module allows administrators of Drupal Websites to streamline the user experience for organization members. The CiviMember Roles Sync module allows you to.
- Automatically grant a Drupal Role to a user based on the type of membership he/she has with your organization and whether or not he/she is currently in good standing.
- Allow a user to access member-only content or perform specific member-only tasks.
- Restrict a non-member or expired member user from accessing member-only content or performing member-only tasks until he/she registers or renews membership with your organization.
Scenario: Member-only Content
The Retail Baker's Association of America (RBA) connects bakery suppliers and owners across the country to foster a community that encourages exchange of business and industry information, networking, mentoring, and business opportunities, and establish industry standards through certification, research, and school programs.
Visitors to their website fall into three different user experiences:
- Non-Members who purchase resources and materials from RBA's online boutique. A non-Member must register for a user account to make a transaction so that he or she can keep track of purchase history, so that RBA can petition him or her for membership in the future.
- Current members in good standing who have access to member-only resources including discussion boards, programs, marketing materials, and digital version of RBA publications.
- Members with expired memberships or former members who need to renew need to log into the RBA website to renew their membership, but should not have access to member-only resources until their membership has been reactivated.
In order to save their staff from having to grant the Drupal Role "Active Member" to a user each time he or she renews his or her membership and then remove the "Active Member" role if that user cancels his or her membership or allows his or her membership to expire, RBA uses CiviMember Role Sync to grant the "Active Member" role to any user who is either a new or current member and any user who's membership has fallen into the grace period. Now when a user registers or renews his or her membership he or she will automatically be granted access to RBA's Member-Only web content.
What You Need to Know
This section covers what you need to think about before beginning to work with CiviMember Role Sync.
You should spend some time assessing the different ways that different sorts of users interact with your website, being sure to ask yourself whether or not the use case is dependent on your membership structure or dependent on the organization of committees, teams, and contacts meeting a specific set of criteria, or if your workflow simply does not warrant the use of CiviMember Role Sync at all.
CiviCRM Membership Types
You should have a full understanding of CiviCRM Membership Types and CiviCRM Membership Statuses before you begin working with the CiviMember Role Sync module. You can learn more about the CiviMember component by reviewing the MEMBERSHIP chapter.
Configuring CiviMember Roles Sync
Before using CiviMember Roles Sync module you should have the following prepared:
- your organization's Membership Types and Membership Statuses should be created and configured in the CiviMember component.
- the roles you will need for each use case should be created in Drupal.
- what content each Membership Type should grant permissions to should be agreed upon by your staff
- what tasks each Membership Type should grant permission to should be agreed upon by your staff
- if you are using additional modules to fine-tune access, you should have all modules you need installed and configured
When determining what Membership Types and what Drupal Roles you should create it is important to remember that multiple Membership Types may grant the same Drupal Role and each Membership Type can be used to grant multiple Drupal roles.
For example: The Retail Bakers Association of America has five different membership types: Corporate Sponsor, Bakery, Individual, Student, and Retired Bakery. Having any one of the five Membership Types will grant a user the "Active Member" Drupal Role that gives access to the member-only content. In addition to this, users with the Corporate Sponsor Membership Type should have access to additional exclusive content. RBA decides calls the Drupal role used to access this additional exclusive content "Corporate Member" and user with the Corporate Sponsor Membership Type will be granted the "Corporate Member" role in addition to the "Active Member" role.
Enabling CiviMember Roles Sync Module
-
To enable the CiviMember Roles Sync Module navigate to your list of installed Drupal modules.
- Drupal 6: Go to Administer > Site Building > Modules
- Drupal 7: Go to Modules from the Administration Menu at the top of your screen.
-
Find the Module CiviMember Roles Sync and check the box to the left of the module's name.
-
Click on Save Configuration.
Syncing CiviCRM Membership Types to Drupal Roles
-
Navigate to the CiviMember Role Sync configuration screen.
- Drupal 6: Go to Administer > Site Configuration > CiviMember Roles Sync
- Drupal 7: Go to Configuration > CiviMember Roles Sync
-
Click on Add Association Rule.
-
Under Select a CiviMember Membership Type select the Membership Type that you want a user to have in order to be granted a specific Drupal Role.
-
Under Select a Drupal Role select the Drupal Role that should be granted.
Example: RBA wants any user with a Current Bakery Membership Type to be granted the "Active Member" role, so the RBA staff creates a new Association Rule and selects Bakery under Select a CiviMember Membership Type and selects "Active Member" under Select a Drupal Role.
- Under Current Status select the Membership Status that a user should have to be granted your selected Drupal Role.
Example: RBA wants to grant any user who has a Membership Status of either New, Current, or Grace access to the member-only website content, so the RBA staff checks the boxes next to those three Membership Statuses.
- Under Expired Status select the Membership Status that will revoke the Drupal Role from the user.
Example: RBA wants to make sure that any user whose membership expires or who cancels their membership has their access to the member-only website content revoked, so the RBA staff checks the boxes next to Expired and Canceled.
-
Click on Add Association Rule when you are finished configuring your new association rule.
-
The page will reload, and you should see the message "Your Association Rule has been added."
-
Repeat steps 1-8 to add all necessary association rules for your organization. Once you have finished adding all of your association rules, move on to step 10.
-
Click on the tab Manually Synchronize
-
Click on Synchronize CiviMember Membership Types to Drupal Roles Now. This will put your new CiviMember Role Sync Association Role immediately into effect.
Editing Existing Association Rules
You can always edit or delete existing association rules.
-
To edit or delete an existing Association Rule, Navigate to the CiviMember Role Sync configuration screen.
- Drupal 6: Go to Administer > Site Configuration > CiviMember Roles Sync
- Drupal 7: Go to Configuration > CiviMember Roles Sync
-
You should now see a list of all existing CiviMember Role Sync Association Rules. If not, click on List Association Rule(s) tab.
- Edit an Existing Association Rule
- Find the Association Rule you want to make changes to and click on edit for that Association rule.
- Make the changes to your Association Rule and when yo are finished click on Edit association rule.
- Delete an Association Rule
- Find the Association Rule you want to remove and click on delete for that Association Rule.
- Your association rule will be deleted. You will not need to confirm deletion.
- Edit an Existing Association Rule
Configure when Synchronization Should Happen
You can select several different options for when synchronization should occur by navigating to the CiviMember Role Sync Configure screen.
- Drupal 6: Go to Administer > Site Configuration > CiviMember Roles Sync > Configure
- Drupal 7: Go to Configuration > CiviMember Roles Sync > Configure
Automatic Synchronization Methods:
- Synchronize whenever someone logs in or logs out: This method will trigger synchronization only after a user logs in or out of his or her account. You should be careful when using this method because if you have long user sessions a user could continue to have access to actions or content until he or she finally logs out. (This is the default setting)
- Synchronize when a Drupal Cron occurs: This method relies on a cron to trigger synchronization. Learn more about Drupal Cron.
- Synchronize when membership is updated: This method will synchronize when the user registers for or renews his or her membership and when the organization staff updates a user's membership information from the back office.
- Disable Automatic Synchronization: This method relies on an organization staff member to manually trigger synchronization. To manually trigger synchronization, go to CiviMember Roles Sync settings, click on the Manually Synchronize tab, and click on Synchronize CiviMember Membership Types to Drupal Roles Now.
Be sure to click Save Configuration after making any changes.