Perfiles
Un Perfil es una colección de campos de su base de datos. Los perfiles son una herramienta muy potente que puede tener muchos usos diferentes entre todos los componentes de CiviCRM. Los perfiles se usan para recoger información (p.ej., en un formulario de registro), y para mostrar información al usuario (p.ej. como un diretorio de miembros). Pueden ser utilizados tanto internamente (p.ej. para crear pantallas de de registro de datos más sencillas para los empleados) como externamente (para mostrar información actualizada de la base de datos).
Puede añadir cualquier campo principal o personalizado a un perfil, incluyendo campos personalizados multi-valor. También puede añadir un par de campos especiales, como Grupos, que incluirá un listado de casillas a marcar - una para cada uno de los grupos marcados como públicos - y etiquetas, que incluirán todas las etiquetas públicas.
Al crear un Perfil, tiene la opción de elegir solo aquellos campos que son relevantes para un propósito específico. El siguiente diagrama proporciona una explicación visual de cómo los campos existentes se convierten en parte de un perfil.
![]()
En esta sección se explicará cómo usar los perfiles para recoger y compartir información, además de varias formas de cómo usar los perfiles que pueden ahorrar tiempo a las personas de backoffice de su organización.
Diferentes usos para Perfiles
En esta sección se discuten brevemente varias maneras distintas en las que se pueden utilizar los perfiles. Para las instrucciones paso a paso de cómo crear y usar un Perfil consulte más abajo en este capítulo.
Recogida de información en páginas públicas
Se puede utilizar un perfil para recoger información de sus seguidores. Los perfiles se pueden mostrar por sí solos o a través de páginas de contribución, alta de membresía y/o registro de eventos. Puede añadir más de un Perfil a una página. También puede elegir los campos obligatorios y añadir texto en el perfil que sirva de ayuda para los usuarios que rellenen el formulario.
Algunos ejemplos:
- Un formulario de registro para voluntarios que contiene los campos predefinidos para el nombre, apellidos, dirección postal y un campo personalizado para los intereses de los voluntarios
- Un perfil que contiene campos personalizados sobre las preferencias alimentarias que se pueden añadir a las páginas de registro para cualquier evento donde se sirva comida.
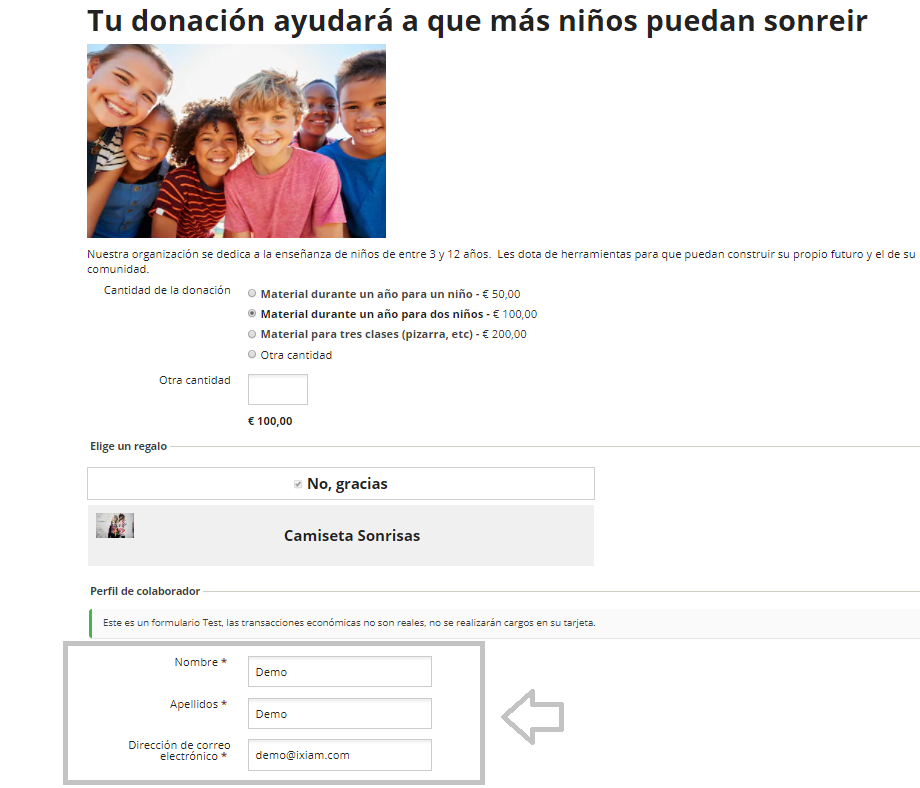
Por ejemplo, este perfil está siendo utilizado para recoger campos básicos en una página de donación.
Visualización de información en páginas públicas
Un perfil puede mostrar información de la base de datos en páginas públicas. Esto supone un ahorro de tiempo y eficiencia ya que no necesitará incluir la información en su página web y su base de datos CiviCRM, con que lo haga en CiviCRM será suficiente.
Por ejemplo, una organización basada en miembros puede proveer de un directorio de búsquedas de miembros en su página web que se actualice tan pronto como un nuevo miembro se de de alta. También una organización que quiere agradecer a sus donantes públicamente puede listar sus nombres en la página web tan pronto como la donación se realiza.
Un mini caso de estudio: La organización"Native Americans in Philanthropy" (NAP) quería crear un directorio de miembros que sus miembros pudieran usar para buscarse y conectarse entre ellos. Antes de utilizar CiviCRM, creaban un directorio impresos anual muy caro y lo enviaban a todos los miembros. Este proceso requería mucho tiempo y era muy caro y parte de la información acababa estando desactualizada antes de que los miembros recibieran su directorio. Al utilizar un Perfil para búsquedas en su página web en su lugar, significó ahorro de recursos y ayudó a avanzar en la misión de la organización ya que su página web se convirtió en un portal para que sus miembros entraran en contacto.
Los detalles sobre el uso de los Perfiles, como directorios, se incluyen más adelante en este capítulo.
Personalización de su interfaz de usuario
Los formularios de perfil también se pueden usar como formularios de entrada de datos simplicados. Si tiene voluntarios en su organización o becarios que realizan entradas manuales de datos de su organización, puede hacer que su tarea sea más sencilla creando un formulario de perfil que muestra solo los campos que necesitan rellenar. Esto simplifica enormemente la entrada de datos y reduce las posibilidades de que se registre información errónea.
También puede usar un Perfil para mostrar campos seleccionados en los resultados obtenidos de la Busqueda Avanzada. Por ejemplo, podria crear un Perfil que incluya el campo número de teléfono y campos personalizados sobre los intereses de sus voluntarios; cuando lo utilice para mostrar los resultados de la búsqueda, le mostrará en la pantalla un listado de voluntarios con sus números de teléfono que facilitará la labor del coordinador de voluntarios.
Los detalles de cómo usar Perfiles de esta forma están disponibles en el capítulo de Customizando la interfaz de Usuario en Configuración Inicial.
Actualizar registros múltiples al mismo tiempo
A menudo es necesario actualizar una gran cantidad de registros al mismo tiempo. Por ejemplo, después de un evento, es posible que tenga una lista de asistencia y que desee registrar a todos aquellos que finalmente Asistieron o No se presentaron respectivamente. O quizás quiera actualizar de una sola vez, el campo de "Agradecimiento Enviado" para las donaciones de una semana.
Las acciones que le permiten actualizar varios registros al mismo tiempo están disponibles desde el menú desplegable Acciones para la mayoría de tipos de resultados de búsquedas (Buscar, Búsqueda Avanzada, Buscar Contribuciones, Buscar Membresías, Buscar Participantes y Buscar Actividades) y desde el listado de participantes de un evento que se genera desde la pantalla de Administrar Eventos.
La función de Actualizar múltiples registros muestra una vista de los resultados de búsqueda con los campos que contiene el perfil utilizado y permite modificar el contenido de los campos en una misma pantalla y guardarlos todos a la vez.
Los detalles de cómo usar los perfiles de esta forma están incluidos más abajo en este capítulo.
Administrar lista de correo electrónico
Otro uso de perfiles es crear un formulario en el que las personas puedan registrarse para recibir correos electrónicos de su organización. Los Grupos que usa para rastrear diferentes listas de correo pueden ser añadidos como casillas de verificación y cuando un usuario, que visite su página, web envíe el formulario, será automáticamente añadido a la lista de correo que haya marcado.
Los detalles de cómo usar Perfiles para administrar las listas de correo pueden encontrarse en el capítulo de Configuración en la sección de Correo Electrónico.
Planear sus Perfiles
Debido a que los perfiles se pueden usar para muchos propósitos, nos encontramos con muchas elecciones que hacer y funcionalidades que definir cuando los configuramos. Existen configuraciones para el Perfil como un todo y configuraciones para cada campo que se añade, y también hay que tener en cuenta la elección de para qué se utilizarán esos campos. Las elecciones que realice sobre un aspecto afectará las elecciones que podrá realizar sobre otros. Por ejemplo, algunos tipos de Perfiles limitan el tipo de campos que puede incluir, y algunas combinaciones de campos no están permitidas en ningún tipo de perfil. Debido a esta complejidad, es importante entender las consecuencias de ciertas configuraciones y planificar cuidadosamente para qué usará su perfil y qué necesita en él, antes de crearlo. Puede que necesite realizar varias intentos con distintas composiciones antes de que encuentre el perfil adecuado para sus propósitos.
Aquí hay unas pautas sobre qué campos se pueden agregar a un Perfil:
- Los perfiles que son utilizados como Vistas de Busquedas pueden contener únicamente campos del Contacto (y de los diversos tipos de Contacto, como Individual).
- Los campos de Contacto están disponibles en todos los Perfiles, sin embargo, no pueden mezclarse campos de los diversos tipos de Contactos (ej: Individual y Organization).
- Para añadir campos (como Dirección o Correo electrónico) que aplican a más de un tipo de Contacto seleccione los campos desde el contacto en lugar de hacerlo desde el tipo específico. Los campos del menú de Organizaciones, por ejemplo, contiene sólo los campos que no pertenecen a otro tipo de Contacto.
- Excepto en los Perfiles de Resultados de Búsqueda, sólo puede combinar los campos de Contacto con un único registro de otro tipo: Actividades, Participantes, Contribuciones y Membresía.
- Si intenta combinar campos cuya combinación no es soportada, recibirá un mensaje de error cuando intente salvar el campo.
Crear y manejar perfiles
Crear un perfil es un proceso con vaios pasos. Primero se crea el perfil y se selecciona su configuración. Hay configuraciones básicas y avanzadas. Luego se agregan los campos y se selecciona su configuración particular también.
Crear un Perfil y comprender su configuración
Esta sección lo guia a través de toda la configuración de los Perfiles y explica cómo éstas afectan el funcinonamiento de sus Perfiles. Como podrá observarse el listado de configuraciones es bastante amplio. Es importante comprender que la mayor parte de las configuraciones aplican a un único tipo de uso de los Perfiles.Cada vez que se crea un Perfil podrá ignorar muchas de ellas, ya que no aplicarán para el uso que se le está dando.
- Go to: Administer > Customize Data and Screens > Profiles and click on Add Profile.
- Profile Name: Give the profile a meaningful name.
- Used For: Your choices are Standalone Form or Directory; Search Views; Drupal User Registration; and View/Edit Drupal User Account. You can check more than one box in the Used For field, to make your Profile available for more than one use; just remember that checking Search Views will limit your field choices to Contact and Contact type records only.
- Order: This field determines controls the order in which Profiles are presented when more than one Profile is included in a page. Lower numbers are displayed ahead of higher numbers. The field is filled in automatically when a Profile in created; change the number if you wish.
- Pre-form Help and Post-form Help: These fields allow you to write text that appears either before or after your Profile to guide people in filling out forms.
- Is this CiviCRM Profile Active?: This box is checked automatically; it is what allows the Profile to appear as options for insertion into forms and use by the Batch Update function. When creating Profiles, you obviously want to leave it checked; later on, if you want to take a Profile out of use in your organization, you can edit the Profile and un-check the box.
Advanced settings
Profiles have a number of advanced settings which are applicable in various different contexts. Not everything listed under Advanced Settings applies to every Profile; some apply only to specific Profile uses. You can skip over any settings that do not apply to the way you will use your Profile. To access advanced settings click on the gray advanced settings bar and a set of fields will appear
Limit listings to a specific group
This is important only for Profiles that will be used to display information on your website (e.g., if you will be allowing web visitors to search your data, as in a membership directory).
- Select the Group whose information you want to make publicly viewable/searchable from this field's dropdown menu. For example, if you want to display a directory of active members, create a Smart Group of all members that have a status of New, Current, and Grace.
- Choose the Smart Group in this field. (Remember, smart groups are dynamic lists of records; when new memberships are added, the corresponding contact will automatically be included in the directory.)
- If you do not choose a Group from the dropdown menu in this field, by default CiviCRM will allow a search to expose every record in your database. In most cases this is a bad idea, as you probably don't want anyone who comes to your website to know who is in your whole database.
Add new contacts to a group
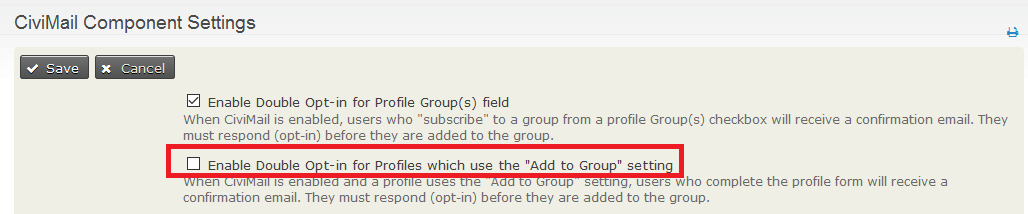
Any new contacts that fill out this Profile will be added to the Group. You can use this, for example, to add anyone who fills out your volunteer sign-up form to a Volunteers Group. Note that by default contacts will not receive any confirmation that they have been added to this group or be asked to validate their email address. To have contacts who complete the profile form receive an email, go to Administer >> CiviMail >> CiviMail Component Settings and check the checkbox "Enable Double Opt-in for Profiles which use the "Add to Group" setting". They must respond (opt-in) before they are added to the group.
Also note that if you want to offer more than one group, you might be better off using the groups profile field.
Notify when profile form is submitted
This setting, which is is also applicable only when using a Profile as a sign-up form, allows you to send an email automatically whenever the form is submitted. For example, maybe your volunteer coordinator wants to get an email whenever anyone fills out the volunteer sign-up form. Simply enter the email address in the field; if you want to send email to multiple addresses, separate them with a comma.
Redirect URL
This applies only to Profiles that are being used as standalone forms; it will not apply when the Profile is embedded in an event sign-up or contribution form. The Redirect URL field allows you to send people to a specific web page after they submit their form. For example, you may want to create a web page that thanks people for submitting their information. If this field is left blank, people will be directed to a page which displays the information they've just entered.
Cancel redirect URL
Performs exactly the same way as Redirect URL, except that it applies when people cancel their form submission.
Include reCAPTCHA?
This applies when profiles are being filled in by anonymous users. CAPTCHA is a type of spam-blocking software that requires the visitor to fill in text displayed in a graphic file. This prevents automated web-crawling spiders (robots) from completing the form. It is highly recommended that you include it.
You must set up a free reCAPTCHA account and enter some configuration information in CiviCRM to use this feature. Go to Administer > System Settings > Undelete, Logging and ReCAPTCHA to configure your account; instructions for signing up are included on that page.
Drupal user account registration option
This setting applies to Profiles that are used in public pages and determines whether people can or must use your form to sign up for an account with your website in addition to submitting the information on the form. This can be useful for ensuring people have to sign up for a user account as part of becoming a member or registering for an event.
WordPress user account registration option
Like Drupal, Wordpress allows CiviCRM Profiles to create accounts as described above. Within WordPress Settings > General "Membership [ ] Anyone can register" must be clicked.
What to do upon duplicate match
This setting applies to Profiles that are used in public pages. It controls what happens when the contact data submitted from the Profile matches an existing contact record. You must choose one of these options. "Issue warning and do not save" is chosen by default. Matching in Profiles uses on the Unsupervised deduplication rule (see the Deduping and Merging chapter in the Working with Your Data section for more information about deduplication rules). Note that if there are multiple matching contacts, the first matching record is used.
Here are the options and their effects how your form works:
- "Issue warning and do not save" This option is ignored if the Profile is embedded in an online contribution, membership sign-up or event registration form. In these cases, a contact match results in the transaction being linked to the matching contact. In other cases, the user will receive a message that a record already exists in the database, and they will be unable to submit the form.
- "Update the matching contact" adds new information from the form to the contact record and, if there are any form fields that are already filled-out in the record, overwrites the existing record fields. For example, if the form includes address fields, the text that the user enters in the form will replace what was already in the database address fields.
- "Allow duplicate contact to be created" ignores any potential matches and creates a new contact record for all submitted forms. This means that all form submissions will be saved and no data will be overwritten; however, it may produce a lot of duplicate records that will need to be deduped later (see the Deduping and Merging chapter in the Working with Your Data section).
Proximity search
This applies if you are using the Profile for a searchable directory; it adds a proximity search block to the search criteria. This block contains a field for start address, and another that allows the user to set a search radius (how far from the start address they want to search). Choose None if proximity search is not relevant to your directory, Optional if you want to offer proximity search to your users, and Required if you want to force the user to enter a start address and a search radius.
Enable mapping for this profile?
This applies only if you are using the Profile for a searchable directory; it adds a map to the search results.
Include profile edit links in search results?
This applies only if you are using the Profile for a searchable directory; it adds a link in the results listings to edit the Profile fields in the returned contact records. Only users with permission to edit the result contacts will see this link.
Include Drupal user account information links in search results?
This applies only if you are using the Profile for a searchable directory; it includes a link in the results to the resulting contacts' Drupal user account information (i.e., their My Account page). This link will be included for only result contacts who have a user account on your website.
Once you've saved the profile settings, it's time to add fields to the profile. If you plan to reference custom fields in a profile form, make sure that those fields have already been created.
Adding fields and choosing field settings in Profiles
This section walks you through all the field settings and explains how they affect how your Profiles work. As with the overall Profile settings, not all of them are necessary to consider for each use.
- Click Add Field.
- Field Name: Choose the record type where your desired field appears from the - select - dropdown menu. This will bring up a secondary dropdown menu listing all available fields for that record type. Choose the field you want to add to your Profile.
- Field Label: This is the field label that will display on all uses of your Profile. It is prefilled with the default field label. However, the default field labels are often confusing for users of your forms, so you can rewrite them here. For example, the Postal Code field can be renamed Zip Code if your audience is more familiar with that term.
- Required?: Check this box to make this required anytime the Profile is used. This is most useful when you want to make sure that certain information (e.g., First Name, Last Name, Email) is always included in a form submission. (This is not relevant to Search Views usages [known as Search Results in 4.1 and previous].)
- View Only?: Check this box to allow users to view but not edit this field. If your Profile is used to expose search results, fields marked View Only will not be included. This setting is not relevant when a Profile is being used only to collect information.
- Visibility: If the Profile is being used for a searchable directory, set the Visibility of any fields you want to include on the search form to Public Pages or Public Pages and Listings. For fields that will be used on sign-up forms, set Visibility to User and User Admin only. This ensures that other visitors to the form can't view any data from the database. To use fields for Search Views, you must set Visibility to Public Pages or Public Pages and Listings. Choosing either of the Public Page options pops up two additional settings:
- Searchable?: This applies only to searchable directory uses. Check the box if you want to include the field in the search form.
- Results Column?: This applies only to Search Views (known as Search Results in 4.1 and previous). Check it or the field will not appear in your Search View.
- Field Pre Help and Field Post Help: These fields allow you to write text that appears in the user interface to guide people in filling out forms. Field pre help appears inline. Field post help will create a small speech bubble which when clicked appear in a yello
- Order: You can use this field to control the order in which fields display in the Profile. Lower numbers are displayed ahead of higher numbers.
- Active?: Leave this box checks to ensure that the field appears when the Profile is used.
- Click Save and New to add more fields to the Profile, or Save if you have no more fields to add.
Managing Profiles
All your profiles are available for viewing and editing at Administer > Customize Data and Screens > Profiles. You can add fields and edit field settings (at the Fields link) and change Profile settings (at Settings). You can also look at how your Profiles will appear, get links and embed code for your Profiles, and copy Profiles to use as a basis for building other Profiles (at more).
Using Profiles
This section contains specific instructions for the different profile uses discussed above.
Standalone forms with Profiles
There are two ways in Drupal and Joomla! to use standalone forms once you have created your Profile according to the instructions above:
- Use the page created automatically by CiviCRM to hold the Profile. Get the link to this page at Administer > Customize Data and Screens > Profiles. Click the more link next to your Profile and choose Use Profile-Create Mode from the pop-up menu. You can then publish this link wherever you want: in an email, on a blog, etc.
- Paste the HTML code for the form in a page you've built on your website. Get the code at Administer > Customize Data and Screens > Profiles. Click the more link next to your Profile and choose HTML Form Snippet from the pop-up menu. Copy the code that appears on the next screen and paste it wherever you want.
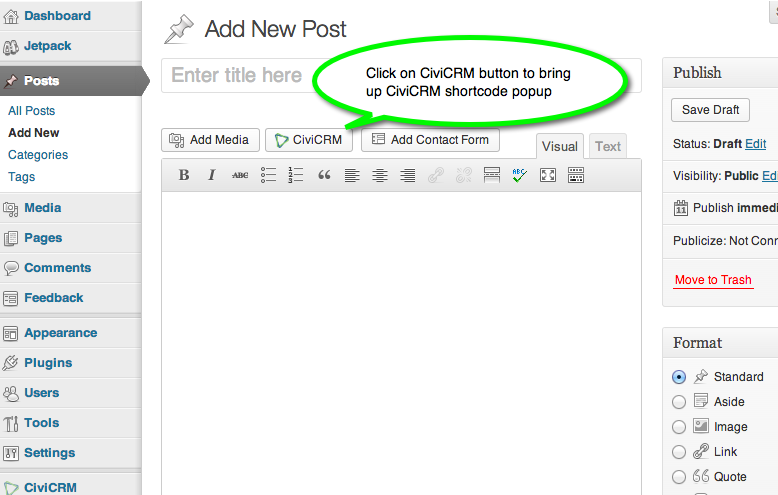
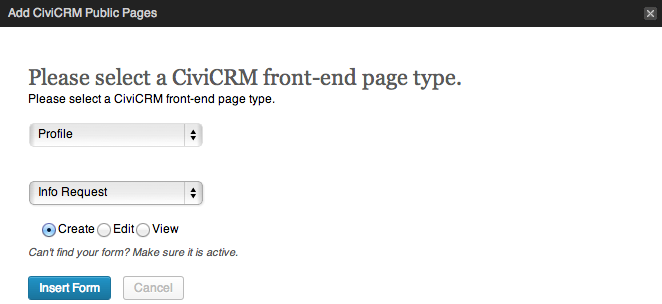
In WordPress, there is an additional third way. When creating or editing a post, click on the CiviCRM button to insert a CiviCRM shortcode into the post.
On the popup form, select Profile as the desired frontend element.
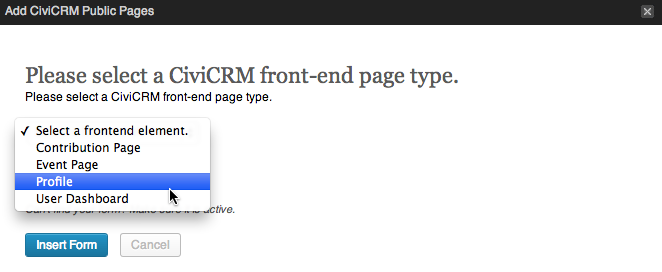
Use the second select widget to specify the profile you would like to use. Finally, select the purpose of the form — create, edit or view — and click Insert Form.
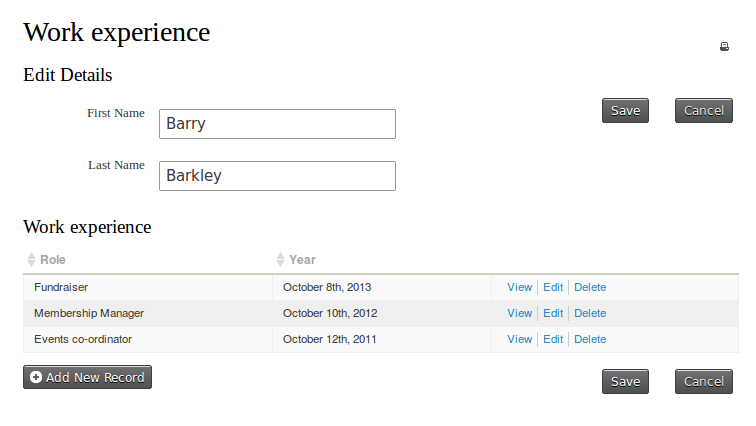
Multi-value fields in profiles
Multi-value custom field sets allow you to have more than one set of custom data per contact. They are handy for modelling data that repeats, for example, work experience data. You can expose these multiple value custom fields via profiles. In the screen shot below, we have created a profile that is used to collect name and work experience data. Notice that the multi-value custom data appears slightly differently in the profile to facilitate adding, editing and deleting multiple instances of these records.
Making directories with Profiles
To put a directory onto your website:
-
Create your Profile as described above. Be sure to consider these Advanced Settings, as they are especially helpful when using profiles for directories.
-
Enable mapping: a really cool feature available in CiviCRM is giving visitors the ability to map contacts in your directory using Google or Yahoo! maps. They can then obtain directions to a record's address dynamically. To use this feature, you must have already enabled mapping under Administer > System Settings > Mapping and Geocoding.
- Include profile edit links: check this box if you want to include a link in the directory listings to allow people to edit data in the profile's fields. Only users with permission to edit the contact will see this link. More often than not you will not need to enable this setting, as it is not commonly used in the membership directory scenario.
- Include Drupal user information (Drupal only): check this box if you want to include a link in the directory listings to view a contacts' Drupal user account information (e.g. their My Account page). This link will only be included for contacts who have a user account on your website.

Now it's time to include the fields that will make up the directory. For profiles used as directories you have total control over which fields:
- are searchable in the directory
- appear in the results columns of your search
- appear in the record detail View page.
The important options you must configure in the fields for directory purposes are shown below:

- Visibility for all fields in your directory must be set to Public Pages or Public Pages and Listings. The difference between these two options is that those configured as Public Pages and Listings will have the field in detail view hot-linked, enabling the user to generate a follow-up search for other records which also have that same field value. For example, you might set City to Public Pages and Listings. After the user conducts a search and views the details for a record they can click on the city value and run an immediate search. The search will run as if they had selected that city in the profile search screen.
- The Searchable option determines if visitors to your directory can search the directory by this field. In common directory uses, almost every field is set to searchable. The more fields you set to searchable, the more power you provide to your visitors to find the information they need.
- The Results Column check-box determines if the field is displayed as a column in the list of results. For example, your directory may have a field for website, and if you set the website field to appear in the results column, it will appear in the results table. If you do not check the results column the field will still appear in the view mode for a record. In other words, checking Results Column? will allow the field to appear in the results column AND in detail view mode.
The image below shows the search mode for our membership directory.

Once you hit search you get this result set. Profile fields that have Results Column checked are shown in the listing.

Clicking the view link gives you more details about the constituent, showing all profile fields.

As we've seen, building a directory for your website can provide a valuable tool for your constituents.
Linking to your directory
You have several options to link to your directory:
- Drupal: link to the directory search page using this path: http://www.myorganization.org/civicrm/profile?reset=1&gid=N where N is the ID of the profile directory.
- If you add &force=1 to the above URL it will directly show a result set.
- If you add &force=1&search=0it will hide the search criteria and directly show the result set.
- Joomla!: use the Menu Manager to create a front-end menu item. After creating a new menu item, select CiviCRM and choose the profile search option. In the parameters pane, choose the specific profile to use.
- Wordpress: this feature is not yet implemented.
- You can also prepopulate any search criteria in the URL. These options are described here: http://wiki.civicrm.org/confluence/display/CRMDOC/Linking+Profiles
Updating multiple records at the same time
You can Update multiple memberships from the results of a Find memberships search or from the advanced search results when Display results as is set to Memberships. You will need a profile that contains only membership fields.
Similarly you need contact, contribution, activity or participant search results and profiles containing only contact, only contribution, only activity or only participant fields to update multiple contacts, multiple contributions, muliple activities or multiple participants respectively.
You can update up to 100 records at one time using the Update multiple ... functions.
Example:
You have a custom contact field called "Diving Skill Level" and you have just run a Intermediate Diving course. You want to set the "Diving Skill level" to "Intermediate" for all people who attended the course.
Go to the Advanced Search screen and set the appropriate filters in the Event accordion. Leave Display Results As set to Contacts as you want to update a contact custom field. CLick on Search.
You will go to the "Update multiple contacts" screen.
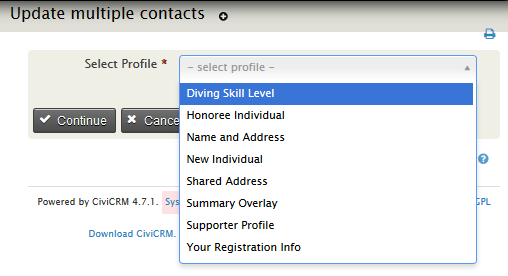
From the drop-down list, choose the Profile you want to use and click Continue.
The next screen will contain a grid. Each row shows the contact's name and the fields in your profile. You should update the field values for each contact as needed.
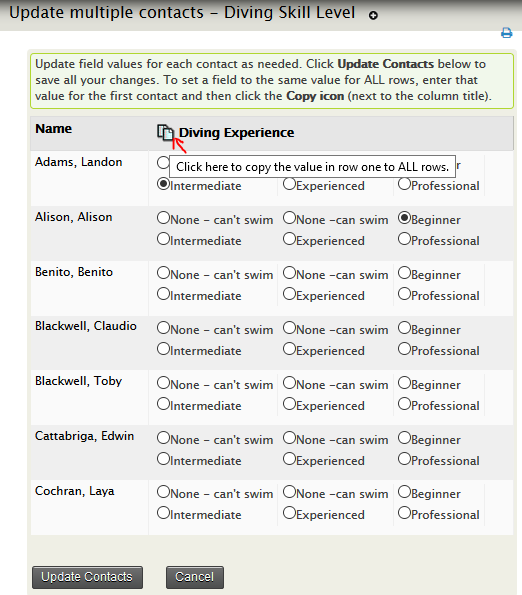
To set a field to the same value for all rows, enter that value for the first contact and then click the Copy icon (the image of two documents that is next to each column title). The value will automatically be copied into all the records displayed.
Click Update Contacts to save all your changes or Cancel to cancel the changes.
Batch update limitations
- You cannot perform batch updates for different types of contacts (say, individuals and organisations) at the same time.
- If you wish to update participant fields, you must do the update from a Find Participants search (and only include participant fields in your profile).
- You can perform a batch update for up to 100 records at a time. If you find that updating a batch of 100 records is taking a long time, it may be quicker to update 4 batches of 25 records rather than one batch of 100 records.
View/edit user account /new user registration with Profiles
For websites that have logged-in users, you may want to allow people to provide additional information as they register for an account on your website. Similarly, when people fill out a profile form you may want to encourage (or force) them to sign up for a user account.
To include a profile form during the user registration process:
- Create a profile that is used for User Registration:
 2. Add the fields you want people to fill out as they register, using the same process described above. Make sure the field visibility is set to Public User Pages.
Including profiles in Drupal's My Account screen
You can embed one or more CiviCRM profiles directly into Drupal's My Account screen. This makes it easy for logged-in users to review and update their information whenever they visit their My Account page.
To create a profile for this purpose:
- Create a new profile, or navigate to an existing profile and click Settings.
- Select View/Edit User Account in Used For.
- Click Save.
- Add the fields you want people to be able to edit from their Drupal My Account page.
Note: the profile must include only fields related to the Individual contact type.
New account creation during profile sign-up
If you want your constituents to create a Drupal or Joomla! account when filling out a profile, you can enable this with the "User account registration option" under Customize Data and Screens > Profiles click Settings against a profile. Anonymous (not-logged-in) users will then be invited (or required) to create an account when they visit the profile. Logged-in users will just see the profile fields.

You must include a Primary Email Address field in the profile for this feature to function properly. This feature also works when the profile is embedded in an online contribution page or event registration page. Hence you can invite or force anonymous visitors to sign-up for an account when they register for an event.
Including Profiles in forms in CiviCRM components
Often you will want to define certain fields for inclusion in event registration and contribution pages. The only significant difference is that you can include fields in your profile that are specific to participant records (for event registration forms) and contributions (for contribution pages). Read about including Profiles in contribution pages, event registration pages, and membership sign-up pages in the Set-up chapter of Contributions, Events, and Memberships.
Other sources of information about Profiles
Read more about Profiles in the following chapters:
- In the Customizing the user interface chapter of Intitial Set-up
- In the Set-up chapter of Email
- In the Set-up chapter of Contributions
- In the Set-up chapter of Events
- In the Set-up chapter of Memberships
Alternatives to Profiles
As you have seen, profiles can be put to a lot of different uses. It is worth bearing in mind that there are alternative approaches for many of these use cases. The alternatives available to you depend on the CMS that you are using and your skill set, and have advantages and disadvantages We've listed a few of the common ones below for you to investigate.
Drupal specific alternatives
- The Drupal Views module can be used to make sophisticated displays of CiviCRM data. For example you might want to display a list of members on your public website using Views.
- Drupal Webform-Integration is the most powerful form-builder for CiviCRM and includes many features missing from profiles, such as the ability to work with multiple contacts, events, memberships, and relationships, and offers greater flexibility in how forms are displayed, offering pagination, draft-saving, advanced spam-control, and conditional fields. For more information see the Drupal Integration chapter or the Webform CiviCRM Integration page.
- You can add fields directly to Drupal user accounts without using an embedded profile. These fields won't be available in CiviCRM but they will be more available in Drupal, so depending on why you are collecting this information, that may be appropriate for you.
The API
With some basic coding skills (which if you are keen and reasonably technically minded you might be able to pick up in a day or so) you could use the API to flexibly display data on your website. See the Developer Documentation wiki for an introduction to using the API.