Creating new forms
CiviCRM ships with an extension that allows you to create your own forms.
The extension is called FormBuilder (also known as Afform) and can be enabled on the extensions page if not already installed.

Once enabled, a FormBuilder link will appear in the menu under Administer > Customize Data and Screens.
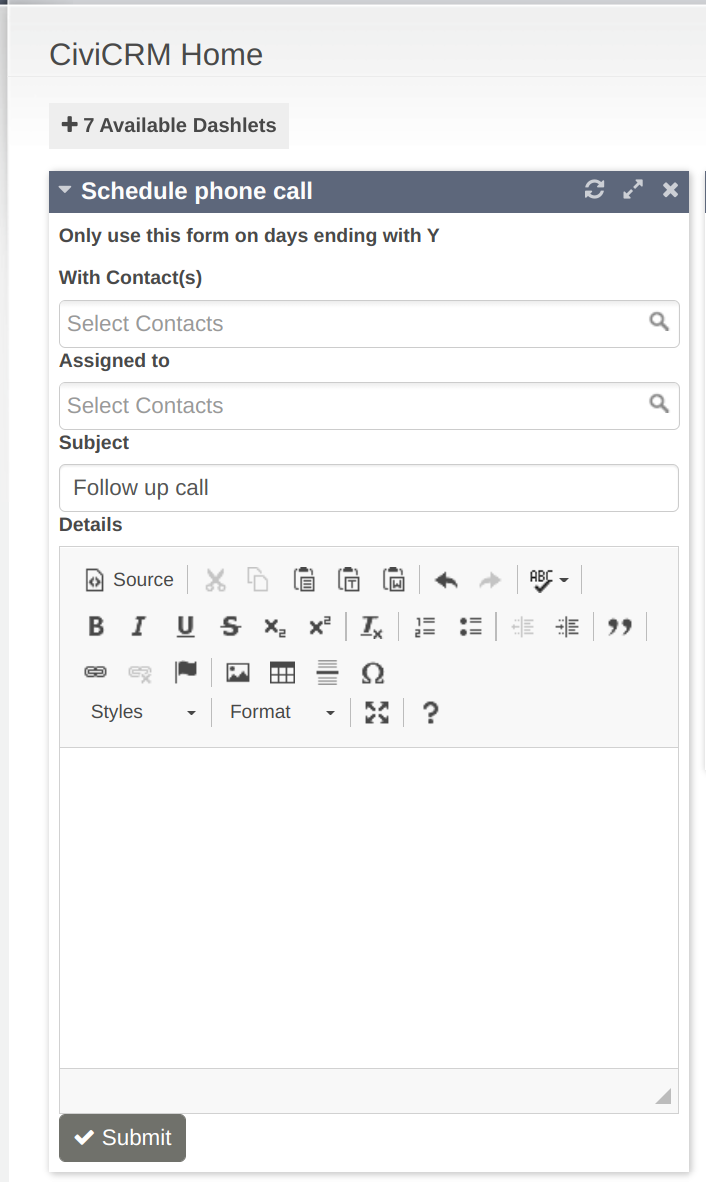
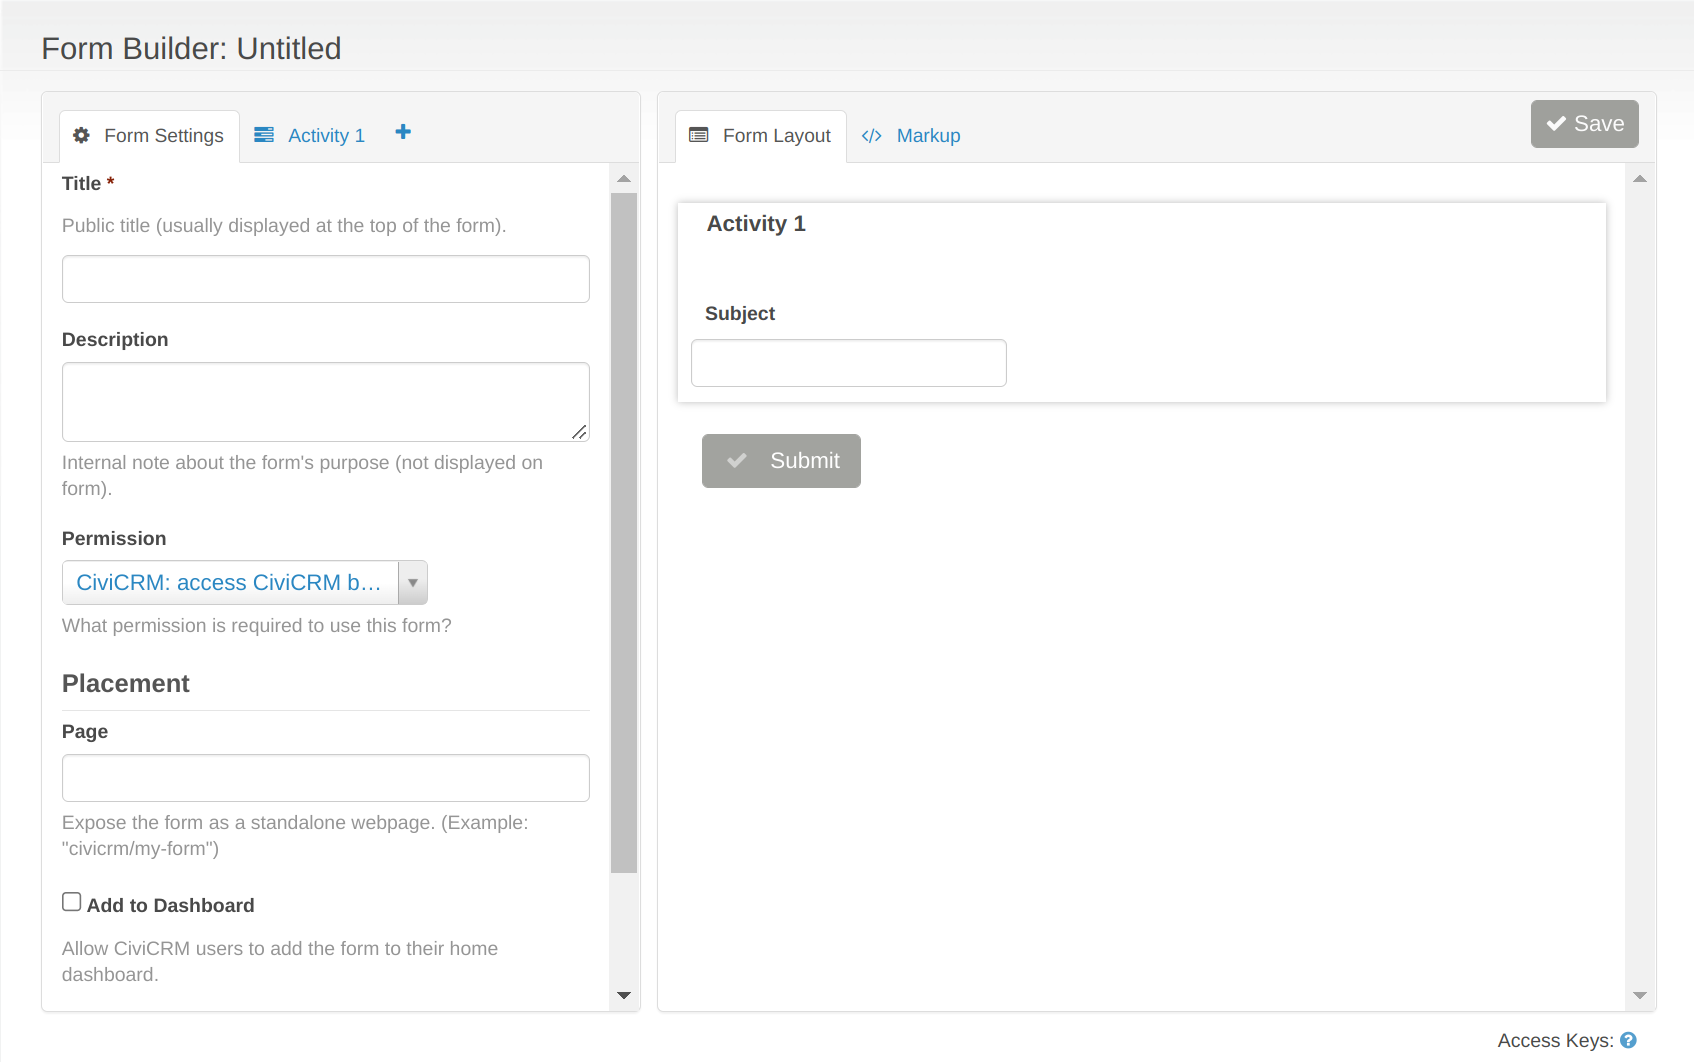
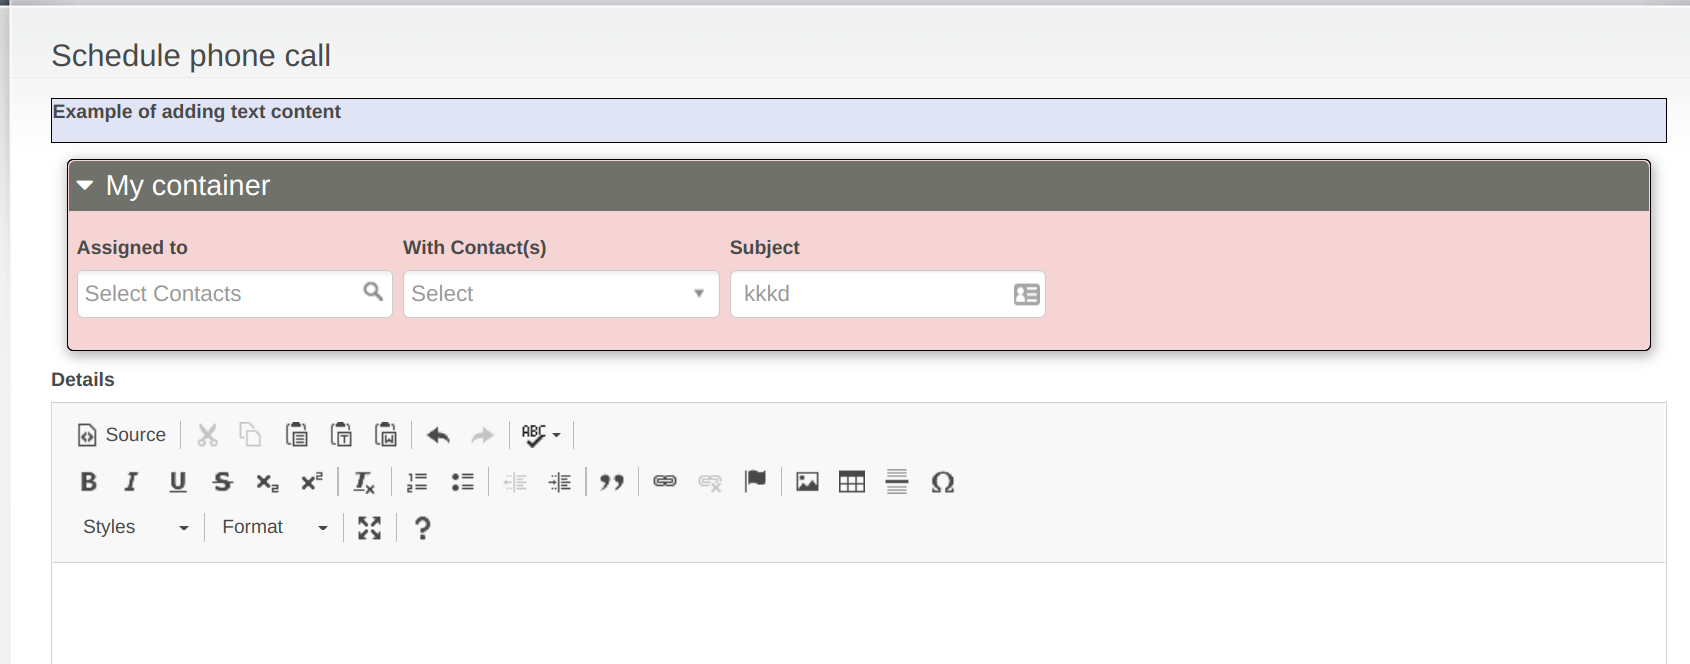
FormBuilder is excellent for when only a few fields are needed, such as in the image below that depicts an embedded form on a main dashboard that quickly creates and assigns activities of a particular type (i.e. schedule a phone call). The user only needs to enter the contacts involved, but has the option to add a subject and details.
Form types
Submission Form
Submission forms are used to build interactive forms for data entry. They can be used to create a new Activity, Contact, and other enabled entities.
Create the form
- Navigate to the FormBuilder UI by selecting Administer > Customize Data and Screens > FormBuilder.
- Click the downward-pointing arrow to the right of New Submission Form to reveal the list of entity-related forms available.
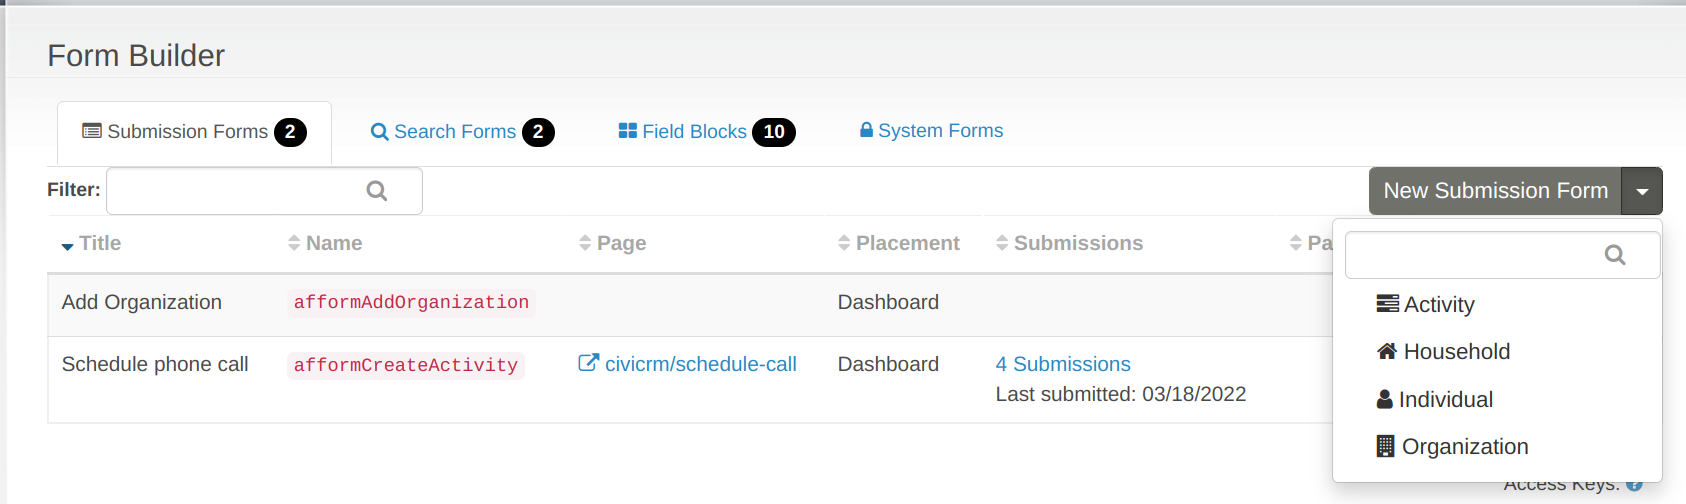
- Selecting one of these items navigates to the FormBuilder editor page.
Note
Currently, Activity, Contact, and some other entity-related forms are offered; however, it is anticipated that more entities will be added soon (they can also be added programmatically).
Search Forms
Search forms are used to build interfaces for searching through entity results from a SearchKit saved search.
Create the form
A SearchKit saved search is required to create a Search Form. The form can be created directly from the SearchKit interface or from the FormBuilder interface.
From the SearchKit table
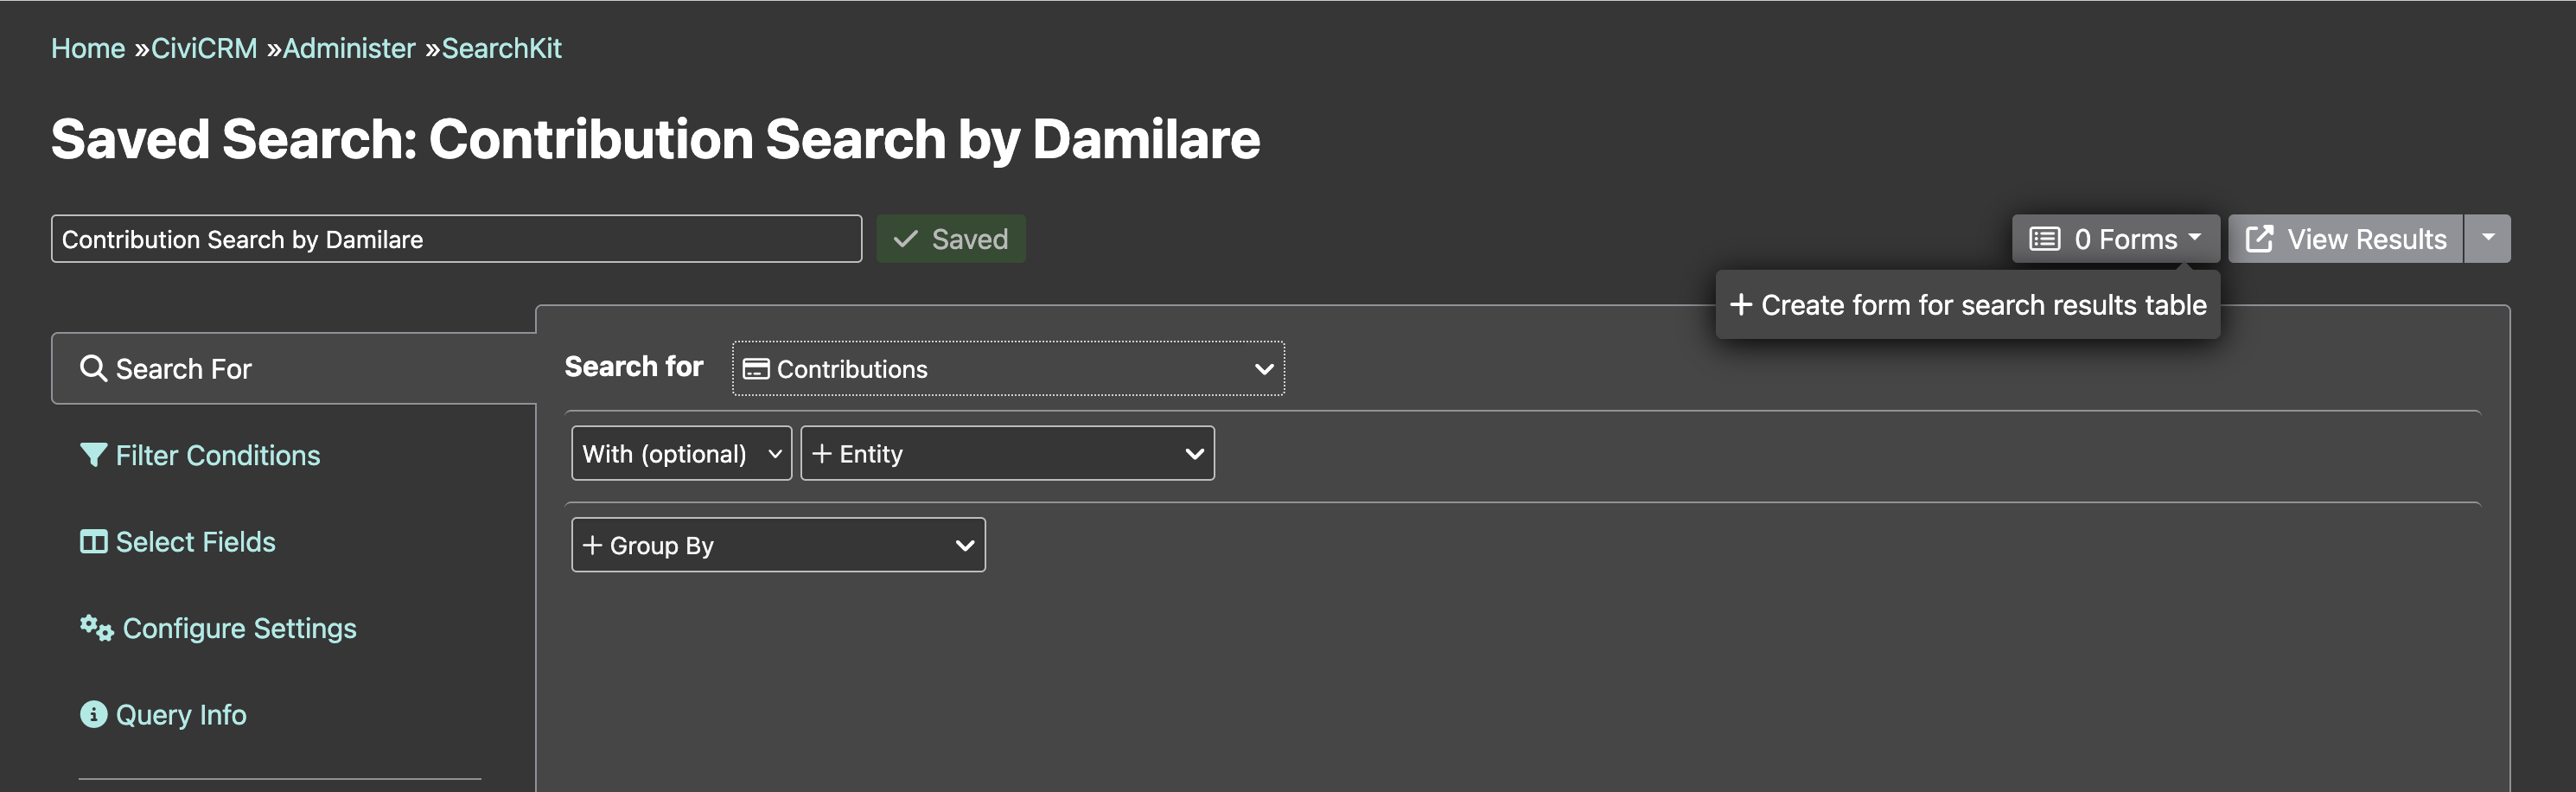
- Create a SearchKit entity table or reuse an existing SearchKit table.
- After creating the search, enter an appropriate name for it and click Save.
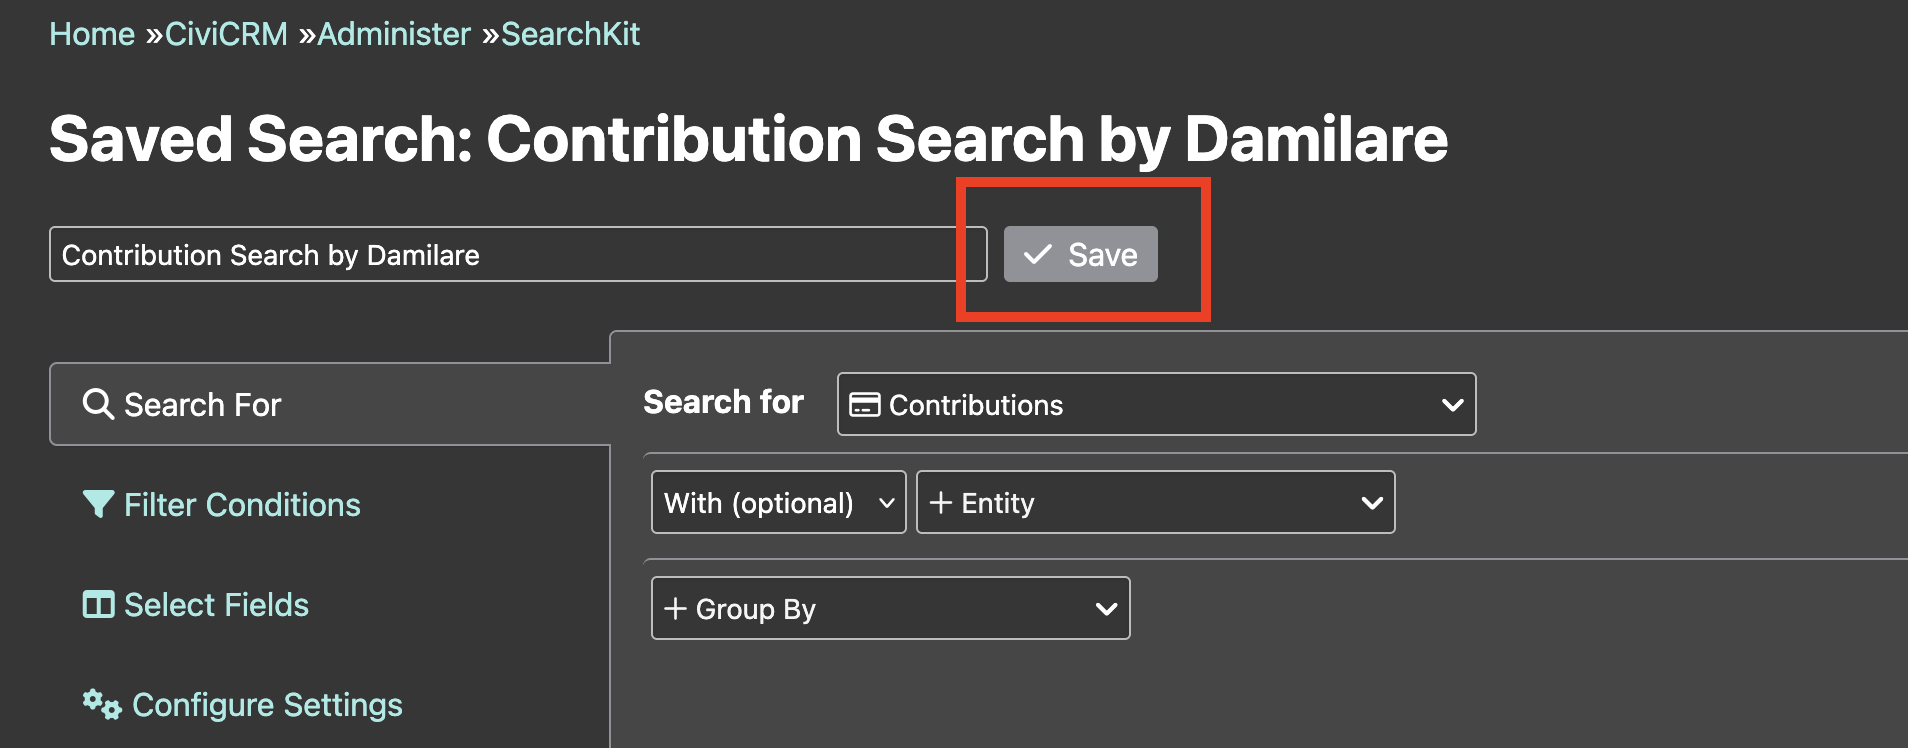
- On successful save, two buttons will be displayed on the right side: Forms and View Results.
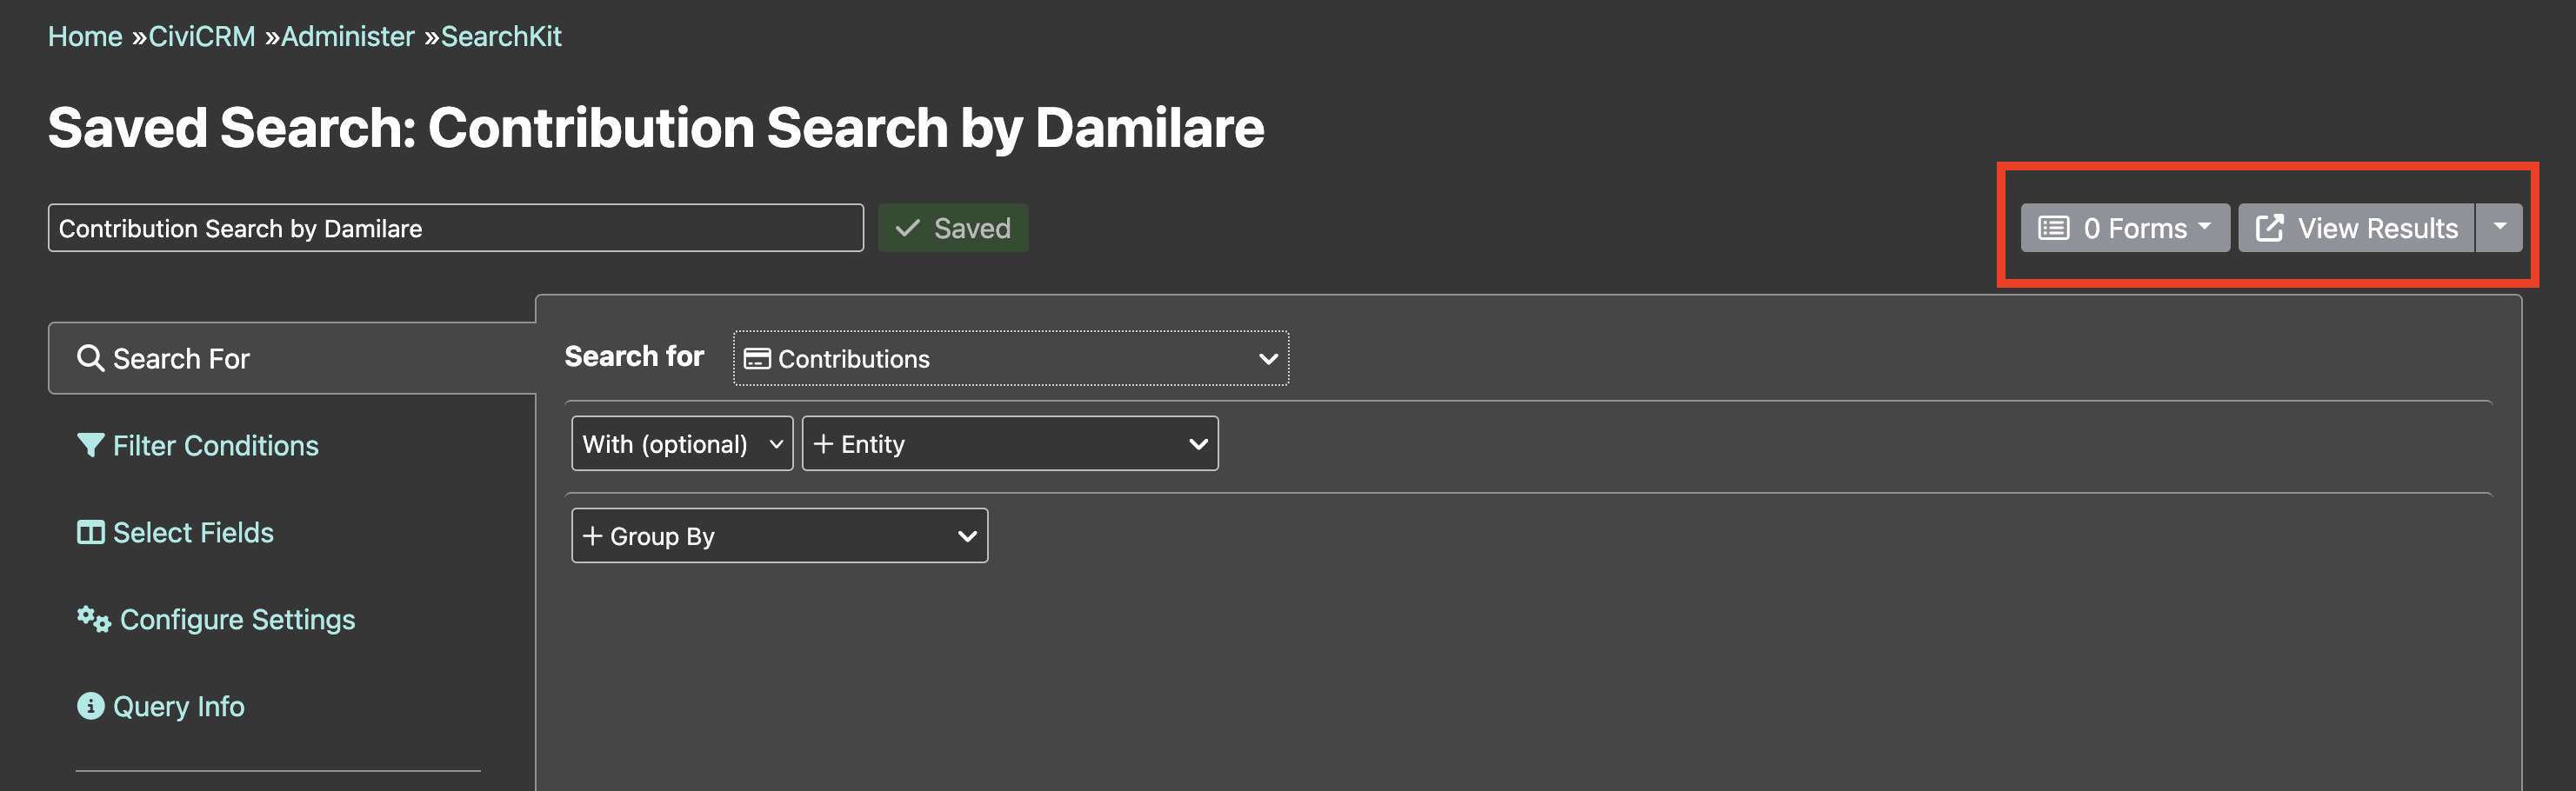
- Clicking Forms shows a list of existing FormBuilder forms and a button to create a new form using the saved search. Clicking that button navigates to the FormBuilder editor page.
From the Formbuilder UI
Search forms can also be created using existing SearchKit entity tables. The steps for this are as follows:
1. Navigate to the FormBuilder UI by selecting Administer > Customize Data and Screens > FormBuilder.
2. On the FormBuilder UI, click on the Search Forms tab to see the list of existing Search Forms and to create a new one. 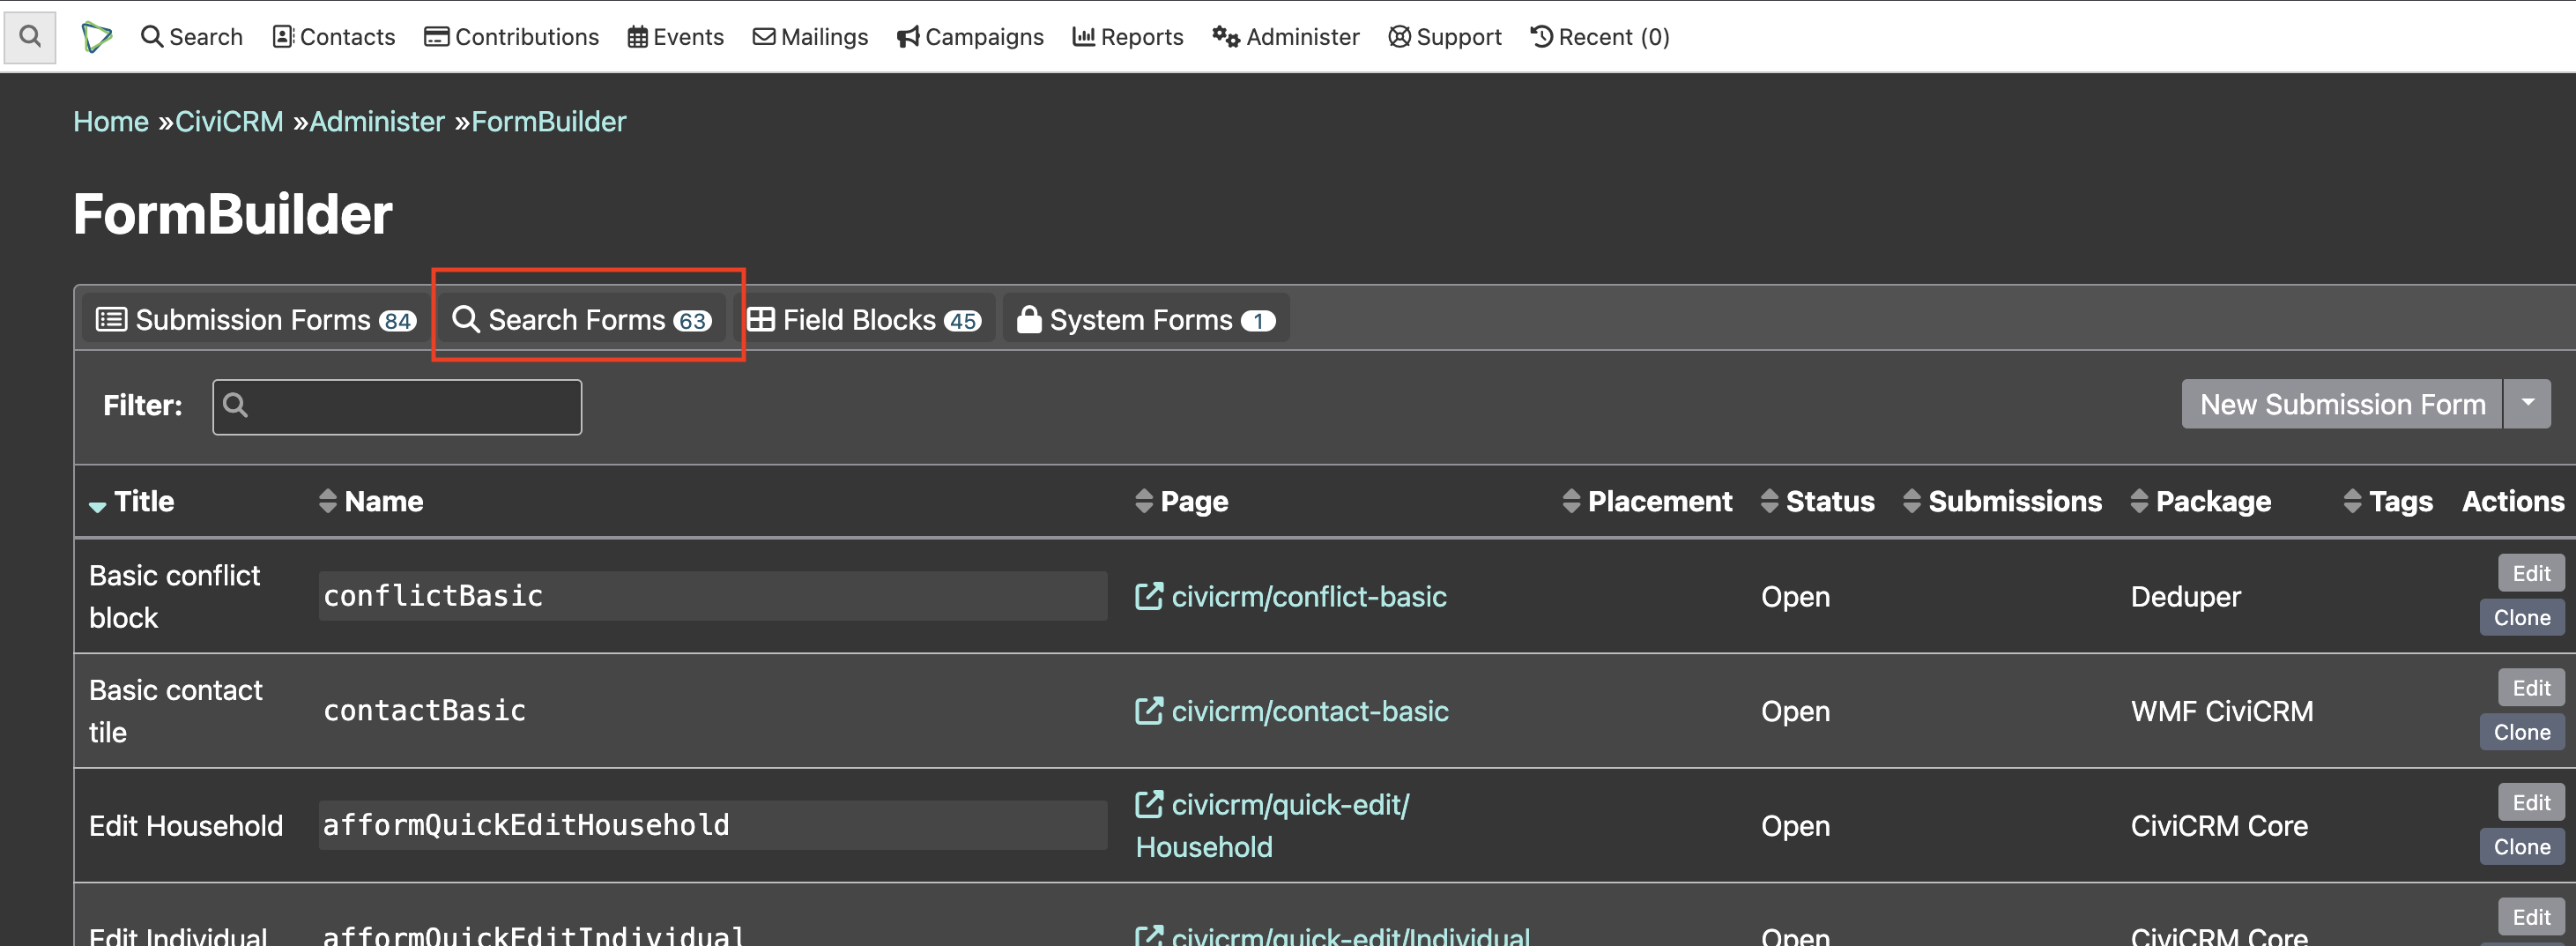 3. Clicking the New Search button shows a dropdown of existing SearchKit saved searches.
 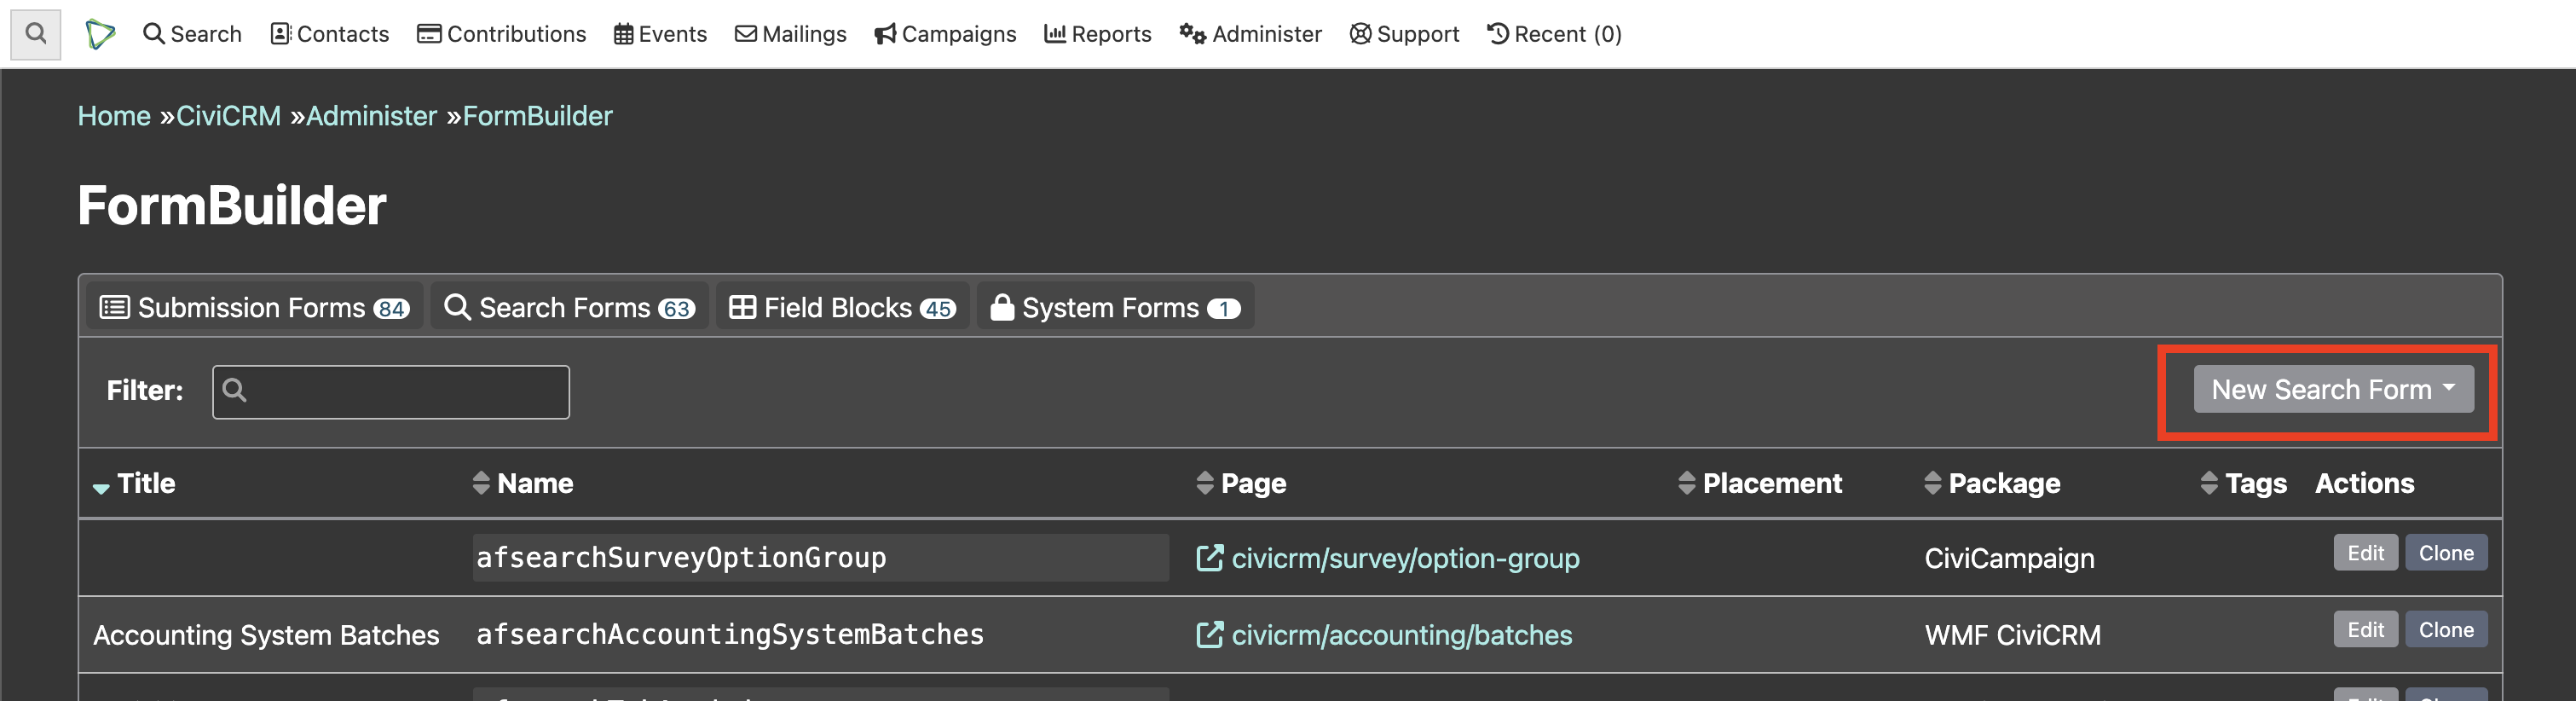 4. Selecting the desired search will navigate to the FormBuilder editor page.
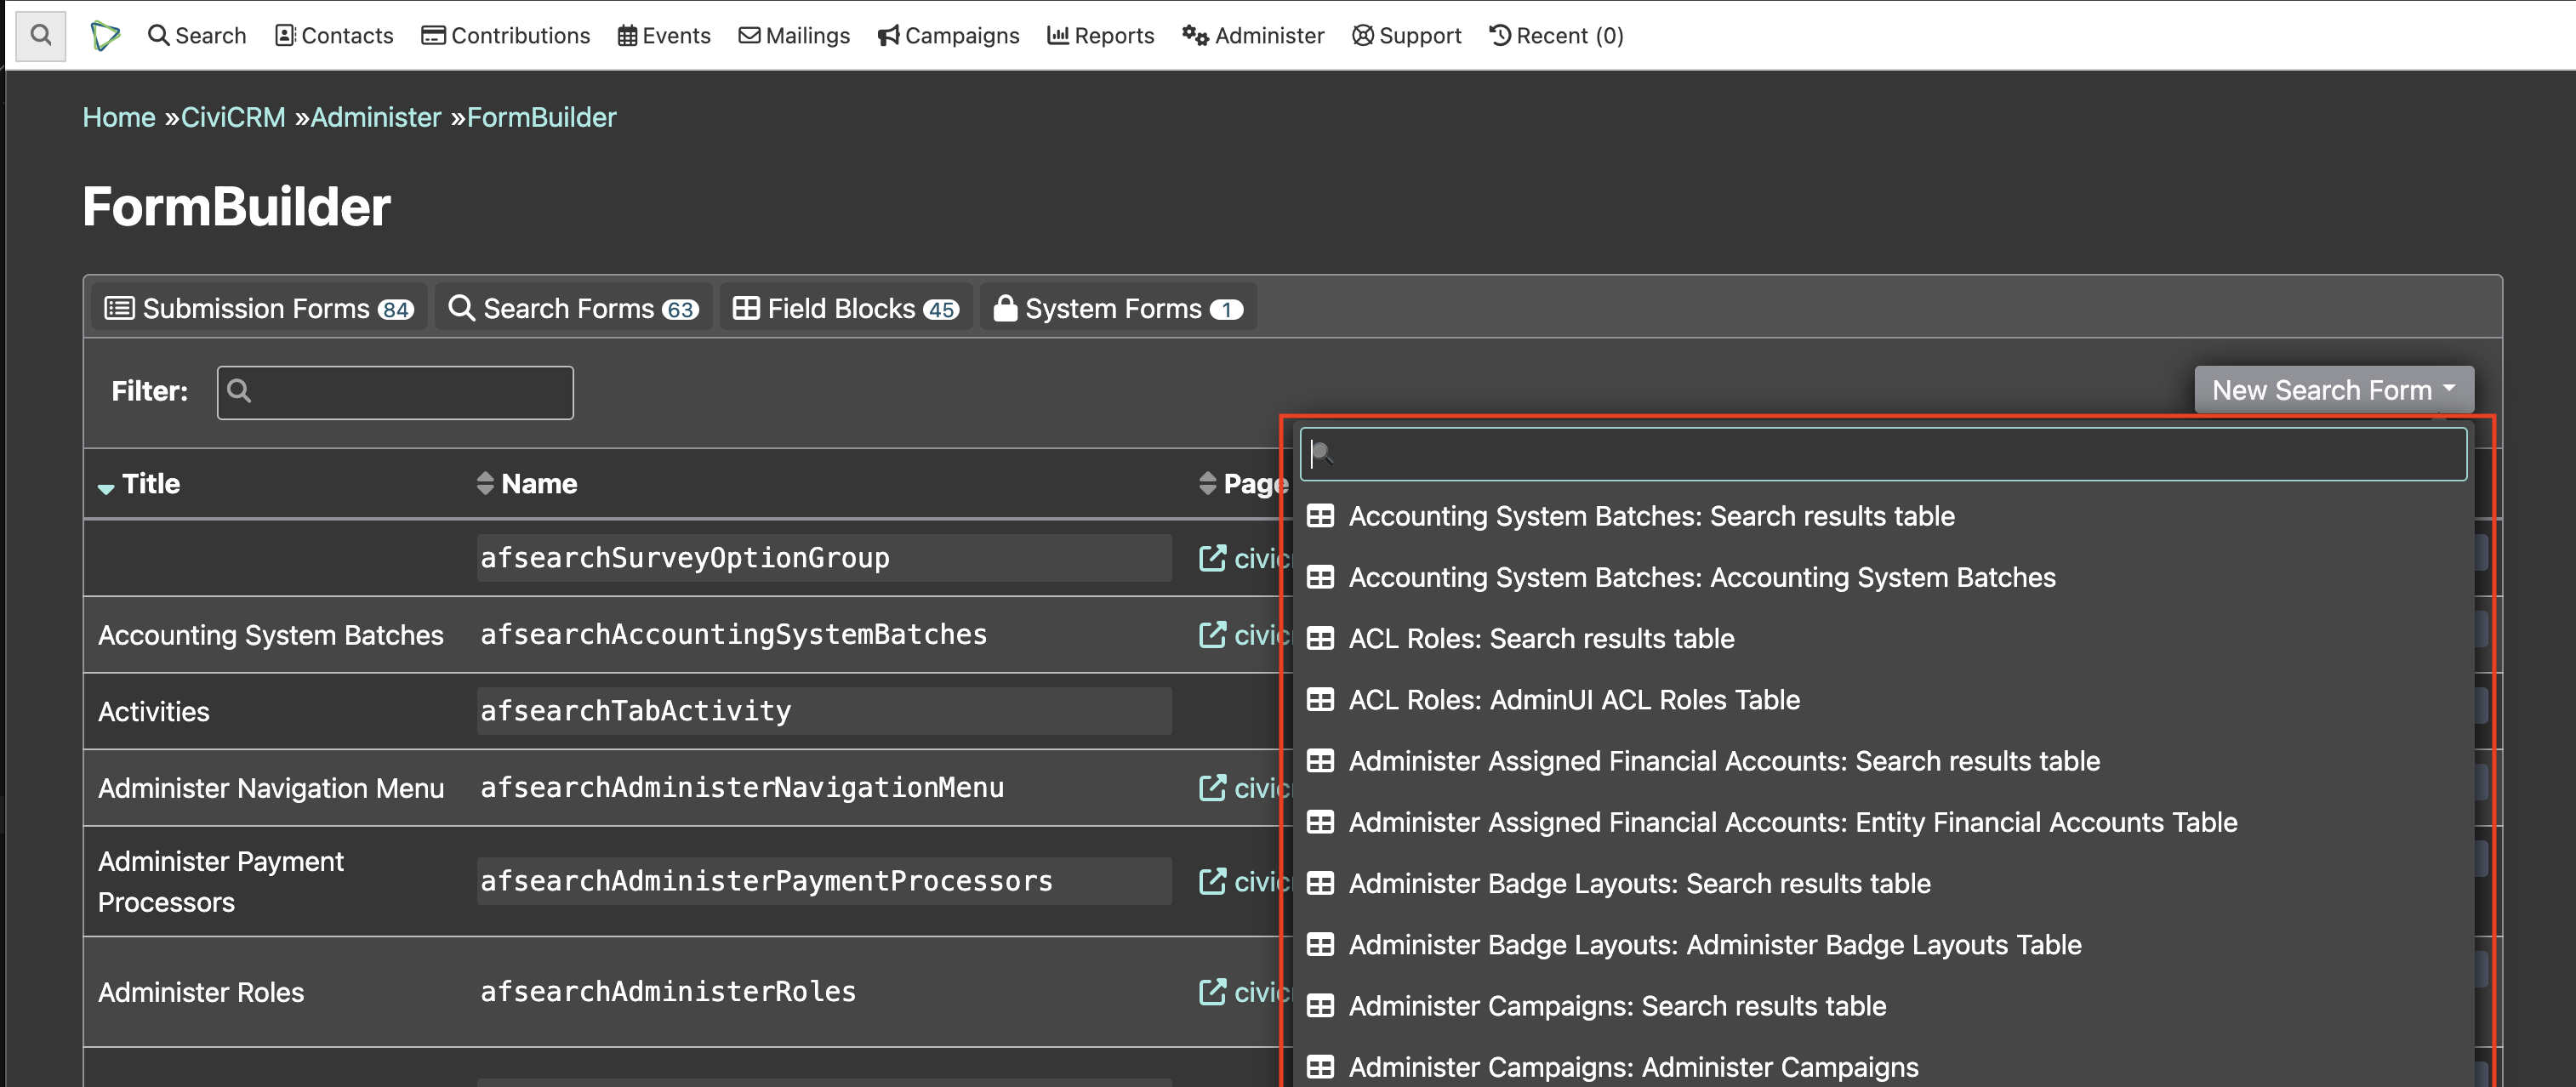
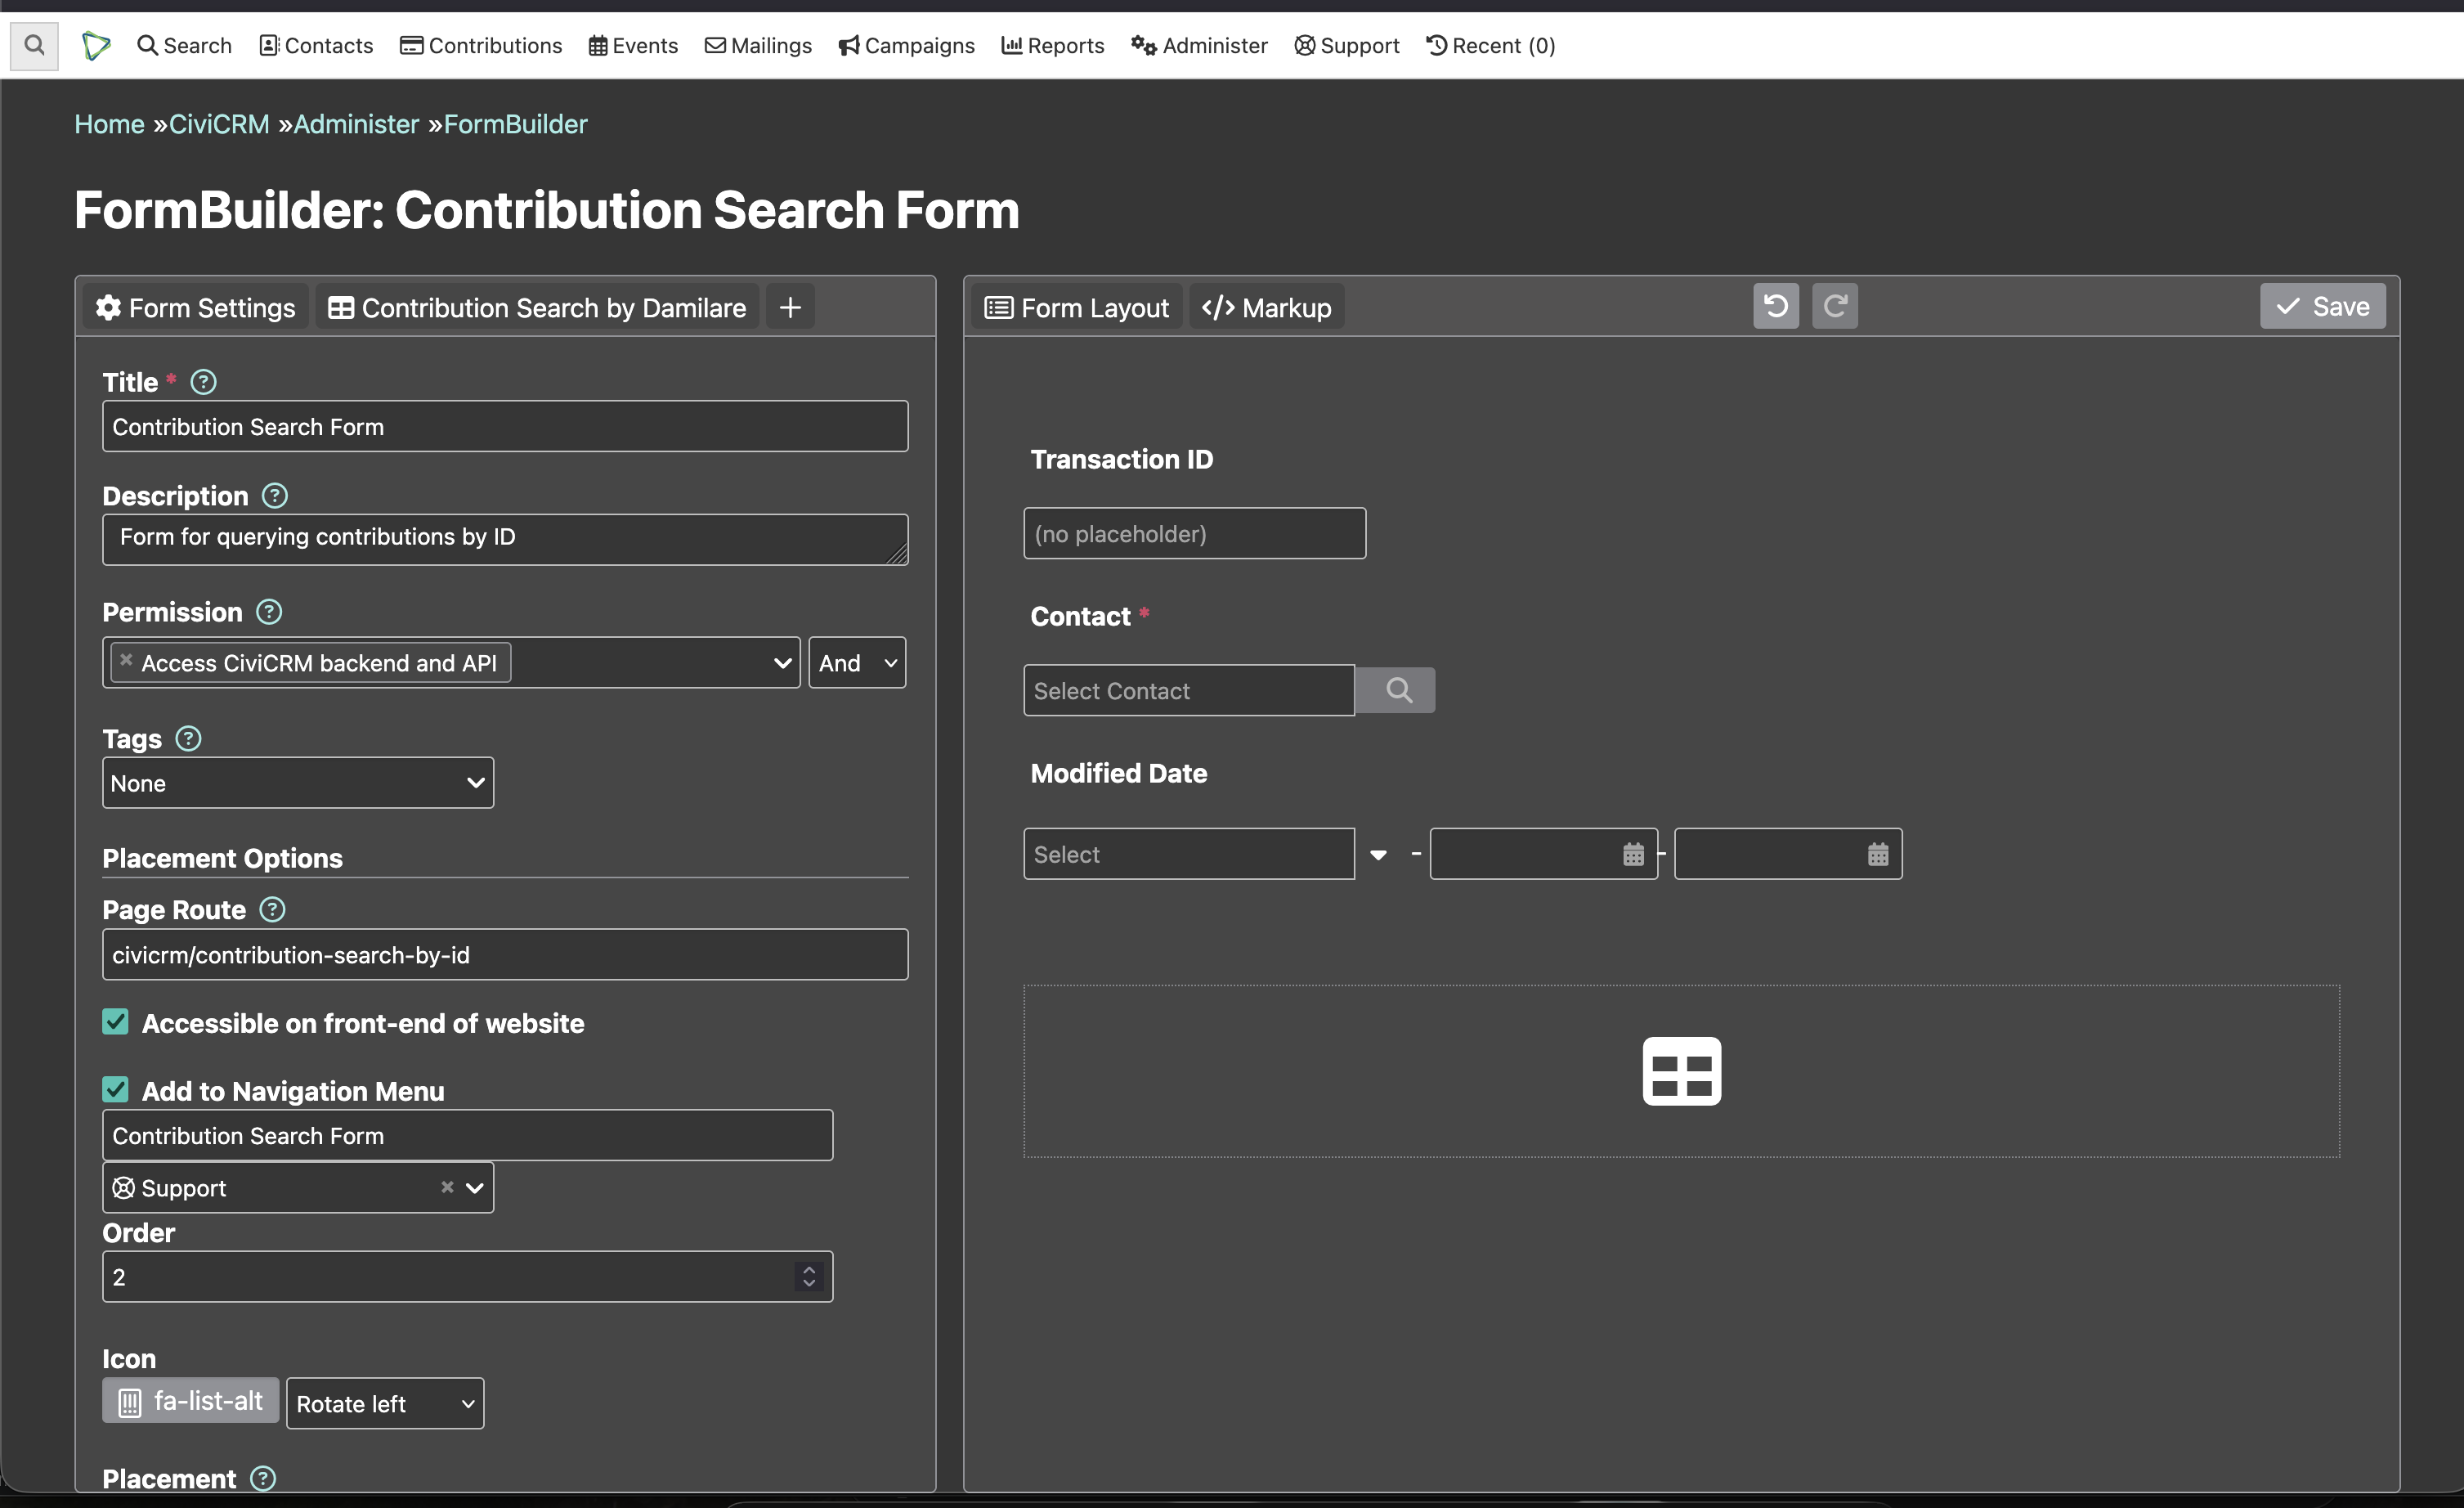
Configure the form settings
Both the Search and Submission forms have similar configuration screens. The form configuration screen can be broadly grouped into two parts:
- a configuration pane (left) that contains:
- the title (required and visible on the form)
- the description (highly recommended for clarity)
- the permission required to access the form
- the url at which the form will be found (must start with
civicrm/) - a checkbox as to whether the form should be accessible from the website front end
- a checkbox to add the form to the navigation menu
- a select "Expose to" where you can make the form available to the Contact Layout editor, to the dashlets interface or to be accessed via tokens
- options to log form submissions (for Submission forms)
- a layout pane (right) that contains:
- a display of what the form looks like
- settings icons on the fields
- tabs to switch between the Form Layout and read-only auto-generated Markup
- options as to the form's security
- auto-fill options
Submission Form configuration UI
Search Form configuration UI
Form Builder Settings (Recommendation)
These recommendations for options to configure on a form for page-level auth on 5.79 were originally published here:
On the form tab:
- Form Settings: Permission: Use exactly one of these generic permissions
- "Generic: Allow any authenticated contact" (if you allow email-link and/or logged-in users)
- "Generic: Anyone with secret link" (if the email-link is the only way to get in)
- "Generic: Allow all users (including anonymous)" (if you allow anon and/or logged-in and/or email-links)
- (Do not require any other permissions.)
- Form Settings: Placement: Page Route: Yes, fill in a value (civicrm/my-path)
- Form Settings: Placement: Accessible on front-end: Enable
- Form Settings: Placement: Expose To: Message Tokens
and for the Individual tab on the form (Submission form - Individual):
- Individual 1: Security: Form-Based
- Individual 1: Autofill: Current User
- Individual 1: Allowed Actions: Must enable "Update". In some cases, "Create" may also makes sense.
- Individual 1: Accept ID from URL: Disable (not strictly forbidden/tested -- but just doesn't make sense with any "Form-based" security. It's a feature for RBAC use-cases.)
Build the form
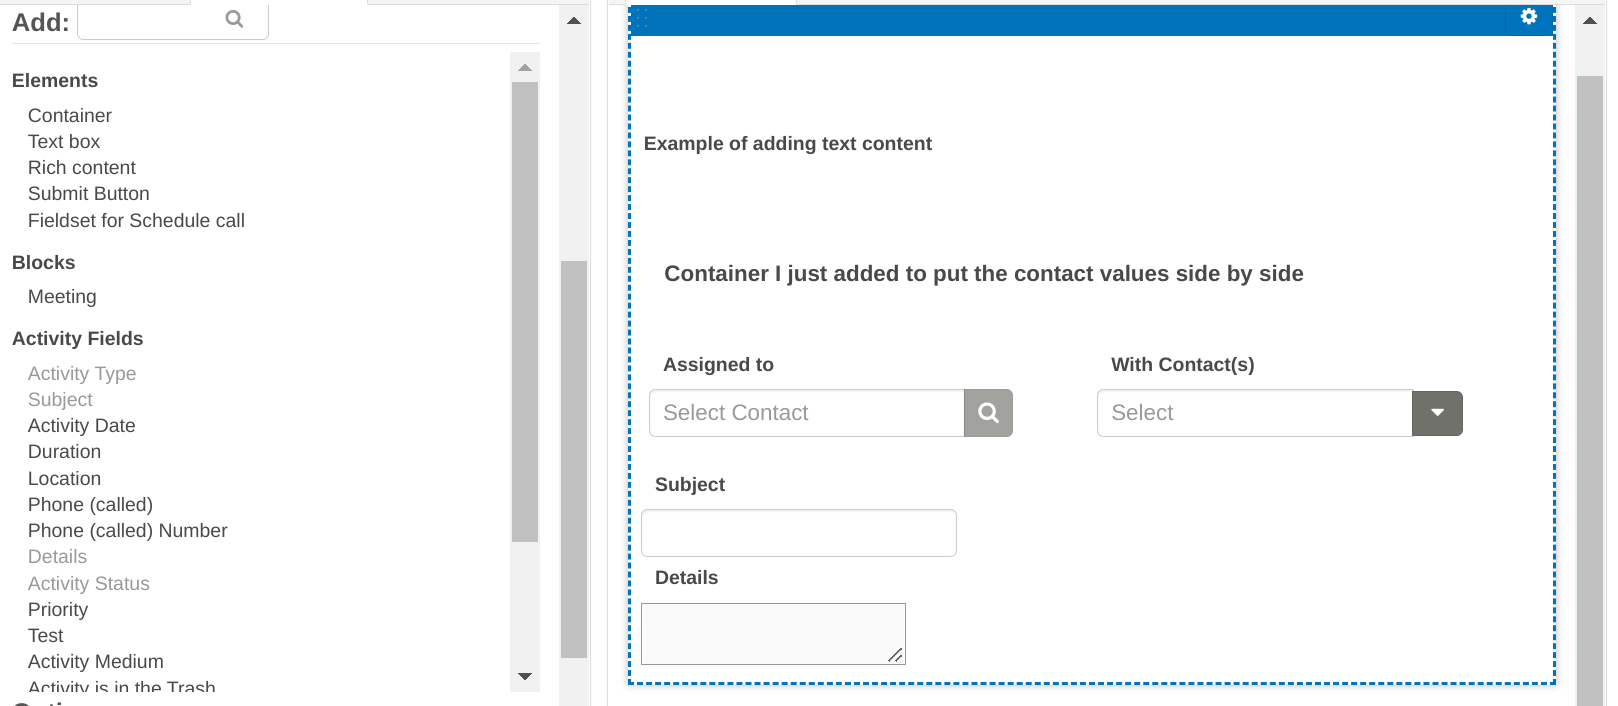
On the left configuration pane, there are two tabs. The second tab displays the content that can be added to the form, based on which contact type or activity was chosen. Drag and drop the desired fields into the layout pane on the right, where they can be ordered and customized.

Under the Elements section, there are some formatting options that allow blocks of text, other html, and/or containers to group fields to be added.
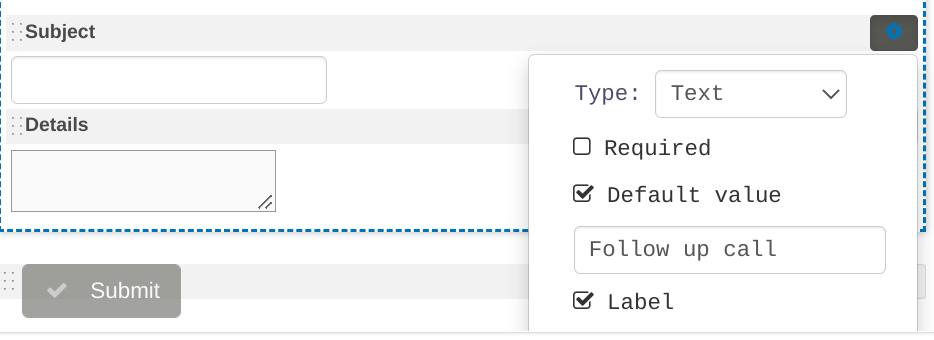
To the right of each field on the layout pane is a settings widget. This widget has options to: - change the widget for data entry (for example, if you choose RichTextEditor then a full WYSIWIG input widget will show up) - specify if the field is required - add a default value - specify if the label is shown - add any pre or post help text
Click on the layout elements to: - rename the label - add placeholder text that will show in text boxes.
The html elements also have options:
To customize the look and overall layout of the form:
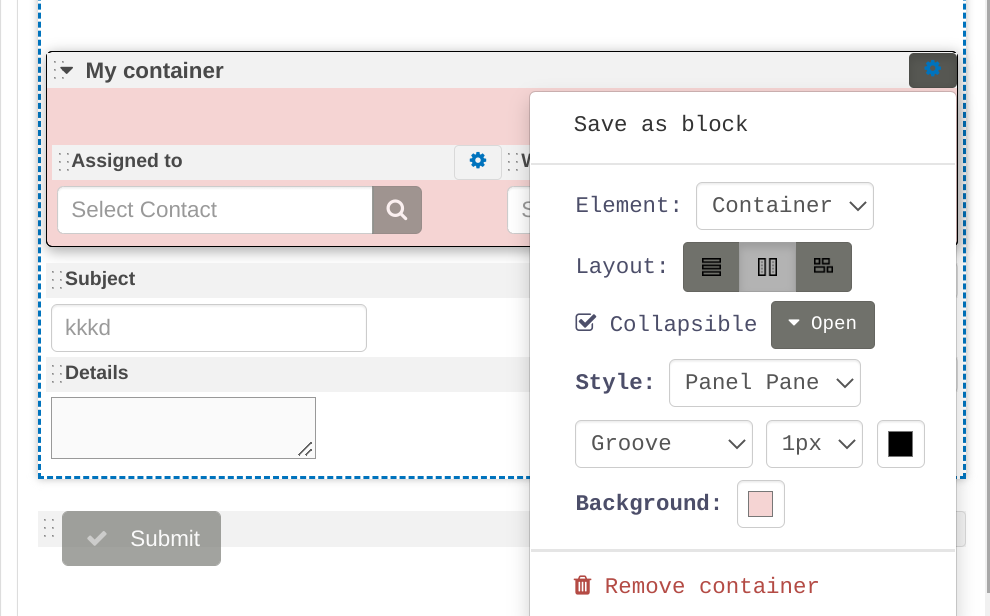
Containers can also be saved as blocks, which can then be used on other forms as well. For example, a grouping of customized fields that are reused could be saved as a block and applied to multiple activity forms. Then, if that grouping of fields needs to be changed, the block would only have to be changed once instead of on each individual form.
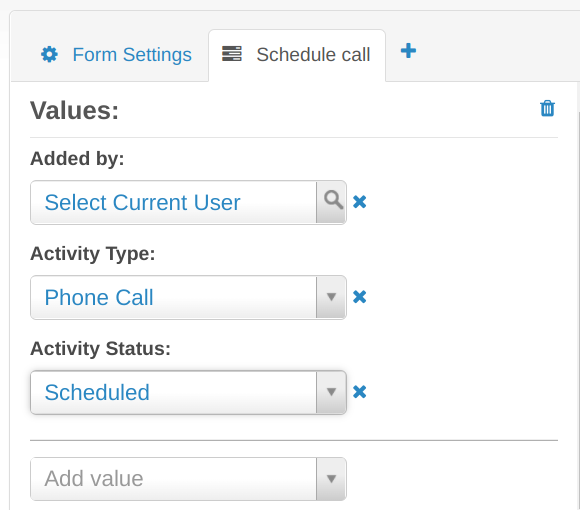
And on the topic of reusable values, the Values section at the top of the left pane includes the option to pre-set data on the form. Continuing with the example from this section, the image below shows the renamed tab,'Schedule call', and three pre-set values. Having pre-set values can be useful if information, such as the Added by or Activity Status fields, should be consistent across the form's submissions.
URL filters in search forms
For search forms with pages you can make them get filter values from a special part of the URL. This means you can link to filtered views of the search form, e.g. from another search form (by using tokens in the Link URL field.)
When looking at the left-side panel with a search display tab selected while editing a form, there's an option called Filters. Select a field, e.g. Hair color, then select URL and then type a codename, e.g. haircolor. If the field you want is missing, it's because that field has not been added to the Search, so jump back and do that first.
To use this feature, the URL can be constructed like this:
https://your.example.org/civicrm/path/to/your/searchformpage/#?haircolor=brown i.e. appending #?haircolor=brown. If you had multiple such filters, you would add subsequent ones like #?haircolor=brown&hairlength=short.
When the field has a : in it that indicates that the field is a 'pseudoconstant'. The underlying database value is generally a number which maps to a name and label. In this case the database field payment_instrument_id is a number. In some cases we know the number instead, in which case we could use payment_instrument_id=1 in our URL or payment_instrument_id:name=Cash. As well as being more readable and discoverable, this variant is more useful for implementers who work with multiple sites, since the actual ID numbers will likely change between sites, but the name is fixed.
You can get the exact field name needed by adding the filter on the form setup.
If the field is already filtered (e.g receive date before this week) then the URL filter will further narrow down the results rather than replace the existing filter.
The following formats are acceptable for dates:
receive_date=2021-09-23receive_date=20210923receive_date=20210923234040(i.e. time is 23:40:40)receive_date=this.month(See the list)
You can also filter with the same value on one of a set of multiple fields by adding a hidden field to your form, adding additional fields with Combine multiple fields and then copying the resulting field name from the Markup tab to use in your url.
For example, if you want to filter on both first name and last name, you could add the first name field to your form, make it a hidden field, and then use Combine multiple fields to add the last name field to that field. Now you can filter on both fields at once by appending #/?first_name,last_name=foo to your form URL.
URL parameters to set defaults in submission forms
The method described for setting values for filters in a search form can also be used to set values for other fields in form that will be submitted. So if a form for a hair styling salon had fields for email, first name, last name, hair color and hair length, adding #?haircolor=brown&hairlength=short to the URL of the form will cause the haircolor field to be defaulted to brown and the hairlength field to be defaulted to short when the form is rendered. The user could modify these values before submission.
This method also works if the default is being specified in the URL for a field not shown to the user. The field must be added to the form for it to be processed, but its type can be set to "hidden". One use case for this is to allow a single input form to be reused in different contexts. For example, a signup form could be used at different events, with the URL key-value pair indicating which in person event the signup is from. Different QR codes incorporating different key-value pairs like #?event=May1Rally could be used at each event.
Setting up forms to work with 'secret links' (similar to the use of checksums for other CiviCRM forms)
CiviCRM has long offered a solution for sending out emails from CiviCRM which contain the Contact ID and a unique checksum so that users can arrive at forms as if logged in, and hence with the ability to see pre-filled data on that form (read more about Checksum Tokens here).
Form Builder does not support checksum tokens, but you can achieve the same results with 'secret links.' There are a number of Form and Individual settings that need to be set for secret links to work, and there is a different method for generating the link.
Generating the link
With Checksum Tokens, there is a generic token that can be added to any link. With Form Builder, each form has its own link. When browsing the list of tokens, look for the "Form" section for the name of your form. You can either choose the "Full Hyperlink" version (if you want a fully formatted link that can be placed into your email message) or just the URL version if you want to configure a button with the link.