Everyday Tasks
This chapter provides instructions on how to do some of the common tasks using CiviEngage.
Conducting a door-knock canvass
CiviEngage allows you to easily print walk lists for your volunteers or staff who are doing door-knocking activities and want to conduct a survey at the door.
Door-knocking canvass activities may be one strategic activity that's part of a larger campaign, so you may want to set up a Campaign if you haven't done so already. To learn more about working with campaigns and surveys, refer to the Campaign and Survey chapters respectively. You will also want to review the previous Set-up section in this chapter to learn more about configuring custom data sets and profiles to be used in your Walklist survey.
Create the campaign and survey for the walk list
- Create a new group of contacts that you will be targeting during your door-knock canvass. You may do this by searching for contacts who live in a particular geographic area or district (to learn about working with groups, see the section on Tags and Groups).
- To create a new Campaign (if you haven't already) go to Campaigns > New Campaign. Refer to the Campaign chapter for detailed instructions on how to create a Campaign and add the group of contacts you created.
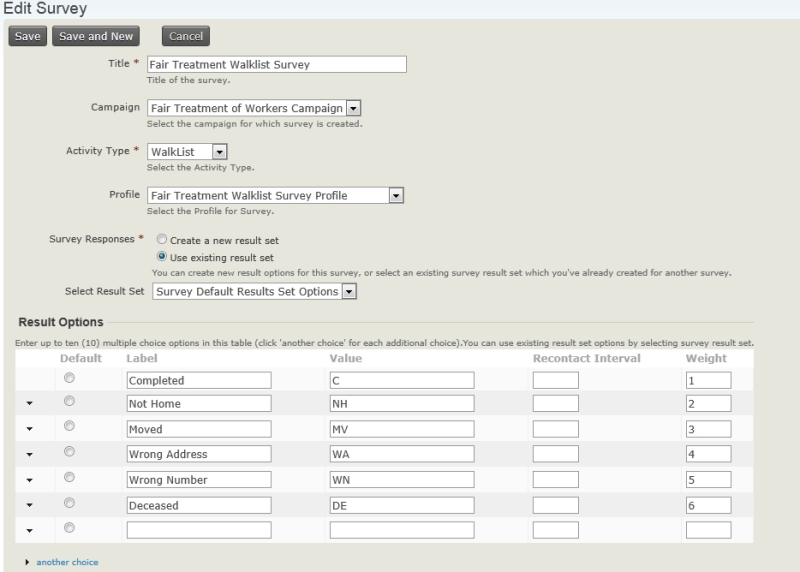
- Go to Campaigns > New Survey; give the survey a title and select the appropriate Campaign that it is part of.
- From the Activity Type dropdown menu select WalkList.
- From the Profile dropdown menu select the custom Profile you created for use with this Walklist survey.
- For Survey Responses select Use existing result set and select Survey Default Results Set Options.
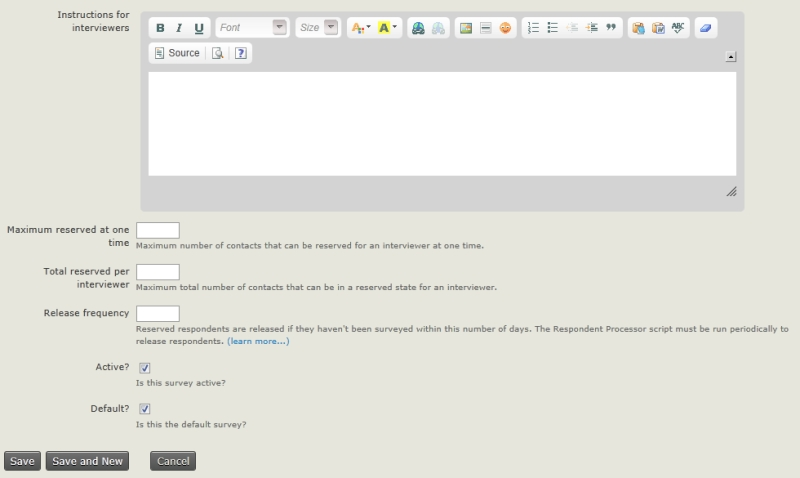
- Click Save.
Reserve the target group you want to survey
Next, you'll need to reserve the target group of contacts you will be surveying during the door-knock canvass:
- Go to Campaigns > Reserve Respondents and select the appropriate survey.
- Select your target group in Group(s), then click Search.
- On the Find Respondents to Reserve screen, select the contacts you want to survey.
- Click Go to Reserve Respondents.
- On the Reserve Respondents screen, click Reserve.
Create your WalkList report
- Go to Reports > Create Templates from Reports > Survey Report (Detail).
- In the Display Columns area, check the boxes for: Street Number, Street Name, Street Unit, Survey Responses.
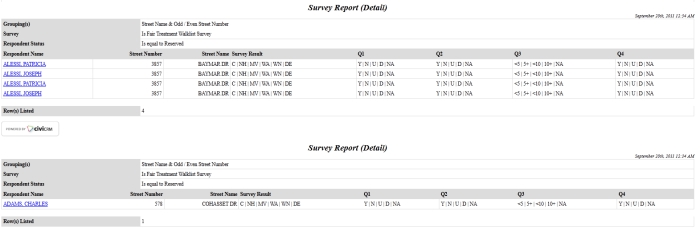
- In the Group By Columns area, check the boxes for: Street Name, Odd/Even Street Number.
- In the Set Filters area, select your survey name in Survey. For Respondent Status, select Is Equal to and Reserved from the dropdown menus.
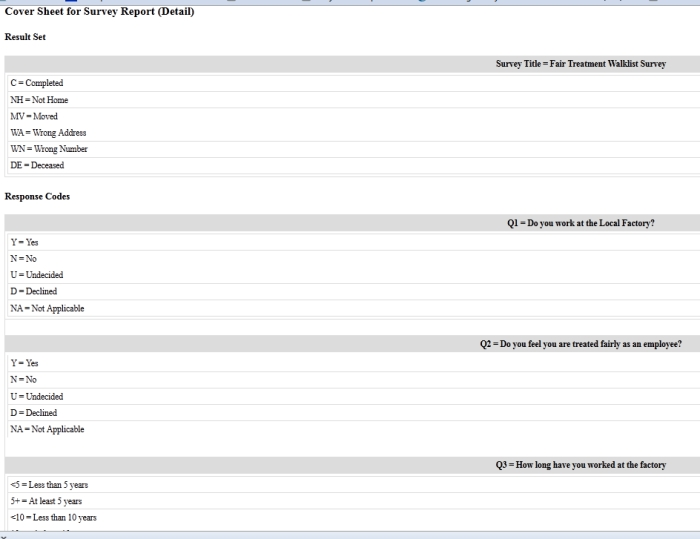
- Click Preview Report, then Print Preview.
- Print your report. You will see that the print out includes a cover sheet with the response codes and that the report is sorted by street name and odd and even street numbers.
Conduct your door-knock canvass
Your organisers and volunteers are now ready to go door-to-door and collect responses on their WalkList report sheets.
Recording responses from the canvass
At the end of each day or evening of canvassing, each organiser or volunteer can record the responses directly into CiviCRM.
- Go to Campaigns > Interview Respondents.
- Enter the name of your survey and the name of the target group you surveyed during the canvass. You may also enter the street name if you want to work with a smaller group of contacts to record responses.
- On the Find Respondents to Interview screen, select the contacts for whom you want to record responses.
- Click Go.
- Enter the responses and results according to your WalkList sheet responses, then click Record Response.
Reviewing Results of the Survey
At the end of the canvass, a program lead may want to review the results of the survey. Refer to the Reports and Analysis chapter to learn how to view this report.
Conducting a PhoneBank
CiviEngage allows you to easily to enter responses from constituents during a PhoneBank directly into CiviCRM.
Phone banking activities may be one strategic activity within a larger campaign, so you will want to set up the Campaign if you haven't done so already. To learn more about working with campaigns and surveys, refer to the Campaign and Survey chapters respectively. You will also want to review the previous Set-up section in this sectichapteron to learn more about configuring the custom data sets and profiles to be used in your PhoneBank survey.
Create the campaign and survey for the PhoneBank
Creating a survey for phonebanking is the same process as creating a survey for walklists.
- Create a new group of contacts that you will be targeting during your phone bank. To learn about working with groups, see the Groups and Tags section.
- Create a new Campaign (if you haven't already) by going to Campaigns > New Campaign. Refer to the Campaign chapter to find out how to create a campaign and add the group of contacts you created.
- Go to Campaigns > Create New Survey and create a new survey of type PhoneBank.
- From the Profile dropdown menu select the custom profile you created for this phonebank survey.
- For Survey Responses select Use existing result set and the set, Survey Default Results Set Options.
- Click Save.
Reserve the target group you want to survey
Next, you'll need to reserve the target group of contacts you will be surveying during the phone bank:
- Go to Campaigns > Reserve Respondents.
- Select the name of your survey in Survey and your target group in Group(s).
- Click Search.
- On the Find Respondents to Reserve screen, select the contacts you want to survey, then click Go to Reserve Respondents.
- On the Reserve Respondents screen, click Reserve.
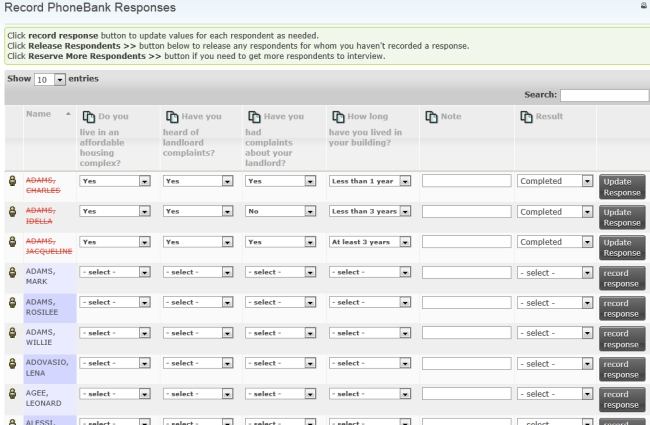
Conduct your phone bank and record responses
During the phone bank, organisers and volunteers can search for the group of contacts they will be calling and enter the responses directly into CiviCRM.
- Go to Campaigns > Interview Respondents.
- Enter the name of your survey and the name of the target group you surveyed during the phone bank.
- On the Find Respondents to Interview screen, select the contacts whose responses you want to record, and click Go.
- Enter the responses and results, then click Record Response.
Reviewing Results of the Survey
At the end of the phone bank, a program lead may want to review the results of the survey. Refer to the Reports and Analysis chapter to learn how to view this report.
Mobilising Individuals to a Direct Action Event
The Participant Info custom data group that comes with CiviEngage contains fields that hold information about prospective event participants, including a history of interactions between your organisation and prospective participants. Use this information (such as needs for childcare or rides) to bring these individuals to your events. Tracking the history of your organisation's contact with individuals around events such as an annual membership meeting, a direct action, or leadership training can help you to understand the effectiveness of your outreach methods and determine how committed or engaged an individual is based on if that person actually attends events after multiple contacts.
This feature is mostly useful for organisers or staff who have a list of individuals they are recruiting to attend an event through multiple phone calls or face-to-face meetings. The following CiviCRM tasks could be used to mobilise individuals:
- Conduct a basic or advanced search or use Groups and Smart Groups to create a list of the contacts you want to mobilize or invite to the event.
- From the search results or Group Contacts screen, you can add the list of contacts to the event by selecting Add Contacts to Events from the actions list. See Mass Registrations to learn more about registering multiple contacts for an event.
-
Once you have added the contacts to the event, you can enter participant information or responses from multiple interactions in the Participant Info area in a contact's participant record. You can either enter information for one participant by editing the participant record itself, or you can add information for a list of participants at one time. For example, if you plan to call through your list by viewing the participant list from the event listing, you could use Batch Update Participants Via Profile and select one of the following custom profiles provided by CiviEngage:
- Update Event Invite Responses - to record responses from multiple contacts with the participant.
- Update Participant Info - to record general information about participants, such as if they need childcare or rides to the event.
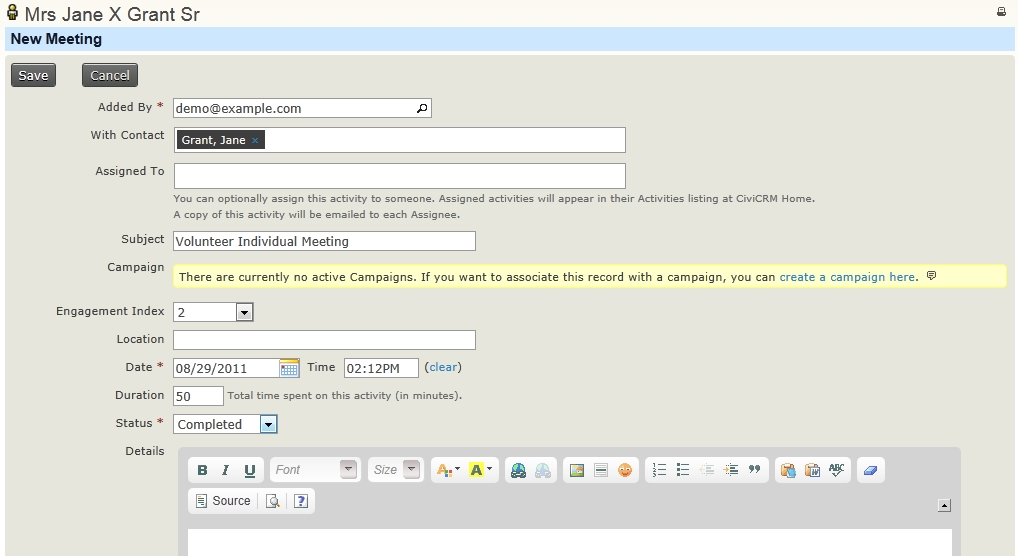
Using the Engagement Index
You can record the level of interest or engagement in a specific activity by an individual contact. This allows you to then review an individual's activities to understand if their interests or engagement has increased over time, or give you the opportunity to have further contact with the individual to increase their participation with your work.
You can record an Engagement Index for the following activities or actions: Phone Call, Meeting or Interview.
- From an individual's contact record, click Actions then select an activity such as Meeting.
- Fill out the information about the activity, then enter the Engagement Index. To find out how to create options for the Engagement Index, see the Campaign chapter of this book.
Manage Voter Information
CiviEngage enables you to manage voter history and other voter information collected during a voter engagement, voter education or electoral cycle.
If you wish to collect voter contacts with information such as thier demographics and history, or enhance your contact list with additional information about existing voters, you can:
- Export the contacts you want, including the CiviCRM internal Contact ID, First name, Last name, address information, and any other contact information.
- Upload the list into your voter management system and match to the voter records. You can then continue conducting your voter education and engagement activities there.
- When the electoral cycle is over, export the contacts you want (new and existing), and import into CiviCRM. With the existing contacts, you'll be able to do an update import to match the contacts back into CiviCRM.
- Use the Voter Info custom field set to capture your voter information related to the contact.