Keeping track of events and participants
After creating your event and providing the registration form to web site visitors, you can manage your event participants through the CiviEvent administrative tools. These tasks vary depending on the type of event you are organising. This chapter outlines how to view your events and participants and describes how CiviCRM supports a variety of the associated administrative tasks.
Dashboard
The CiviEvent Dashboard (Events > Dashboard) brings all your events and participant information together in one place (see screenshot). It displays an Event Summary table, providing a summary of up to ten scheduled and recent Events. Click the Event name to view the event as it will be displayed to site visitors. Click the Participants count to see a list of participants.

To run your own customized searches, click Find more event participants at the end of the page. Here you can search by Participant Name, Event, Date Range and Status.
From the Dashboard you can also:
- click on Manage Events to find and manage specific events
- click on New Event to create a new event page
- use the icons for RSS feeds and calendars to use the data in external applications.
Finding and viewing events
Another way to access your events is to navigate to Events > Manage Events. This screen gives you a list of all CiviEvents that have been created. Search filters at the top of the page allow you to search for events by name, by specific event type or by date. At the right hand side of the page you have four links for each event:
- Configure - access to amend the settings of the event including Information and Settings, Location, Fees, Online Registration, Schedule Reminders and Tell a Friend
- Participants - quick links to lists of participants who are registered or attending the event, or participants who are not attending
- Event Links - quick links to Register Participant and the live event pages including the event information page and the live online registration page.
Finding and administering participants
This section describes some common tasks and searches associated with event participants. Note that these tasks all refer to existing event participants. If you are looking for how to add participants, please see the Manual event registration chapter.
Overview of participants for all upcoming events
- Navigate to Events > Dashboard
- Click the Counted: link to see all the contacts for an event.
If any count is zero, the associated text will not be a hyperlink. Some participant roles may not count for the event total, such as someone who is on clean-up duty.
Find participants for any event with a variety of criteria
- Navigate to Events > Find Participants.
- In the event name field, start typing to see a list of events. Click on the event you want. Set additional search choices for the fields you want to see.
- Click Search.
When the search returns results, you have the opportunity to select all of the resulting participants or a subset, and perform an action on them. Available Actions include:
-
Cancel registration for the selected participants.
-
Delete participants from event: Deleting participants does not delete the contact record; it will delete all transactions and activities associated with the participant for this event. Note that this action cannot be undone.
-
Email - send now CiviCRM also lets you generate an email on the fly to your search result list. For example, you may want to let recipients know details about the event in advance, such as parking options or changes to the programme.
-
Export participants: This allows you to export a predefined set of fields (export mapping) or create your export mapping that can be saved for reuse. The software exports to CSV format, which can be easily opened in standard spreadsheet software or directly used for mail merges.
-
Group - add contacts to an existing group or one you create during this action.
-
Group - create smart group: Smart groups are saved search results based on defined criteria, similar to a query. The advantage of a smart group is that the system will rerun the query using the criteria you have defined each time you open the smart group. This is particularly helpful for complex search criteria that you need to view on a regular basis.
-
Name badges - print: Select the type of badge you require and a printable PDF will be generated with the names of the selected participants (see Event Badges subsection in this chapter).
-
PDF letter - print for participants
-
Participant status - change (emails sent) When using this feature emails will be sent to participants when the status is changed from one which belongs to the pending class (eg Pending (pay later), Pending from approval) to either Registered or Attended (positive class). Emails will also be sent if the status is changed to Expired or Cancelled.
-
Print selected rows This prints what is shown on the screen for the rows you have selected.
-
Update multiple participants: This feature is useful if you wish to edit multiple fields for multiple participants in a table grid layout. Note that you must create the profile set you wish to use before implementing this action. If you are not familiar with how Profiles work, please see the Profiles chapter in the Organising your Data section.
List participant's individual fees
- Navigate to Search > Custom Searches.
- Click on Event Aggregate.
- Choose your search criteria, and click Search.
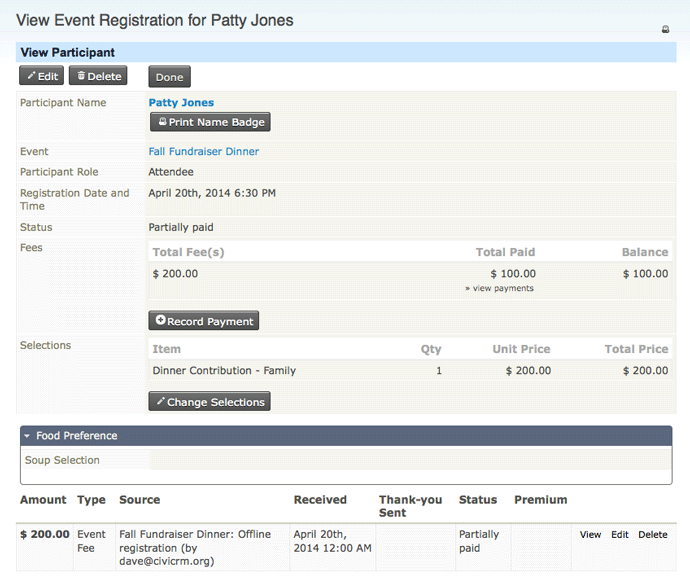
Changing event registration selections for an existing participant
Sometimes the details of an existing registration needs to be changed. Some examples are:
- A volunteer for an event has been asked to register online selecting a pay later option for the event fees. Back-office staff want to change the person's role from attendee to volunteer and select a zero fee option from an admin-only price field.
- A conference participant decides they no longer want to attend the conference dinner and requests a refund of the dinner fee.
- A participant decides after registering online that they do want to attend the pre-conference workshop and contacts the registration office with that request and give their credit card details for the extra charge.
- A child registered for a holiday program later decides she wants to do archery rather than pottery one afternoon. Although there is no difference in fees, back-office staff need to change her event registration so that they know where the child should be for that session.
All of these situations can be managed by back-office staff editing the participant's event registration as follows:
- Navigate to the participant's event registration (One way to do this is via Events > Find Participants)
-
Select View or Edit (towards the right of the event record)
-
Click on Change Selections.
-
Make the required adjustments. The event fee will be adjusted appropriately and the event status will be set to partially paid, registered or pending refund based on the difference between the new event fee and the contribution(s) already processed.
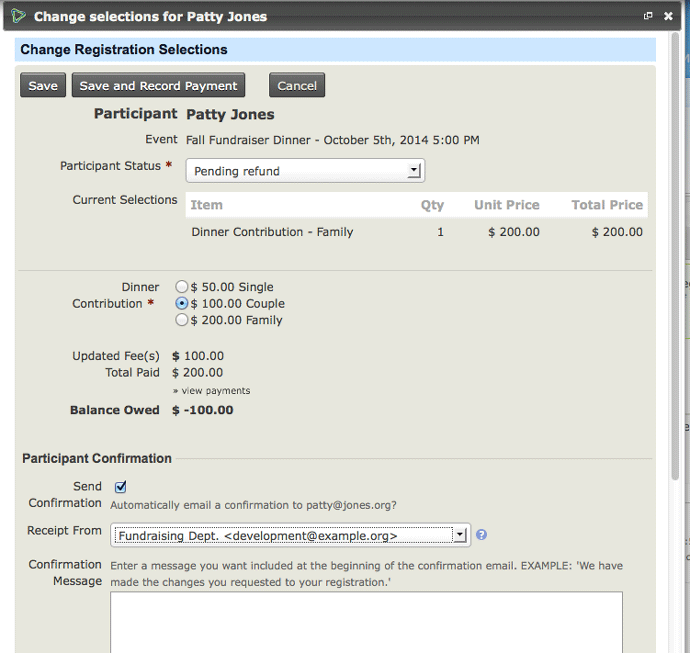
Additional payments (credit card or offline methods) or a refund (offline methods only) will need to be entered via the record payment link associated with the event registration record as described in the section on partial payments.
Event badges
You can create custom name badges for your event.
Navigate to Administer > CiviEvent > Event Badge Layout > New Badge Layout and you will see the following set-up screen.
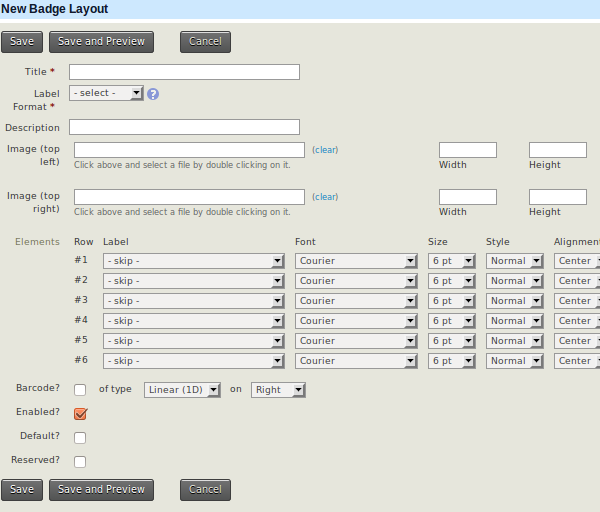
Points to consider are:
Label format: Four options are available
- Avery 5395 - 2-1/3" x 3-3/8"
- A6 Badge Portrait 150x106
- Fattorini Name Badge 100x65
- Hanging Badge 3-3/4''x4-3/4''
Image (top left) and/or Image (top right): You can select an existing image or upload a new one. Images can be positioned on the right and the left so that your logo and that of you major sponsor could be included.
Elements - Rows: Most standard or custom contact, event and participant fields can be selected to provide up to 6 rows on the labels or you can select spacer to improve the layout. Typical fields to include would be display name, current employer, country and/or participant role. If you have set up the appropriate custom fields you could also include which sessions the participant has registered for and which meal option they selected.
Barcode?: A linear barcode or QR code can be added at the bottom of the badge.
Enabled?: This needs to be ticked for people to use this badge layout. If you want to keep a special layout for your annual conference you could untick this box for most of the year to prevent accidental usage.
Reserved?: Select this option if you want to ensure that admin users do not accidentally delete the badge layout.
Note
You will not be able to preview the badge layout unless at least one event has been created and at least one participant has been registered.
Printing Name Badges
Once your list of event particpants is finalised you can print the name badges for the event as follows:
To print name badges, do the following:
- Go to Events > Find Participants.
- Select the relevant participants.
- Choose Print Event Name Badges from the drop-down list of actions and Click Go.
-
Select the name badge layout for this event.
-
Click Make Name Badges
A PDF file will be created that you can print on the appropriate-sized labels.