Customizing the user interface
CiviCRM is highly flexible and customizable. This chapter gives information on the many ways you can change the interface to suit your needs and make it easier for your users.
How to customize your data itself — what you collect and track — is covered in Organising Your Data and in the What you need to know and Set-up chapters in the sections on the different CiviCRM components (e.g., learn about customizing event types in the Events section).
Changing dropdown options
The options included in the dropdown fields you see on contact entry/editing forms in CiviCRM can be modified (you can add, rename, disable or remove options) from Administer > Customize Data and Screens > Dropdown Options. These include:
- Gender
- Individual prefixes and suffixes (e.g., Ms., Mr. and Jr., Sr.)
- Phone types (e.g. Phone, Mobile, Pager)
- Mobile phone providers (e.g. Sprint, Verizon and Cingular)
- Instant messenger services (e.g., Yahoo, MSN, AIM, GTalk, Jabber and Skype)
- Website types (e.g., Work, Facebook, Twitter)
- Location types (e.g., Home, Work, Billing, Main). Note that that Billing location is assigned to Billing Addresses entered when constituents contribute or pay for event and membership fees online. Location type names may not contain spaces (e.g., Summer Home is not permitted; use SummerHome).
The choices in Preferred Communication Methods (e.g., Phone, Email, Postal Mail, SMS) in the contact edit/entry form can also be modified; go to Administer > Communications > Preferred Communications Methods.
Modifying dropdown options that define data — such as Activity Type, Relationship Type, Contribution Status, etc. — is outside the scope of this chapter; see Organising Your Data and the sections on the different CiviCRM components.
Changing display preferences
If there are types of activities you do not track or categories of data you do not collect, you can make it so these fields and tabs don't even show up when your users log into CiviCRM. This can make training and everyday use much easier.
To do this, go to Administer > Customize Data and Screens > Display Preferences.
You can change which tabs are available when you are viewing contact records by checking and un-checking the appropriate boxes next to Viewing Contacts.
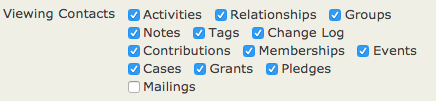
For example, if your organization is not using Cases or Grants, you could uncheck those boxes and those tabs would no longer show up in the user interface. If you later decide start using them, simply re-display the tab by checking the box. Information stored in the tabs you hide remains in your database; you can hide tabs you have already used, and when you choose to display them again, all the information will display as it did before.
You can change which blocks of information appear when you are editing a contact by checking and unchecking the appropriate boxes next to Editing Contacts:
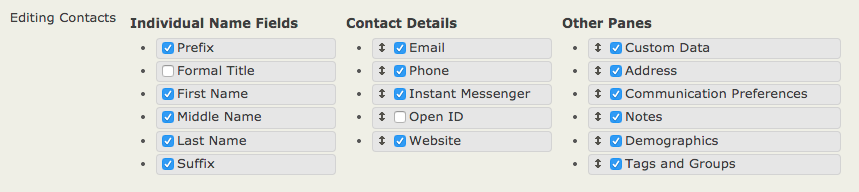
For example, if your organization doesn't collect information Demographics or Communication Preferences, you could uncheck those boxes to streamline the editing screen. As with the Viewing Contacts preferences, any information contained in fields you choose not to display remains in your database, and you can choose to display it again at any time by re-checking the boxes in this setting.
Disabling Popup Forms
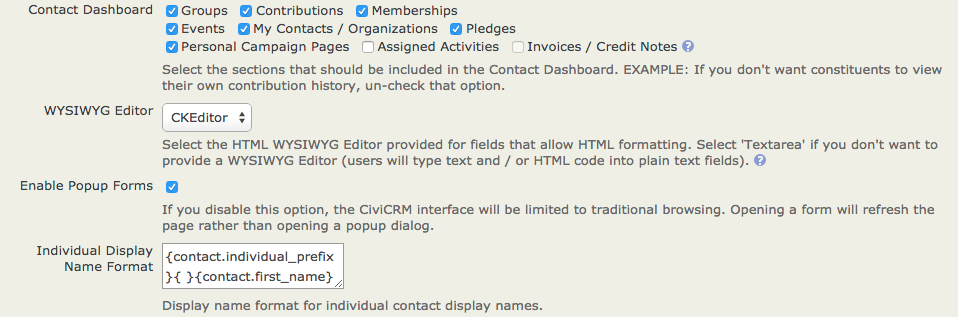
The CiviCRM user-interface makes extensive use of popup dialog boxes to enable quick viewing and easy editing of data. You can disable this feature and limit the interface to traditional browsing by deselecting the checkbox Enable Popup Forms in administer > customize data and screens > display preferences. Note that CiviCRM will be slower with this feature disabled as every form will require a complete page load in the browser.
Disabling Activity Assignee Notifications
When an activity is created, CiviCRM sends notifications to all activity assignees by default. You can disable this feature by deselecting the checkbox Notify Activity Assignees in Administer > Customize Data and Screens > Display Preferences. You can also selectively disable email notifications for specific activity types by selecting them in the field below.

Customizing search preferences
You can change CiviCRM's default search behavior at Administer > Customize Data and Screens > Search Preferences. Available options are:
- Automatic Wildcard (choose Yes or No): If you choose Yes, wildcards are automatically added to the beginning AND end of the search term when users search for contacts by Name. For example, searching for "ada" will return any contact whose name includes those letters: Adams, Janet; Nadal, Jorge; etc. If disabled, a wildcard is still added, but only to the end of the search term. In this case, searching for "ada" will return any contact whose last name begins with those letters: Adams, Janet' but not Nadal, Jorge. You might choose to disable this to speed up searching on a large database.
- Include Email (choose Yes or No): If you choose Yes, email addresses will be automatically included when users search by Name. You might choose to disable this to speed up searching on a large database.
- Include Nickname (choose Yes or No): If you choose Yes, contents of the Nickname field will be automatically included when users search by Name.
-
Include Alphabetical Pager (choose Yes or No): If you choose Yes, a bar will appear at the top of your search results allowing you to choose a letter of the alphabet. Clicking A, for example, will take you to a page displaying only contacts that begin with A. You might choose to disable this to speed up searching on a large database.
-
Include Order By Clause (choose Yes or No): If you choose No, your search results will not be ordered.
- Smart group cache timeout: This determines how often the smart group cache is refreshed. A value of 0 turns off caching. What works for you site might be variable. More information is in the admin guide..
- Autocomplete Contact Search: This is a series of checkboxes for basic contact fields (name, email, phone, etc). The fields that are checked will show up in the autocomplete results list that appears when you use the Quick Search bar at the top left of all screens.
- Contact Reference Options: This is a series of checkboxes for basic contact fields (name, email, phone, etc). The fields that are checked will show up in the autocomplete dropdown search results for 'Contact Reference' custom fields.
- Autocomplete Results: This determines the maximum number of results that will be displayed when typing in an autocomplete field.
If your database is large and your searches are slow, consider disabling some of these options to increase your speed.
There is one more place to customize search search settings: Administer > Customize Data and Screens > Display Preferences has a block of Contact Search settings:
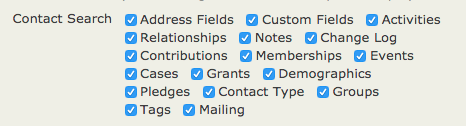
These check boxes modify the Search > Find Contacts and Search > Advanced Search screens. Uncheck the boxes to remove the corresponding types of fields from your search screens.
Customizing date preferences
The default display preference for dates is set at Administer > Localization > Date Formats.
You can override this default setting and define the range of allowed dates for specific field types at Administer > Customise Data and Screens > Date Preferences. By default, CiviCRM provides ranges for input on specific date fields. For instance, the default range for Activity Dates are 20 years prior to the current year all the way through to 10 years beyond the current year. If you would like to track activities that have occurred, say, 25 years ago then you would need to update this range to enable your end users to log these activities.
Customizing the navigation menu
You can add, delete, rename, and move all items in the CiviCRM navigation bar to better meet the needs of your users. Some things you might want to do are:
- Streamline the navigation by removing menu items you don't use
- Add items to support specific workflows (e.g. data entry Profiles)
- Add links to non-CiviCRM web pages or apps
- Rename menu items to use terms for familiar to your users
- Move menu items to better support the flow of your work
To customize menu items, go to Administer > Customize Data and Screens > Navigation Menu. You will see a file structure containing all of your menu items, with the items represented by folder icons. Expand folders by clicking the small triangles to the left of their names.
- To delete an item, right-click it and select Delete.
- To rename an item, right-click it and select Rename.
- To move an item, drag and drop it to the desired location in the tree structure.
- To add an item:
- Click on the Add Menu Item button.
- Enter the text you want to appear in the menu in the Title field.
- Enter the link to your item in the Url field.
- Select the location of your new item from the Parent dropdown menu. You can place the item anywhere in the navigation, at any level. If you want your new item to be in the top level of the navigation, do not select anything from this dropdown.
- Check the Separator box if you want to add a line below your new item to separate it form the item below.
Making custom data entry forms
If you have staff or volunteers who are often entering batches of similar contacts manually, you can create a tool called a Profile with only the fields they need. This can speed up data entry considerably.
- Go to Administer > Customize Data and Screens > Profilesand clickAdd Profile.
- Give your Profile a clear name that relates to its purpose (e.g., Name and Address Data Entry Form)
- Check the Standalone Form or Directory box in the Used For field.
- Use the Pre-form Help and Post-form Help fields to add any text you'd like to display to those doing data entry.
- Click Save; this takes you to the Add Fields screen so you can choose which fields to put in your Profile.
- From the Field Name dropdown menu, select the contact record type where your desired field is found. This will be Contact, Individual, Organization, Household, or any custom contact subtypes you may have created. (The other record types available on this menu will not work with data entry forms, so do not choose them.) It's important to note that any field applying to more than one kind of contact record type (such as Phone or Email, which applies to both Individuals and Organizations) will be found on the Contacts menu.
- Once you have chosen a contact type, another dropdown menu will appear listing the available fields. Choose your desired fields.
- If the text that appears automatically in the Field Label field is not what you would like to appear on the form, edit it.
- If every record entered through this form must have data in this field, check the Required? box.
- Use the Field Pre Help and Field Post Help fields to add any text you'd like to display to those doing data entry.
- You can use the Order field to change the order in which fields are displayed on the form. Lower numbers are displayed ahead of higher numbers.
- Click on Save and New to add more fields, and Save when are finished.
- You'll be taken to a screen listing all your fields and their settings. Click Preview (all fields) to make sure your form looks the way you want it to. Click Use (create mode) to go to the page containing your form. Copy the link and use it to create a navigation menu item (see Customizing the navigation menu).
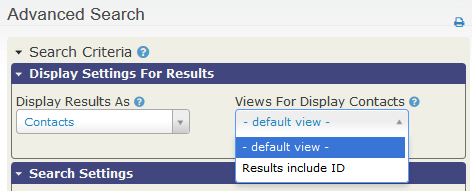
Customizing search views
To do this:
- Create or open a profile and mark it as used for Search Views (known as Search Results in 4.1 and previous):
- When adding fields to this profile, you will need to set Visibility for the fields to Public Pages and check the Results Column box.
When conducting your advanced search, use the Search Views dropdown menu in the top right of the page to select your Profile (see image below).
Using Word Replacement to change terminology
CiviCRM has a Word Replacement setting that lets you replace existing text found in the system with your desired text. For example, if your organization does not typically refer to monetary transactions as "contributions," but prefers to use the term "donations," you can define a word replacement and have it automatically altered throughout your instance of CiviCRM.
To use Word Replacement:
- Go to Administer > Customize Data and Screens > Word Replacements.
- Enter the original text in the Original column on the left, and the replacement text in the Replacement column on the right.
- Check the Exact Match box on the right to replace only instances of the word or phrase that match exactly. For example, if Exact Match is not checked checked, replacing "Contribution" with "Donation" would also replace "Contributions" with "Donations"; if it is checked, this would not happen.
- Check the Enabled box to the left to replacement of the word or phrase.
- You can add additional rows using the Add row button.
- Click Save when you are finished entering replacements.
When using this function, be sure to anticipate alternate forms of words and different ways your chosen word or phrase may appear in CiviCRM.
Note
If you're using CiviCRM in another language, word replacements unfortunately only work if you use the English words as the original to replace, not the words in the language you are using.