Creating an event
This chapter covers how to create a new event, describing each of the set up options available in the event creation screen. If you're going to allow online registration for the event, you will also want to read the online event registration chapter. If not, you'll want to read the manual event registration chapter.
To get started, create a new event by choosing Events > New Event from the menu. (If you can't see the events menu, make sure that you have enabled the Events component. You can do this in Administer > System Settings > Components.)
Event Information and Settings
The first page you see when creating an event requests basic information online about the event. You can click on any of the blue question marks to show help for each of the fields. When you see a pencil, clicking on it will take you to a screen where you can edit the options available. Note, depending on your permissions, you may not be able to edit these options and therefore will not see the pencil.
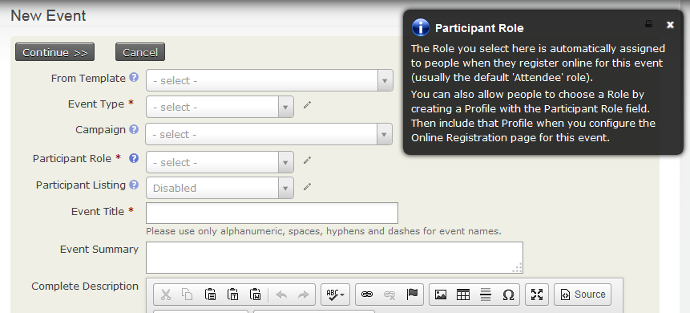
From template allows you to create an event from a template (see Event templates chapter in this section) rather than creating one from scratch.
Event type allows you to categorise the event.
If you have CiviCampaign enabled, you can select a campaign for this to be a part of (see the Campaign section for more details).
Roles distinguish different types of event participants, such as attendees, speakers and staff. What role should participants be assigned when they register online for this event? The value placed in this field will be assigned by default when users register online or when you import registrations unless you include the field Participant Role with other values in your CSV import file. The most common value is Attendee.
Do you want users to see a list of participants, and how much information about the participants do you want to reveal? Participant Listings demonstrate support for an event and can help to generate interest within your constituent community. Note that the options you define in this section only enable participant listings — to display one, you will need to create a menu item or link to the listing somewhere on your website. Once you've created the event, the participant listing link is displayed on the event configuration page. Refer to the chapter Event management for information on participant listings and other ways to promote your events.
What is your event called? The Event Title will appear on event information pages, registration pages, event listings, and in the Manage Events administrative page. Be sure to choose a meaningful, well-crafted title to represent your event.
The next two fields (Event Summary and Complete Description) let you describe your event. Both the summary and complete description will be included on event information pages. Use the rich-text editor provided for the description field to include photo, images, and formatted text.
Enter the Start date/time and End date/time for your event. These will be included on the event information page and event listings.
You can set a Maximum number of participants for each event and define a message to be displayed when that number is reached.
If you want to display a map showing the event location you can do so using either Google Maps or Open Street Maps (you will need to configure your mapping solution through Administer > System Settings > Mapping and Geocoding).
Select the Public Event box to include the event in promotional listings such as RSS feeds, iCal files or feeds, and event listing pages.
Select Allow sharing through social media to include social media links for sharing this event on the Event Info page, Thank-you page, Tell-a-Friend page (if enabled), and in event confirmation emails.
The event can be active or inactive. If you anticipate that it will take some time to complete the configuration of your event, consider making it inactive until it is complete to ensure it is not inadvertently listed on the event listing feeds. You can easily activate the event when you are ready to begin publicizing it.
If you want CiviCRM to add links on the information page and registration mails for downloading a calendar meeting invitation, select Show Calendar Links. Note that these calendar invites do not work well if participants are in different timezones than the server. Test thoroughly if you enable this.
After reviewing the details on this page, click Continue >> to create your event and advance to the next step. You can interrupt configuration on any subsequent page by clicking Save and Done and return later to review and modify any of the settings.
To return to a saved event, navigate to Events > Manage Events and click Configure to continue working on the event.
Event Location
The next step is to complete the location and contact details for the event.
Once you have entered an event location, you can reuse it for subsequent events by clicking Use existing location and selecting it from the dropdown list. Note that if you choose an existing location and edit it, it will update that location for all events that use it.
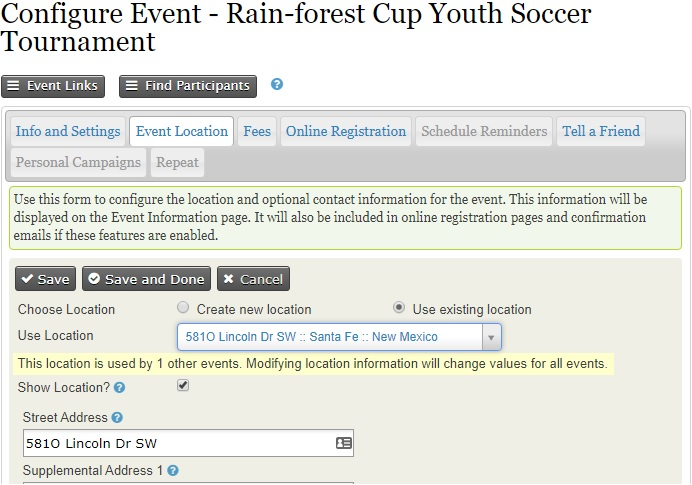
You can also list phone numbers and email addresses on the event information page if you want to give registrants a way to contact event organizers directly. If the event is being held off-site from your organization's primary location, you may also want to provide contact information for the meeting location.
You can also select whether or not the event location is showed on the registration and event information screens.
Fees
If the event is free, set the Paid Event radio button to No, then click Save and skip to Online Registration.
If this is a paid event, click Yes. The screen will show the options available (see the following set of screenshots).
What Contribution Type (financial type) will be assigned to paid registrations for this event? Although the most common value for this field is simply Event Fee, CiviCRM provides the flexibility to define multiple Financial Types and assign them to different events as needed. See Set-Up in the Contributions section for details.
If you plan to accept credit card payments through the online registration form, you need to configure a payment processor prior to creating your event. Find more information about this, see Payment Processors in the Contributions section.
Do you want to allow registrants to pay later by mailing in a check, paying on-site with cash or credit card, or arranging some other payment method? If so, you can enable the Pay Later option and define a label and payment instructions. If you keep this unchecked, registrants will be required to pay by credit card.

Regular Fees provide a set of price levels from which the registrant must select a single level (e.g. an individual registration for $50 or a family registration for $100). Each fee amount has a label assigned and you can set a default fee. This approach works well for many events and is easy to set up. Here's a simple example:

If your event requires a more complex pricing structure, with more options or additional add-ons, you may wish to use price sets or discounts. For more information about this, see the Complex event fees chapter in this section.
Online registration
Allowing people to register online (self-service) through your web site offers many benefits. Online registration is convenient for your constituents and can save staff time and resources. If you do not need to offer online registration, do not check Allow Online Registration and move onto the next step. If you do want to allow online registration, please see the Online event registration chapter in this section.
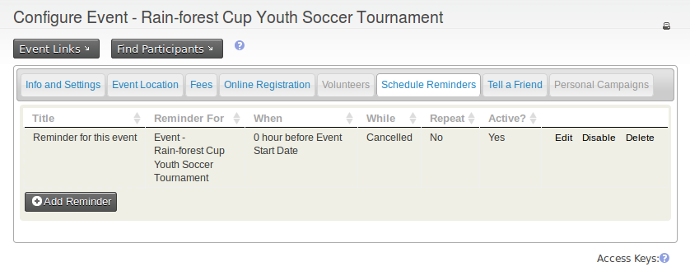
Scheduled reminders
Scheduled reminders can be used to automatically send event registrants emails at certain times before or after events, for example
- a week before: remind them that they should check out the conference schedule
- a day after: ask them to fill in the feedback form
- Two days before payment is due for a Pending from Pay Later registration: warn them that their registration will be cancelled if they don't provide payment details in the next 48 hours.
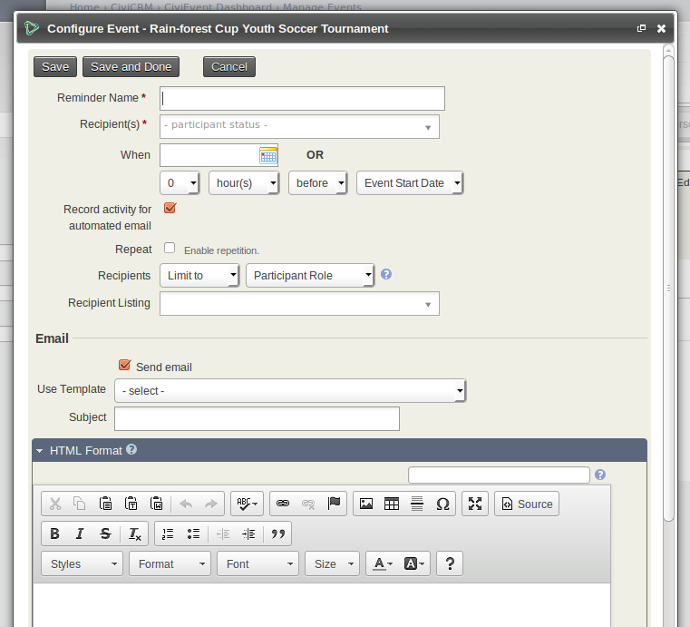
To set up a scheduled reminder for a specific event, click on the scheduled reminders tab, which will show you already existing scheduled reminders for this event (if any) and click on Add Reminder.
Fill in the details on this form to send, for example, an email to all registered speakers 3 days before the event start date. Note that you can limit recipients by status (registered, attended, etc.) and also by role (speaker, attendee, volunteer, etc.). You can either use a template or compose your own message in the HTML format box.
As well as setting up reminders on an event by event basis, you can also set them up for specific event types and add them to specific event templates. The idea is basically the same as above, but you can access this functionality from Administer > Communications > Scheduled reminders.
Tell-A-Friend
CiviEvent makes it easy to leverage the social networking power of your committed constituents by empowering them to quickly and easily share details about your organization and event with their friends and colleagues. The final step in the event creation is a page where you can enable "Tell-A-Friend" capabilities. You can define the text and links to be included on that page and in the email sent from the tool (see the following screenshot).

A "Tell a friend" activity record will be added to a participant's Activities tab each time she sends mail to her friends. This allows you to track your most active supporters and engage them further. The people who are emailed using this feature are also automatically added to CiviCRM as contacts.
Registration confirmation and receipting
You can send automated confirmation and receipt emails to participants who register for an event, whether they register online or are registered by your staff or volunteers. The content and layout of these emails are controlled by message templates. Both HTML and Text formats are provided. You can modify or add text to these emails, or add branding such as a logo to the HTML versions. To set up a from email address from which to send the confirmation and receipts, see Set-Up in the Email section.
Navigate to Administer > Communications > Message Templates (shown in the following screenshot) and click the System Workflow Message tab to see the list of messages you can modify. Click Edit next to "Events - Registration Confirmation and Receipt" rows to edit the content and layout.

The templates for these messages include both the text shown and necessary program logic. Use caution when editing so as not to modify the program logic. Be sure to test the workflow and review the emails sent after making any changes. If you find that your changes have caused problems, errors or missing information, you can always revert to the system default for that workflow.