Set-up
Now that you've gone through the planning process and determined the types of cases, activities and case roles that you need, you're ready to configure your CiviCase installation.
Enable the CiviCase component
The CiviCase component is included in CiviCRM downloads, but it is NOT enabled by default. To enable the component:
- Go to Administer > System Settings > Components.
- Select CiviCase.
- Click Save.
You will now see Cases in the navigation menu.
Define Case Types
You can create one or more new case types.
To add a case type:
- Go to Administer > CiviCase > Case Types.
-
Click New Case Type. Enter a "Title" and an optional "Description" of the case type.
The case type has both a "Title" and a "Name". The title will be displayed to users, and the name is used internally by CiviCRM. CiviCRM will autofill the name field. (The default name is usually fine, but advanced user may unlock and change the name. Once the case type is created, the name should not be changed.)
-
Optionally choose to restrict Activity Assignment.
By default any contact can be selected as the assignee for case activities. You can optionally restrict this by group or by contacts with a user account on your website.
-
Include Case Roles. This section lists the types of people who are involved in the case in some way. Roles listed here will be automatically included in each case when a new case is opened.
Select the roles that you wish to be included in the case type from the "Add role" drop-down shown below the listing of roles.
If you need to create a new custom role for your case type, click the drop-down, and type the name of the new role into the field. As well as displaying any matches from the existing list of roles, you will also see a blue bar containing your keyed entry, underlined. Simply click on this to define the new role. The new role will be created when you save your new case type. Using this method you can quickly create as many new roles as you need for your case type.
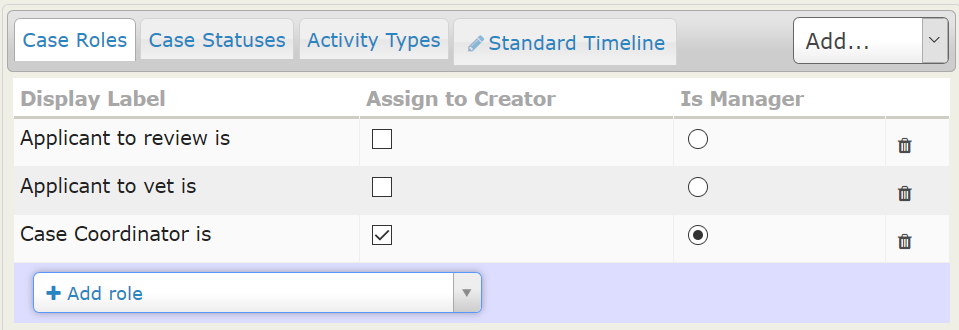
As each role is selected or created, it appears in the listing of Roles, where you can further set "Assign to Creator" and "Is Manager" options:
- Any role marked with "Assign to Creator" is then automatically assigned to the person who creates the case.
- You may also mark one of the roles as the manager. The case manager's name will be displayed prominently in case listings and reports.
Specific people may be assigned to case-roles -- after a case has been opened.
New roles/relationship types created through the Case Type interface are individual-to-individual relationships. If you want roles that are individual-to-organisation relationships then, once you have finished creating your case type, you can change the relationship definition at Administer > Customize Data and Screens > Relationship Types. There you will also be able to review and edit other details of the roles/relationships if you need to.
-
Include Activities When working on a case, the user has access to a drop-down menu in the case summary enabling them to quickly record a new activity as part of the case. For example, if the case manager looks at a case and decides they need to check a point of detail with a colleague, they could make a phone call, and quickly log that call to the case by selecting Phone Call from the Add Activity menu, recording the details of the call in the activity. The Phone Call activity automatically gets filed on to the case.
When defining the Case Type you can choose which Activity Types are made available within this drop-down menu.
If you are including most or all of your custom Activity Types in the Standard Timeline, or another timeline or sequence within your Case Type, you may not want to include these custom Activity Types in your 'Add Activity' menu, particularly if you want tight control over the workflow pattern in your case type. In a different scenario you might want to give your users more flexibility, and give them access to some or all of the custom Activity Types in the menu, allowing them to have much more control over the pattern and flow of activities in the case.
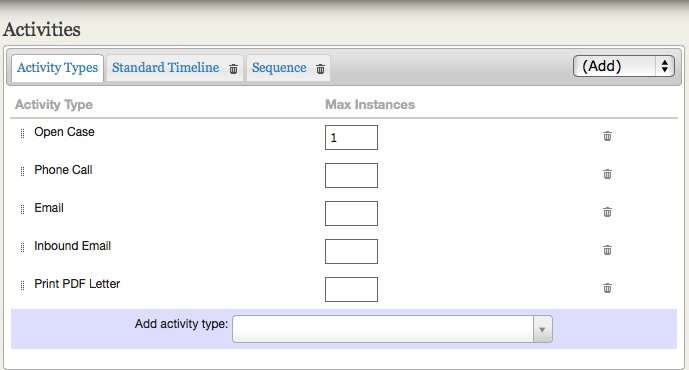
The first step is to create a list of all of the Activity Types that you would like to have readily available from within the case. This is the listing under the 'Activity Types' tab. You should focus on selecting just the activity types that your users will find useful. These might include Phone Call, Email, Meeting, and Follow Up along with any custom activity types. (CiviCRM also includes some special activity types -- such as Open Case, Change Case Status, and Change Case Type. There is no need to manually add these activity types.)
Note - the Activity Types listing needs only those activities that a user might choose to add to the case. Activities that you include in a Timeline or Sequence do not need to be in this list.
Select the activity types that you wish to be included in the case type from the "Add activity type" drop-down shown below the listing of activity types.
If you need to create a new custom activity type for your case type, click the drop-down, and key the name of the new activity type into the search field. As well as displaying any matches from the existing list of activity types, you will also see a blue bar containing your keyed entry, underlined. Simply click on this to define the new activity type. The new activity type will be created when you save your new case type. Using this method you can quickly create as many new activity types as you need.
As each activity type is selected or created, it appears in the listing of Activity Types. You can optionally specify the maximum number of times a given activity type can be used in a case using the 'Max Instances' element.
Once you have created your case type you can review and amend the details for any new activity types you may have created by editing them at Administer > Customize Data and Screens > Activity Types. New activity types created through the Case Type interface have default settings that should be fine in the majority of situations, but you may wish to amend the label, add a more useful description, or if you want to make the activity type available to be used more generally outside of CiviCase you can change the 'Component' setting from 'Cases only' to Contacts AND Cases'.
-
Having defined all of the Case Roles and the Activity Types that will be available for user selection in your new Case Type, you next need to define the Standard Timeline, any additional Timelines and/or a Sequence that you want to use within the case type.
These are simply groups of activity types which define a series of interactions, giving you the ability to pre-define one or more standardised workflows for any given case type.
In a Timeline you control the scheduling of each activity in your timeline relative to the date the case is opened, or relative to another activity in the case, using the 'Reference' and 'Offset' fields. When you use a timeline, all of the activities defined in the timeline are created when the timeline is added to the case and are visible in the case summary. You can create multiple timelines for use in any given case type.
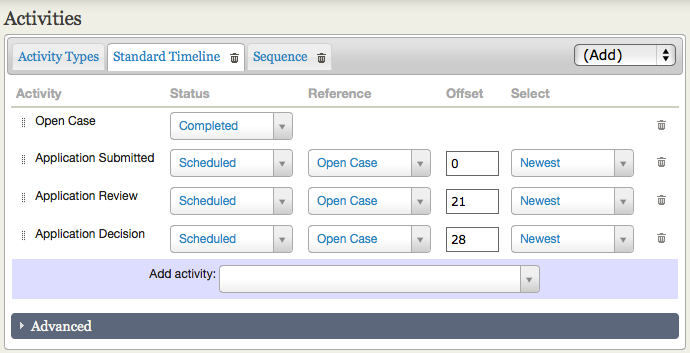
The Standard Timeline is the default timeline for each new case type that you create, and provides the essential elements that will make your case types work correctly, so each case type must have a standard timeline. The activities in the standard time line are added automatically when the case is opened.
The Standard Timeline starts with one predefined activity, Open Case, whereas additional timelines are empty to start with. As you control when an additional timeline is added to the case you will choose the first activity, which may also be a key reference activity for this timeline.
A Sequence defines the order in which a set of defined activities should occur, but unlike the timeline it includes no information about time intervals between activities. A sequence also differs from a timeline in that the next activity in any sequence is created only when the preceding activity is marked as completed. You must make sure that any activity type included in your timeline(s) is not also included in your sequence and vice-versa.
You may add additional timelines or a sequence by selecting the option from the (Add) menu. Currently you can only add one sequence to any given case type.
 To add activities to a timeline, select the tab for the timeline you want
to work with:
To add activities to a timeline, select the tab for the timeline you want
to work with:
- Select or create an activity using the drop-down list.
- Select a status for the activity (the default is Scheduled).
- Enter a Reference Activity. The default reference activity is Open Case and this is often appropriate. For the Standard Timeline any activity in the timeline can be selected as the reference for any other activity. For other timelines you can select any activity in the case type as a reference, bearing in mind that at the point in alive case where the additional timeline is activated, the reference activity must already exist in the case.
- Enter an Offset (in days). Offset values can be positive, negative or zero.
- The 'Select' option is helpful if there are multiple instances of the reference activity type, as it allows you to select whether the oldest or most recent instance of the reference activity should be used.
You can choose to use the "end date" of a case (i.e the final defined activity) as your reference and use negative offset values to schedule activities as the example below shows.
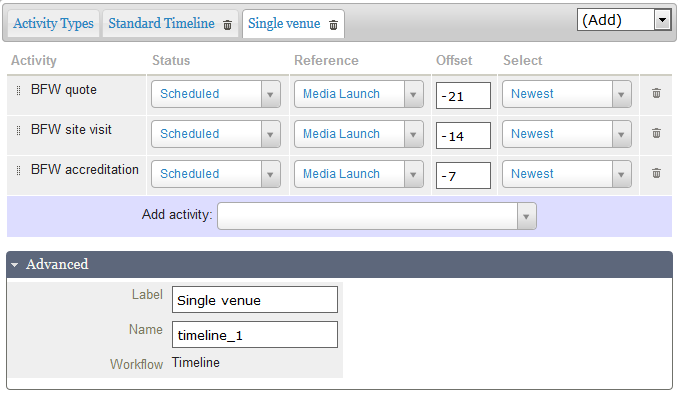
You can rename additional timelines or a sequence using the fields available in the 'Advanced' section below the main Activities section of the page as shown above.
To add activity types to a sequence simply select or create them using the Add Activity drop-down menu.
Once you have all the activity types you need for your timeline(s) or sequence you can re-order them if necessary using the drag and drop handles to left of each activity type in your listing.
A set of sample case types are installed when you enable the CiviCase component. These can be useful either as a point of reference to see what a complete case type looks like, or even as a start point for your own case types.
Custom fields
It is likely that you will want to collect structured data in the case. You can collect data in custom fields connected to a specific activity type, or connected to the case type. For example, in Employment Counselling cases, you may want an activity type Skills Assessment, in which an employment counsellor records client job skills. This activity type will require one or more custom fields, perhaps a set of checkboxes. Alternately a generalized application case might need a custom field to indicate the type of application that is being tracked.
The main difference between using custom data at the case versus activity level is that custom fields attached to the case are visible inside the case management screen, while custom fields attached to activities are only visible if the user views details on that particular activity.
If you are transitioning from a paper-based system, it is helpful to refer to existing forms and then determine what information from the forms is relevant to include.
Please review the section on configuring custom data fields prior to beginning these steps.
- Go to Administer > Customize Data and Screens > Custom Fields.
- Click Add a Set of Custom Fields.
- Under Used For, select Activities or Cases.
- Select one or more specific activity type(s) or case type(s) for which this set of fields will be used.
- Enter any help information you want to be displayed to your users.
- Click Save.
- Enter one or more custom fields for this set.
- Repeat these steps for each activity type or case type which requires custom data to be recorded.
If you need to define a large number of fields for a given activity type, consider breaking them up into sets of related fields. Group the fields into logically related sets that will make sense to the users, and avoid the form looking like an endless tunnel of fields.
Filing Emails on Cases
Some organizations find it useful to record case-related emails in CiviCase. For example, the case coordinator for a work disability case might send an inquiry to a state agency representative and would like both the sent email and the reply to become part of the case story.
You can choose to send outbound emails directly from the Manage Case screen, but you can also set up CiviCRM to integrate with your usual email client so you can send and receive emails as usual and also have them filed in CiviCRM.
In the CiviMail chapter the Email Processor was described as a way to get inbound and outbound emails into CiviCRM as non-case activities. When you enable CiviCase, a new action will be available that allows you to file any non-case activity onto a case.
Additionally, when email activities are sent from the Manage Case screen, if the Email Processor has been set up then replies will automatically be filed directly onto the case.
You can also record an email or an activity on the case by adding a string "case" to the subject field followed by a space and the #id of the case(enclosed in square braces). For eg. A normal activity or an e-mail whose subject value is "[case #123] Any subject" would be recorded under case id = 123.
CiviCase permissions
You will need to create a contact record for each staff member or service provider who will be using CiviCase to enter or view case information. These individuals will also need to have a Drupal, Joomla! or WordPress user account.
For Joomla! and WordPress installations, staff members must have back-end (administrator) access. All CiviCase functions are done within the Joomla! and WordPress Administrator interfaces.
You should also add contact records for service providers who will be assigned case roles but will not be accessing the CiviCase system. This will allow your staff to easily send emails with pertinent case and client information to these providers via CiviCase, as well as record case-related interactions reported by providers.
In order for users to add and manage cases, you will need to configure CiviCase-related permissions for users in your CMS. You may want to create case management-specific user roles for staff, based on their responsibilities within your organisation. You can assign permissions to users in order to control whether or not they have access to the CiviCase component, as well as what case data they can see.
The following is a list of the CiviCase-related permissions:
-
Access my cases and activities: allows a user to create new cases, add activities to the cases they've created and edit those activities. Users with this permission can NOT see cases or activities created by others.
If you need to restrict certain users to ONLY see case data (i.e. hide all other contact information from them), assign "access my cases and activities" permission WITHOUT "edit and view contacts" permission. This permissioning model is useful for users who are external to your organisation and who should not be allowed to see contact details.
-
Access all cases and activities: allows a user to create new cases, as well as view and add activities to any case (regardless of who initially created the case).

-
Delete in CiviCase: allows a user to mark cases or case activities as deleted. Cases and activities are never physically deleted from your database, but only hidden when you mark them as deleted.
Users with this permission can also find and undelete these cases and activities by checking the Deleted Cases option in Find Cases and the Deleted Activities option in the Case Activities Search Filter.

-
Administer CiviCase: gives access to Administer > CiviCase options including:
-
create and edit case types and case statuses
- set rules for redacting case data. These rules are used to disguise data which could be used to identify the case client in case reports which are shared with external reviewers.