Importing Data into CiviCRM
Most organisations have data in sources outside CiviCRM, such as previously used database platforms, spreadsheets created on the fly for specific events or other purposes, and email address books. Because manually entering large amounts of data can be tedious, CiviCRM provides a way do import data en masse if the source can export it into some common format such as a Comma Separated Version (CSV) file.
Imports can also be used to update existing data. This will be covered in the final section of this chapter.
Considerations before importing
For more details on how to think about your data before importing into CiviCRM, please read the section on "Organizing your data", especially "Mapping your data into CiviCRM".
Preparing to import data
Importing data requires considerable attention and care, so we'll present some concepts here that you should know before you start your first import. You can import both core and custom data for contacts, as well as data for event attendance, activities, memberships and contributions. This chapter will focus on the import process for contacts. The processes for other data are similar.
There are two ways to import data:
-
from CSV files. Most database and spreadsheet applications (e.g. OpenOffice.org Calc, Google Spreadsheets, Microsoft Excel) can create and manipulate files in this format. It is often easier to view and clean your data when it's in a CSV file than while it's still inside your old database.
Each column in your CSV file will map to a field in CiviCRM, so make sure you use a different column for every distinct bit of information.
Depending on your country or region, fields in your CSV files might be separated by semicolons (;) instead of commas. If so, you'll need to change the Import/Export Field Separator value in the CiviCRM Localization settings by going to the navigation menu and choosing Administer > Configure > Global Settings > Localization.
-
from another SQL or MySQL database stored on the same server, using an SQL query. (This option is only for advanced users who have a clear understanding of server and database administration.)
If you do not have a clear understanding of your existing data and how it will map to CiviCRM fields, you will experience frustrations and problems when you try to import the data. Please read about each type of data in other sections of this CiviCRM Manual.
The following rules and recommendations will help you to import data with minimal problems:
- Always test your data import with a small subset of your records. After importing the test set, visit the records within CiviCRM and ensure that the data was imported and functions as you expected.
- It can be helpful to create a test contact that has every attribute you've defined in your existing data set. Then import the contact and check results to ensure that CiviCRM correctly represents all the data.
- When you map the columns or fields from your source data to CiviCRM fields during the import, CiviCRM can save this field mapping as an import map for future use. This is helpful if you will be importing multiple files with the same structure. To save an import map for future use, click the "Save this field mapping" check-box at the bottom of the Match Fields screen of the import wizard and enter an appropriate name and description. To reuse a saved import map, select it from the Load Saved Field Mapping dropdown menu on the Choose Data Source screen (step 1) of the import wizard.
- If your imports are timing out or taking too long, try splitting up the imports into smaller batches. If you have the appropriate permissions on your web server, you can also increase the memory_limit and max_execution_time values in the file php.ini.
- You can add all of the contacts imported in an import to new or
existing groups or tags. All of the contacts in a single import will
be given the same groups and tags. This limitation has a couple
effects on your import:
- Make sure that you assign groups and tags that are applicable to every contact in the imported set. If you need to assign groups or tags on a contact-by-contact basis, import contacts in small, discrete batches in which all contacts share the same tags and groups. Alternatively, you can create searchable custom data fields in CiviCRM that contain the groups and tags that you want to assign to imported contacts. After the import you can run searches on those fields and use the "Add Contacts to Group" or "Tag Contacts" batch actions on the search results.
- You can use this feature to manage the import. Consider adding contacts to a new group or tag that indicates what batch of imports the contacts were a part of, thereby allowing you to easily identify when a contact was imported and undo an entire import if necessary.
- CiviCRM stores first names and last names in separate fields, so these should appear as separate columns in your CSV file. The same goes for city and postal code/zip code. Most spreadsheet programs contain tools that automate the process of splitting text across fields.
- Ensure that your country names are expressed in the same way as they are in CiviCRM, i.e., 'United States', not 'United States of America', and 'United Kingdom', not 'Britain'.
- If you are importing multiple locations, the first location will be set as the primary location address. You may want to move your columns around to ensure that the desired location becomes the Primary Location. You may also need to split your import so that some records have one type of record as their Primary Location, while others have a different one.
- If you choose the location type 'Primary' for an address field then it will update the existing primary address, if there is one, for an existing contact. If it is a new contact or they do not have an existing address the location type will be your site's default.
- If you are importing data into multi-choice (e.g. check-box or radio button) custom fields, your data source can use either the label (what's visible to the user in the CiviCRM front end) or the value (what's actually stored in the database for that choice). CiviCRM will recognise it and import it appropriately. When importing into multi-choice core data fields, you can specify only the value(s) in your data source, not the label.
- If you are updating multiple choice options, new values will replace the entire field. For example, if you update the value of the Colors field to be "orange" for a contact that currently has Colors set to "blue", the result will be that Colors is set to orange, not orange and blue.
- To import multiple values into a multiple choice field use the "," (comma) character as a separator - using either the Label OR the Value of the required option(s) i.e.: "1, 2, 3" or "fred, red, yellow".
- Make sure your data source uses an accepted date format and that you select the same date format on the Choose Data Source screen of the import wizard.
- Make sure any name prefixes and suffixes you use have been set up in the administration interface (go to: Administer > Option Lists in the navigation menu).
- If you plan to do additional imports of related data that's associated with your contact data, e.g. contribution data, event participation data, membership data, you can make things easier by ensuring that your contact records have unique IDs that are also associated with the related data. When you do the initial import of your contact data, import these unique IDs and map them to CiviCRM's External ID field, so that you can then use your original (or legacy data) IDs to match to the contact records records for later imports of the related data.
- Master Address Belongs To is a special import field that only works with the CiviCRM_Address.id. The information needed to use this field for imports is only available directly from the MySQL database tables directly. They are not shown anywhere in CiviCRM including on data screens, link urls, profiles, or exports. Information on how to use this special field is available in the Wiki.
Required Fields for Contact Imports
When preparing your data import it is helpful to know what fields are required for Import. You'll want to be sure that these fields are included in your CSV import file. Below is a list of the required fields. They are marked red and starred in the interface. In case you have less data, selecting one field is enough. The External Identifier field is only useful if you want to update existing contacts. Please note that the field with the identifier (Match to Contact)is required for deduplication purposes.
- Email (Match to Contact)
- External Identifier
- First Name
- Last Name
Setting up a CSV file for importing
Example of spreadsheet .csv format
When thinking about setting up your spreadsheet, think about the data that you are collecting and plan out your column headings. Keep in mind that you may need to create more than one .csv file and perform multiple imports before you are finished.
If you plan to import related data that pertains to a specific contact, e.g. event participant information, contribution data, etc., you will need to make sure that each contact record has a unique identifier or the contact record should have First Name, Last Name and Email, so that you can link their related data during later imports. If you have unique ID, you would map the ID to CiviCRM's External Identifier on import.
Running an import
The import process has four steps.
Step 1: Setup
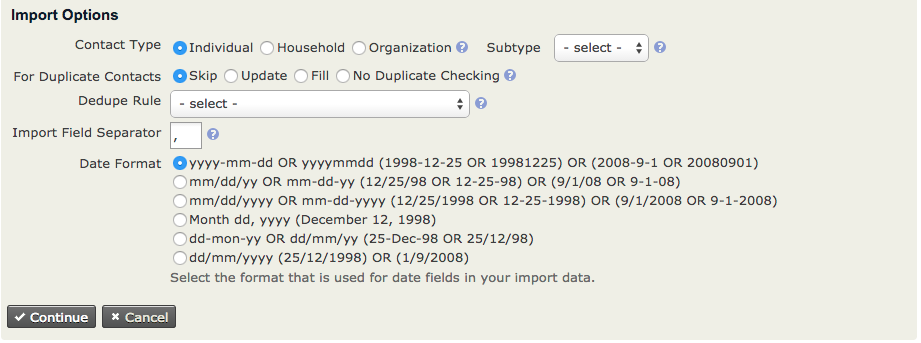
Setup lets you specify the basic details of your import, including the source of the data. Data can come from either a CSV file, or an SQL query of a database on your server. A check-box lets you indicate whether the first row of your file contains column headers.
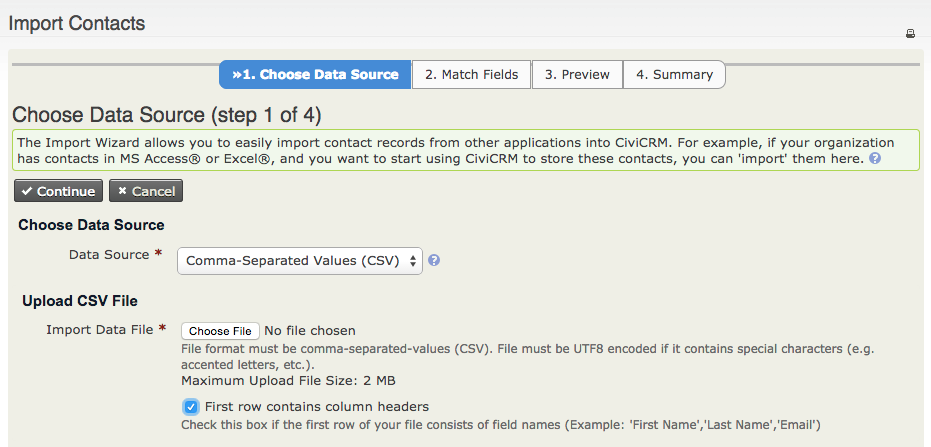
Note that imports use the default unsupervised Dedupe Rule to decide whether a contact record is a duplicate, unless you select another Dedupe Rule during this step. Refer to the Deduping and Merging chapter in this section for information on duplicate matching rules in CiviCRM. You can specify what action to take when an import encounters a duplicate:
- Skip: skip the duplicate contact, i.e. leave the original record as it is.
- Update: update the original record with the database fields from the import data. Fields that are not included in the import data will be left as they are.
- Fill: fill in the additional contact data, if it contains fields that are missing or blank in the original records, and leave fields which currently have values as they are.
- No Duplicate Checking: this inserts all valid records without comparing them to existing contact records for possible duplicates.
You can only match imported data directly to existing Contact IDs in Update, Fill or No Duplicate Checking modes.
Import mappings tell CiviCRM how the fields of data in your import file correspond to the fields in CiviCRM. The first time you import from a particular data source, it's a good idea to check the box to "Save this field mapping" at the bottom of the page before continuing. The saved mapping can then be easily reused the next time similar data is imported, by requesting that it be loaded at this step.
Step 2: Match the fields
If you had column headings in your file, these headings will appear in the first column on the left-hand side of the Field Map, while the next two columns show two rows of data in your file to be imported, and the fourth column is the Matching CiviCRM Field. If you loaded an import mapping in Step 1, your choices will be reflected here. You can change them if they are inappropriate for this import.

The matching CiviCRM fields include standard CiviCRM data such as First Name and Last Name as well as any custom data fields that have been configured for use with contact records on your site. Match the fields by clicking the dropdown list and selecting the appropriate data. For example, if the heading of the second column in your input is Surname, you should choose Last Name as your Matching CiviCRM Field.
Select "- do not import -" for any columns in the import file that you don't want to import into CiviCRM.
If you have a saved mapping for a specific set of spreadsheet columns, and your spreadsheet layout has changed (for instance, you need to import additional fields, so you add the appropriate columns of data in the spreadsheet), you can modify and save the field mapping. One tip to ease the mapping process when you need to import additional fields is to place the additional columns of data in your import spreadsheet to the right of the columns you've previously mapped in CiviCRM. This allows you to use the existing saved field mapping to map the initial import fields, and then continue mapping the new data fields.

Note that if you add new data columns in your spreadsheet and do not position the columns AFTER the columns you previously mapped, you then can't use the saved mapping and will have to map all your import fields again.
Once you've mapped your fields, you can decide if you want to keep the original saved mapping unchanged, or check the box to "Update this field mapping" to include the new field mappings.
Step 3: Preview
This screen previews the results of importing your data, reports the number of rows to be imported, and allows you to double check your field matches.
If some of the rows in your spreadsheet contain data that doesn't match CiviCRM's requirements for one or more fields, you'll see an error message with a count of the invalid rows (see the screenshot below). Click the Download Errors link and review the errors reported in the downloaded file, so you can fix them before doing the import.

At the bottom of the form, you can choose to add the contacts to an existing group, import to a new group, create a new tag, or tag imported records. Adding imported records to a separate group is strongly recommended in order to be able to quickly find the imports and, if necessary, delete and reimport them.

Step 4: Summary
The final screen reports the successful imports along with Duplicate Contacts and Errors. If you have set the import to add all contacts to a Group or Tag, you can click through to see your imported contact records.

At this point it makes sense to check to make sure that your import has worked as expected. Search for the contacts that you just imported and examine their fields and custom data to make sure all is as expected.
Importing relational data
We have just described the process of importing one data file. But what about if you want to import related data, like organizational addresses with employees, parent child relationships, activities, contributions, etc.? For each type of data you want to import, you will need to import a separate CSV file.
CiviCRM has specific tools for importing related contact data and a set of specific import tools for contributions, memberships, event participation etc (and you should see specific chapters for details of how to use these tools). To import relationships, you should run multiple contact imports.
For example if we want to import data for children and then for both parents, we run three imports, one for the child, one for the father and one for the mother.
We first import the child remembering to include an external identifier that we can use to match the child to their parents. We then import the father, and then the mother, as related contacts, linking them to the child using the child's external identifier.
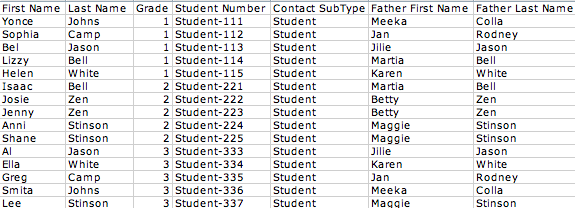
In the example below we have one CSV file which contains father and mother information. We use this CSV file twice as part of the import. Have a look at the fields below to understand what is happening.


We are linking the father to the original child using the external identifier and are then importing the related father name using the 'Child of' relationship type.
When the import is done, go back and verify the data by searching for the parent and examining the relationship tab. They should have a relationship linking them to the child.
You can then repeat this process for the mother, and also for other relationships as necessary.
Address standardisation
For many organisations, an important element of cleaning your data is standardising addresses. In the US, this means conform to conventions defined by the United States Postal Service's Standards for Addresses. Standardising how addresses are entered into CiviCRM will allow for more accurate search results when searching by address, as CiviCRM can parse addresses based on the USPS standards if you choose to do so. To find out more about how Address Parsing is handled and used in CiviCRM, refer to the Installation chapter of the Configuration section of this manual. When adding or editing contacts, you will enter and edit such address elements as street number, street name, and Apt/Unit/Suite number according to these standards.
Import Activities
If you want to insert new activities, your CSV file must include at least the following fields:
- Activity Date
- Activity Type ID
- Target Contact ID (Match to Contact)
- Subject
If you want to update existing activities, your CSV file must include at least the following fields:
- Activity ID
- Activity Date
- Activity Type ID
- Target Contact ID (Match to Contact)
- Subject
The Target Contact ID field is used to attach the activity to the contact the activity is done on. Make sure you've already imported the contacts before running the activity import. These are seperate import jobs.
Import Contributions
You can insert new contributions or update existing ones. If you are on a recent version of CiviCRM and enable the Civi-Import extension you can also create or update the contact and any soft credit contacts in the same import
If you insert new contributions, your CSV file must include at least the following fields:
- Fields to match (or create) the cotnact.
- Financial Type
- Total Amount
The fields required for the contact depend on whether Civi-Import is enabled. If not then you need: - Contact ID or External Identifier or all the fields used in your Unsupervised Duplicate Matching rule (to match to an existing contact)
If CiviImport is enabled then the above still holds for matching contacts but you can specify which Dedupe rule to use.
See also
Importing contributions in the Contributions chapter.
If you want to update existing contributions, your CSV file must include at least the following fields:
- Transaction ID or Invoice ID or Payment ID (to match to an existing contribution)
- Financial Type
- Total Amount
You can also use update existing contributions to import new or change existing data in other core or custom contribution fields. When doing this you will still need to include an ID to match to an existing contribution and the Financial Type and Total Amount fields in you CSV file, even if the values you import for those fields are no different from the values already in your database.
Import Memberships
You can insert new memberships or update existing memberships.
If you insert new memberships your CSV file must include at least the following fields:
- Contact Id or External Identifier or all the fields used in your Unsupervised Duplicate Matching rule (to match to an existing contact)
- Membership Type
- Membership Start Date
If you want to update existing memberships your CSV file must include at least the following fields:
- Membership Id (to match to an existing membership)
- Membership Type
- Membership Start Date
You can use also use update existing memberships to import new or change existing data in other core or custom membership fields. When doing this you will still need to include Membership ID to match to an existing membership, and the Membership Type and Membership Start Date fields in you CSV file, even if the values you import for those fields are no different from the values already in your database.
See also
Importing memberships in the Memberships chapter.
Import Participants
In each import session you can either insert new registrations or update existing participant records.
If you insert new registrations you need to decide whether to restrict registrations for each event to just one per person (set On duplicate entries to Skip) or to allow duplicate registrations for the same event from a given contact (set On duplicate entries to No Duplicate Checking). In either case your CSV file must include at least the following fields:
- Contact Id or External Identifier or all the fields used in your Unsupervised Duplicate Matching rule (to match to an existing contact)
- Event ID
- Participant Status
If you want to update existing registrations, you should set On duplicate entries to Update. Your CSV file must include at least the following fields:
- Participant ID (to match to an existing registration)
- Event ID or Event Title
- Participant Status
You can use also use update existing registrations to import new or change existing data in custom participant fields. When doing this you will still need to include Participant ID to match to an existing registration, and the Event ID or Event Title and Participant Status fields in you CSV file, even if the values you import for those fields are no different from the values already in your database.
Import Tags
There is currently no inbuilt way of importing tags or tag sets. You can use this advanced extension though.
If you want to assign individual tags during your contacts import, you will have to either:
- split your CSV file by individual tags and import each subset separately as described above,
- create temporary custom fields and import tags into them as standard data, then after the import use advanced searches to isolate contacts with particular values and mass tag them. Once you're done, you can remove the custom fields.