Tokens and mail merge
Overview
You can use data in your CiviCRM database to set up mail merged communications both for emails and printed materials such as letters and mailing labels. The mail merging functionality relies on "tokens", which represent fields in your database. For example, use the Postal Greeting token to include a customized greeting for each recipient in your PDF letters. Most contact fields, including custom fields you've created, are available as mail merge tokens.
Basic contact data tokens
If you want each email to address the person by first name after "Dear," you would type a space and then click on Insert Tokens at the top right of the HTML Format field.
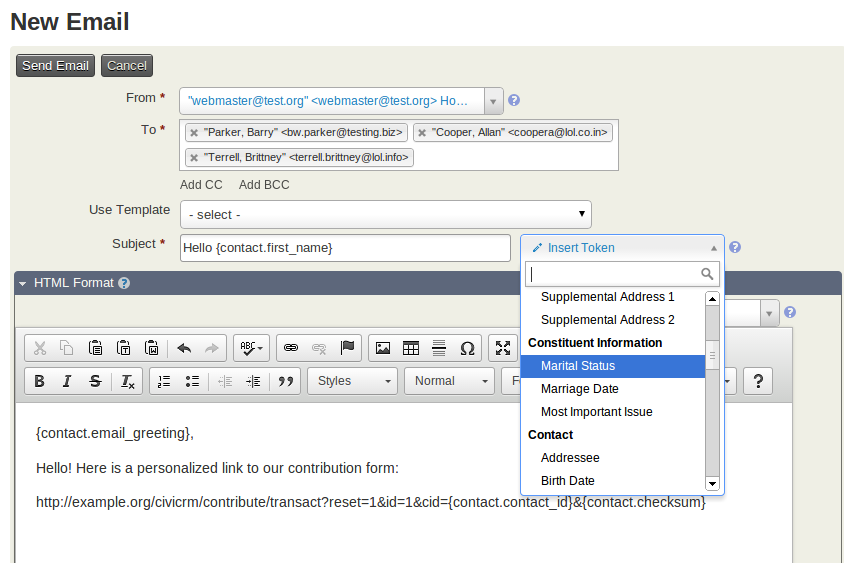
The popup that appears enables you to find the appropriate token by typing "First name" in the box and choose the token that corresponds. Click Close and you will see that your message now reads "Dear {firstname}." When the email is sent, the appropriate first name will be inserted into each message. Browse the Inset Tokens pop-up for a complete list of contact data tokens, including any of the custom fields that have been created for your site.
Organizational tokens
In addition to basic contact data, you can also insert standard organization information, such as "Domain (organizational) address," which displays the address of your organization as defined at Administer > Communications > Organization Address and Contact Info.
Special tokens available for emails
Some additional tokens are available for use in emails.
Note
In the HTML format editing area, tokens that generate URLs (links) need to be placed in the URL field of the Link creation screen. Otherwise, they will display as text and not a clickable link in the email client of the recipient.
Action tokens
You can also insert action tokens, such as opt-out and unsubscribe tokens. These tokens insert links to take the specified action; in order to display the links properly in HTML messages, you'll need to add the proper link tags using the Source icon in the editor.
Required opt-out tokens for mass emails
You are required to include a token for either opt-out token, {action.optOutUrl} or unsubscribe token, {action.unsubscribeUrl}, as well as the organizational address token, {domain.address} in every CiviMail mailing. These can be placed directly in the body of your mailing body, or you can put them in the mailing header or footer. If your organization has developed a standard mailing footer, just include these tokens in the footer so that folks don't have to think about them each time they create a new mailing.
In general, including click-able unsubscribe and opt-out links are a bit friendlier for recipients (as opposed to the reply-to via email method). You can also provide both options.
Additionally, some tokens are only available for mass mailings, such as the token to provide a link to a message stored online.
For more details, see opt-out token, unsubscribe token and organizational (domain) address token.
Checksum tokens
A particularly useful token is the checksum. The checksum allows you to give people links to contribution forms, profiles, petitions, and event registration forms that are pre-filled with information that is already in their contact record. This saves your constituents the hassle of filling out forms and increases the chances they will take action (e.g., donate, sign up for an event, sign the petition). It can also be a simple way to keep your data current by asking people to review and update their contact information.
Caution
For security purposes, checksum links only last for seven days, starting from the time the email is sent. To change this duration, go to Administer > System Settings > Misc (Undelete, PDFs, Limits, Logging, etc.).
Note
For tokens to use with Form Builder, see secret links section in creating new forms.
Create a link in the CiviMail message that includes the checksum token {contact.checksum}. When people click on the special link, CiviCRM looks them up in the database and prefills any information on the contribution form or profile with any data that exists in their record.
{contact.checksum} will give the full cs=checksum, so you don't need to add the cs= key to URLs yourself, while {contact.checksum_value} only gives the checksum itself.
Checksum for Contribution Pages
To send people to a contribution page use this path where IDNUMBER is the ID of your contribution page:
- Drupal:
http://example.org/civicrm/contribute/transact?reset=1&id=IDNUMBER&{contact.checksum}&cid={contact.contact_id} - Joomla!:
http://example.org/index.php?option=com_civicrm&task=civicrm/contribute/transact&reset=1&id=IDNUMBER&{contact.checksum}&cid={contact.contact_id} - WordPress (with Clean URLs):
http://example.org/civicrm/contribute/transact?reset=1&id=IDNUMBER&{contact.checksum}&cid={contact.contact_id} - WordPress (without Clean URLs):
http://example.org/?civiwp=CiviCRM&q=civicrm/contribute/transact&reset=1&id=IDNUMBER&{contact.checksum}&cid={contact.contact_id}
Checksum for Contribution Pages for Membership Renewals
To send people to a contribution page for membership renewals use this path where IDNUMBER is the ID of your contribution page. This is typically used in Scheduled Reminders for membership renewals, where the membership.id will be evaluated to the membership to be renewed:
- Backdrop/Drupal:
http://example.org/civicrm/contribute/transact?reset=1&id=IDNUMBER&{contact.checksum}&cid={contact.contact_id}&mid={membership.id} - Joomla!:
http://example.org/index.php?option=com_civicrm&task=civicrm/contribute/transact&reset=1&id=IDNUMBER&{contact.checksum}&cid={contact.contact_id}&mid={membership.id} - WordPress (with Clean URLs):
http://example.org/civicrm/contribute/transact?reset=1&id=IDNUMBER&{contact.checksum}&cid={contact.contact_id}&mid={membership.id} - WordPress (without Clean URLs):
http://example.org/?civiwp=CiviCRM&q=civicrm/contribute/transact&reset=1&id=IDNUMBER&{contact.checksum}&cid={contact.contact_id}&mid={membership.id}
Checksum for standard Profiles
To send people to a profile use this path where IDNUMBER is the ID of the Profile you want to send them to:
- Drupal:
http://example.org/civicrm/profile/edit?reset=1&gid=IDNUMBER&{contact.checksum}&id={contact.contact_id} - Joomla!:
http://example.org/index.php?option=com_civicrm&task=civicrm/profile/edit&reset=1&gid=IDNUMBER&{contact.checksum}&id={contact.contact_id} - WordPress (with Clean URLs):
http://example.org/civicrm/profile/edit?reset=1&gid=IDNUMBER&{contact.checksum}&id={contact.contact_id} - WordPress (without Clean URLs):
http://example.org/?civiwp=CiviCRM&q=civicrm/profile/edit&reset=1&gid=IDNUMBER&{contact.checksum}&id={contact.contact_id}
Checksum for Event Registration Pages
To send people to an event registration page use this path where IDNUMBER is the ID of your event:
- Drupal:
http://example.org/civicrm/event/register?reset=1&id=IDNUMBER&{contact.checksum}&cid={contact.contact_id} - Joomla!:
http://example.org/index.php?option=com_civicrm&task=civicrm/event/register&reset=1&id=IDNUMBER&{contact.checksum}&cid={contact.contact_id} - WordPress (with Clean URLs):
http://example.org/civicrm/event/register?reset=1&id=IDNUMBER&{contact.checksum}&cid={contact.contact_id} - WordPress (without Clean URLS):
http://example.org/?civiwp=CiviCRM&q=civicrm/event/register&reset=1&id=IDNUMBER&{contact.checksum}&cid={contact.contact_id}
Checksum for Petition Signature Pages
To send people to sign a Petition, use this path where IDNUMBER is the ID of your petition:
- Drupal:
http://example.org/civicrm/petition/sign?reset=1&sid=IDNUMBER&{contact.checksum}&cid={contact.contact_id} - Joomla!:
http://example.org/index.php?option=com_civicrm&task=civicrm/petition/sign&reset=1&sid=IDNUMBER&{contact.checksum}&cid={contact.contact_id} - WordPress (with Clean URLs):
http://example.org/civicrm/petition/sign?sid=IDNUMBER&reset=1&{contact.checksum}&cid={contact.contact_id} - WordPress (without Clean URLS):
http://example.org/?civiwp=CiviCRM&q=civicrm/petition/sign&sid=IDNUMBER&reset=1&{contact.checksum}&cid={contact.contact_id}
Checksum for mail 'view in browser' links
In CiviMail you can use a special link to allow contacts to view the email content in their browser, including the content personalised with tokens.
- Drupal:
http://example.org/civicrm/mailing/view?reset=1&id={mailing.key}&cid={contact.contact_id}&{contact.checksum} - Joomla!:
http://example.org/index.php?option=com_civicrm&task=civicrm/mailing/view&id={mailing.key}&{contact.checksum}&cid={contact.contact_id} - WordPress (with Clean URLs):
http://example.org/civicrm/mailing/view?id={mailing.key}&{contact.checksum}&cid={contact.contact_id} - WordPress (without Clean URLS):
http://example.org/?civiwp=CiviCRM&q=civicrm/mailing/view&id={mailing.key}&{contact.checksum}&cid={contact.contact_id}
Site tokens
Starting in CiviCRM 5.76, Site Tokens allow site administrators to define pre-set snippets which can then be inserted into various content via CiviCRM's standard token-handling features. Site Tokens marked as "reserved" are also inserted automatically in specific places within CiviCRM features, such as Message Templates.
For example, the {site.message_header} token is automatically inserted into the
top of every Message Template. By default this token has an empty value, but site
administrators may wish to edit its content to include an organization logo or
other branding that should appear at the top of Message Templates. (This removes
the need to edit Message Templates directly in order merely to add a logo.)
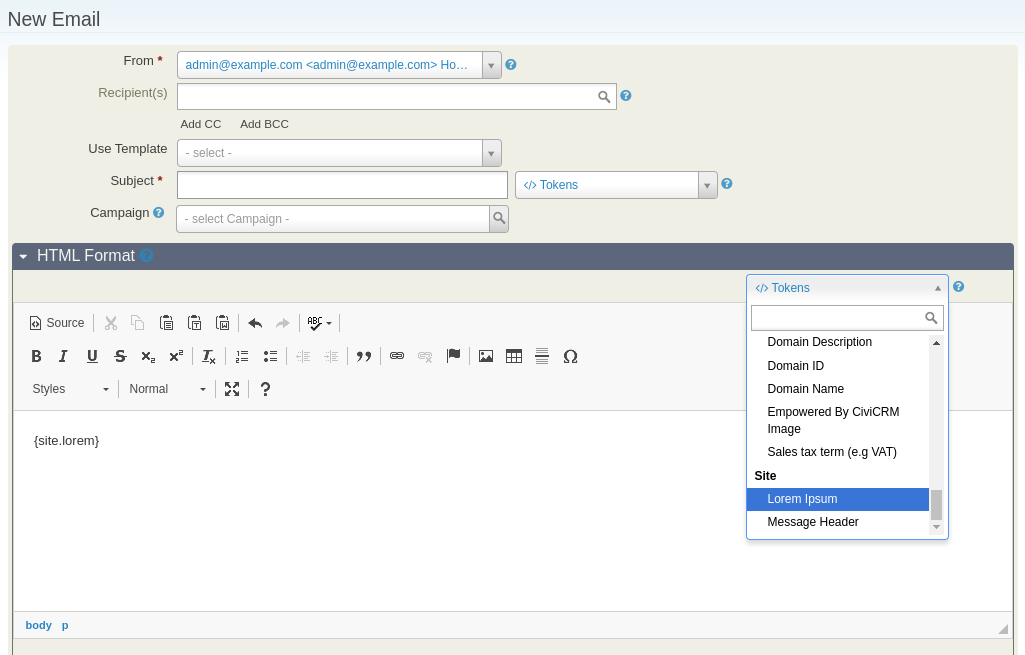
In addition, you may create any numuber of additional Site Tokens for your own purposes.
Like other tokens, Site Tokens are available in the Insert Tokens utility in various CiviCRM features, grouped in a section labeled "Site". For example, after you've defined a Site Token labeled "Lorem Ipsum", when creating an email, that token is available:
Users with the "edit system workflow message templates" permission can manage Site Tokens by navigating to Administer > Communications > Site Tokens.
See Available Tokens below for details on specific Site Tokens provided and managed by CiviCRM.
Custom tokens
Developers can create custom tokens which can, for example, display the total amount of contributions from a contact. See the Developer Guide for more info about custom tokens.
Date tokens
Dates and times are presented in many ways -- using full words (e.g. "September" or "Sunday"), abbreviations ("Sept", "Mon"), numbers, different regional formats (e.g. MM/DD/YYYY vs DD/MM/YYYY), and so on.
During system setup, the administrator may configure date preferences. Tokens such as {event.start_date}, {domain.now}, and
{contact.created_date} will be formatted automatically based on these preferences.
Alternatively, you may customize the format of each token individually. This requires the |crmDate filter (CiviCRM v5.43+). Common ways to format a date include:
-
Configured Formats: CiviCRM includes ~7 configurable formats. On new deployments, the initial configuration is tuned to English (US) conventions, but they are often adjusted depending on the organization's language and locale. Here are some examples of how the
{domain.now}token could be formatted:Format Name Example Token Example Value (US English) "Complete Date and Time" (default) {domain.now|crmDate:"Datetime"}September 18th, 2022 11:58 PM "Complete Date" (default) {domain.now|crmDate:"Full"}September 19th, 2022 "Short Date" {domain.now|crmDate:"shortdate"}09/18/2022 "Month and Year" {domain.now|crmDate:"Partial"}September, 2022 "Time Only" {domain.now|crmDate:"Time"}1:34 PM "Year Only" {domain.now|crmDate:"Year"}2022 "Financial Batch" {domain.now|crmDate:"FinancialBatch"}09/19/2022 -
Adhoc Formats: The adhoc formatting codes allow full access to a range of details, including the conventional month, day, and year (numbers) as well as day-of-week, day-of-year, week-of-year, timezone, and so on. Here are some examples of how the
{domain.now}token could be formatted:Example Token Example Value {domain.now|crmDate:"%B %Y"}September 2022 {domain.now|crmDate:"%m/%Y"}09/2022 {domain.now|crmDate:"%l:%M %P"}1:34 PM For a full list of formatting codes, please see PHP Manual: strftime().
Smarty in mail templates
Mail templates use Smarty to include variables, tokens & functions. A more thorough tutorial can be found at http://www.smarty.net/manual. For example, you can use Smarty for if/then logic.
System administrator required
For Smarty to work you must add (or modify) the following line to your civicrm.settings.php file located under sites/default/ for Drupal and administrator/components/com_civicrm for Joomla.
phpdefine('CIVICRM_MAIL_SMARTY', 1);
Tips
-
You can use CiviCRM tokens within Smarty. If you want to check if a field has a value before using it, use the
|booleanmodifier:{if {contact.email_primary.email|boolean}} Email: {contact.email_primary.email|boolean} {/if}
Modifiers for CiviCRM tokens
Modifiers can be used for CiviCRM tokens by adding them to the token after a pipe, e.g. {contribution.total_amount}. Modifiers available for CiviCRM tokens include:
- upper: Uppercase
- lower: Lowercase
- capitalize: Title case (each word capitalized)
- boolean: Returns 0 or 1
- crmDate: Formats a date, see Date Tokens
- default: Returns the value if it exists and isn't falsy in PHP, or the value you provide if not, e.g. {contact.first_name|default:"friend"} returns friend if the contact has no first name.
CiviMail click tracking of links with tokens in link URLs
Up to CiviCRM version 5.34 CiviMail’s link click tracking would ignore links with tokens in, so if you had a call to action that used a token in its URL, it was not possible to see how many recipients clicked that link. From CiviCRM version 5.35, using the FlexMailer extension which is shipped with CiviCRM itself, it is possible to track links that include tokens in the query parameters of a URL.
For example, if a mailing included a personalised link to a Contribution Page, so that all the fields would be pre-filled for the recipient, like <a href="https://example.org/civicrm/contribute/transact?reset=1&id=1&cid={contact.contact_id}&{contact.checksum}">Donate now</a>. This uses two tokenised URL query parameters cid which is set to {contact.contact_id} and there is {contact.checksum} which generates code like cs=aaaaaaaaaaaaa.... This link will be tracked without tokens; the mailing report will show how many people clicked the Donate now link, listing it as https://example.org/civicrm/contribute/transact?reset=1&id=1 (without the tokens).
Rules for successfully tracking links that have tokens in:
-
Tokens are allowed in the query part of the URL. Tokens in the path or domain etc. won’t be tracked.
- ✔
https://example.org/somepage?magic={some.token} - ✖
https://{some.token}.org/- token in domain name means the link can’t be tracked. - ✖
https://example.org/{some.token}- token in the path means the link can’t be tracked. - ✖
{some.token}- token as the whole URL can’t be tracked.
- ✔
-
You may mix query parameters with and without tokens.
- ✔
https://example.org/somepage?magic={some.token}&x=1&y=two - ✔
https://example.org/somepage?x=1&y=two&magic={some.token} - ✔
https://example.org/somepage?x=1&magic={some.token}&y=two
- ✔
-
You may also use tokens in the fragment part; the fragment part is not included in the tracked part of the URL.
- ✔
https://example.org/spa#{some.token} - ✔
https://example.org/spa?cid={contact.id}#{some.token}
- ✔
-
The expansion of the token must be URL safe! This does not affect the tracking of a link, but is a general point about including token data in URLs (or other HTML attributes).
- ✔
https://example.org/somepage?cid={contact.id}- Contact ID is always a number, which is URL-safe - ✖
https://example.org/somepage?cid={contact.first_name}- First name could include anything and may break the link and could also represent a security risk. - ?
https://example.org/somepage?mycustom={mycustom.token}- If the code that generates a custom token outputs URL-safe data (e.g. within character subset, like a numeric ID, hex hash or such, or it generates a value that is rawurlencoded.)
- ✔
-
The expansion of the token must be CMS safe. As with (4) this is general advice, but hopefully helpful to point out here.
- ✖
https://drupal.example.org/?q={some.token}- Drupal usesqfor its own purposes. (This could be valid in special cases where your token is a valid Drupal path.) - ✖
https://wordpress.example.org/?action={some.token}- Wordpress has many reserved terms that are not allowed.
- ✖
Available tokens
This section documents the available action tokens, their purpose and the place(s) they can be used.
{action.optOutUrl}
- Purpose: Provides an opt-out link for each recipient.
- Used in: Mailing Body, Header, Footer, Unsubscribe, Resubscribe.
-
Example:
You can also
<a href="{action.optOutUrl}" >opt-out of all future mailings from us</a>.
{action.optOut}
- Purpose: Provides an opt-out email address for each recipient.
- Used in: Mailing Body, Header, Footer, Unsubscribe, Resubscribe.
-
Example:
To opt-out of all mailings from us, send mail to {action.optOut}
{action.reply}
- Purpose: Provides a reply-to email address for each recipient
- Used in: Mailing Body, Header, Footer, Unsubscribe, Resubscribe.
-
Example:
To reply to this mailing, send mail to {action.reply}
{action.resubscribeUrl}
- Purpose: Provides a re-subscribe link for each recipient
- Used in: Mailing Body, Header, Footer, Unsubscribe, Resubscribe.
-
Example:
You may
<a href="{action.resubscribeUrl}" >resubscribe to this mailing</a>at any time.
{action.resubscribe}
- Purpose: Provides a re-subscribe email address for each recipient.
- Used in: Mailing Body, Header, Footer, Unsubscribe, Resubscribe.
-
Example:
To resubscribe to this mailing, send mail to {action.resubscribe}
{action.subscribe.gid}
- Purpose: Provides an email address to subscribe to a specific group.
- Used in: Mailing Body, Header, Footer.
-
Example:
To subscribe to our Monthly Newsletter, send mail to {action.subscribe}.
{action.subscribeUrl.gid}
- Purpose: Provides a link to subscribe to a specific group (gid = CiviCRM ID of that group).
- Used in: Mailing Body, Header, Footer.
-
Example:
You can
<a href="{action.subscribeUrl.2}" >subscribe to our Monthly Newsletter</a>.
{action.subscribeUrl}
- Purpose: Provides a link to view and subscribe to any public mailing lists.
- Used in: Mailing Body, Header, Footer.
-
Example:
If you're interested,
<a href="{action.subscribeUrl}" >view all our mailing lists and sign up!</a>.
{action.unsubscribeUrl}
- Purpose: Provides an unsubscribe link for each recipient.
- Used in: Mailing Body, Header, Footer, Unsubscribe, Resubscribe.
-
Example:
You can
<a href="{action.unsubscribeUrl}" >unsubscribe from this mailing</a>at any time.
{action.unsubscribe}
- Purpose: Provides an unsubscribe email address for each recipient
- Used in: Mailing Body, Header, Footer, Unsubscribe, Resubscribe.
-
Example:
To unsubscribe from this mailing, send mail to {action.unsubscribe}
{contact.custom_nn}
- Purpose: Displays content of custom contact field nn
- Used in: Mailing Body, Subject, not sure about elsewhere.
-
Example:
Thanks for indicating your interest in {contact.
custom_1}. We will keep you updated on that topic.
{contribution.custom_nn}
- Purpose: Displays content of custom field nn for the contribution
- Used in: Mailing Body, Subject, not sure about elsewhere.
-
Example:
Thanks for indicating that if your first choice for where we should use your contribution is {contribution.
custom_42}.|
{domain.address}
- Purpose: Displays postal address for your domain.
- Used in: Mailing Body or any message templates.
-
Example:
Mailing Address: {domain.address}
{domain.email}
- Purpose: Displays email address of domain.
- Used in: Mailing Body or any message templates.
-
Example:
Or send a mail to {domain.email}.
{domain.name}
- Purpose: Displays your domain name.
- Used in: Mailing Body or any message templates.
-
Example:
This mailing is from {domain.name}.
{domain.phone}
- Purpose: Displays phone number of domain.
- Used in: Mailing Body or any message templates.
-
Example:
To contact us call {domain.phone}.
{mailing.group}
- Purpose: Displays a listing of the names of the groups to which a mailing has been sent.
- Used in: Mailing Body, Header, Footer, Resubscribe, Unsubscribe or Optout.
-
Example:
This mailing has been sent to the members of {mailing.group}.
{mailing.name}
- Purpose: Displays name of mailing.
- Used in: Mailing Body, Header, Footer, Resubscribe, Unsubscribe or Optout.
-
Example:
Name of this mailing is {mailing.name}.
{mailing.viewUrl}
- Purpose: Will create a 'View in Browser' url
- Used in: Mailing Body.
-
Example:
Can't see this email?
<a href="{mailing.viewUrl}"><strong>View in Browser</strong></a>
{resubscribe.group}
- Purpose: Displays group name in re-subscribe messages.
- Used in: Resubscribe Message.
-
Example:
As requested, you have been resubscribed to {resubscribe.group}.
{site.message_header}
- Purpose: Displays the newly joined group name in a welcome messages.
- Used in: Default Message Templates automatically; anywhere tokens are provided
- Default value: (empty)
-
Example customized value:
<h4>CiviCRM<\h4><img src="https://drupal.example.org/sites/all/modules/civicrm/i/logo_lg.png">
{subscribe.group}
- Purpose: Displays group name in subscription confirmation requests.
- Used in: Subscription confirmation request.
-
Example:
You requested to be subscribed to the {subscribe.group}.
{unsubscribe.group}
- Purpose: Displays group name in unsubscribe confirmation messages.
- Used in: Unsubscribe Message.
-
Example:
You have been unsubscribed from {unsubscribe.group}.
{welcome.group}
- Purpose: Displays the newly joined group name in a welcome messages.
- Used in: Welcome Message.
-
Example:
Welcome to {welcome.group}.