Contacts
This chapter introduces contacts: the basic building block of CiviCRM. We look at how to find, view, add, edit and delete contacts. We also look at ways to extend and customise contacts, and to change the way that contacts appear in the user interface.
Out of the box, CiviCRM comes with three contact types:
- Individuals - i.e. people
- Organisations - for example companies or other non-profit organisations
- Households - typically families that share a physical location
Each contact record comes with a set of core fields, including:
- names (first and last name, etc. for individuals and organisation name, etc. for organisations)
- greeting and addressee fields for different communication methods
- contact methods, e.g. email addresses, phone numbers, website addresses, etc.
- addresses (i.e. physical locations)
- communication preferences: i.e. the methods that they prefer to be contacted by, and those that they do not want to be contacted by.
You can define new contact subtypes based on the out of the box contact types.You can add custom fields that extend all contacts. You can also add custom fields that extend particular contact types or sub types.
Think of contacts as the centre of your CiviCRM universe. All of the other building blocks of CiviCRM, like relationships, activities, groups and contributions connect to contacts in some way.
A quick look at contacts
Contacts are organised into tabs. The first tab that you see when looking at a contact is the summary tab with some basic information about your contact. Following the summary tab are a series of other tabs each showing information about different aspects of the contact. Organising the contact into tabs helps manage the large amount of data it is possible to collect about contacts over time.
Tabs get turned on and off depending on what components are enabled and what permissions you have. For example, you will only see the memberships tab if the CiviMember component is turned on and you have permission to see memberships, etc. You can also define extra tabs that display any extra custom data that you want to collect about your contacts.
Below we look at the most important parts of the contact screen (including most of the contact with pointers to other parts of the book where appropriate.
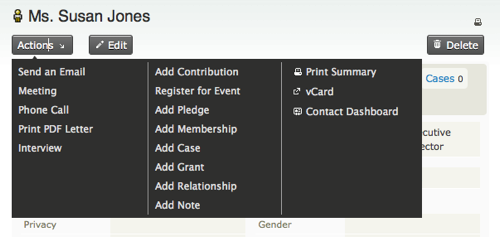
Contact actions
Above the tabs line, you will see a few buttons. The first button is the Actions button which is a handy shortcut to carrying out actions with this contact. For example, you could add a note to this contact, or record a new contribution, meeting or other activity.
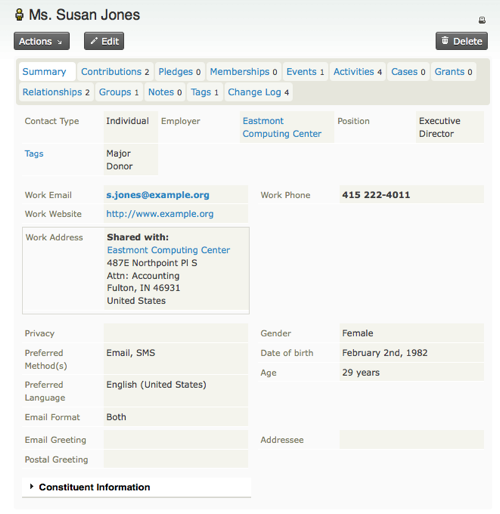
Summary tab
The summary tab shows overview information about your contact. Here you will find names, addresses and contact details as well as details of contact methods.
Some fields on this tab are just for individuals, for example, first name, last name, nickname, etc. Other fields are just for organisations, for example organisation name.
Individual fields
Individuals names are split into the following parts: prefix, first name, middle name, last name, suffix and nickname (you don't have to use all of them). Prefixes and suffixes are selected from a drop down list. If you can't find the value you want, you can add more options to the list from the following screen: Administer CiviCRM > Customize Data and Screens > Dropdown Options > Individual Prefixes (Ms., Mr...).
Addresses
You can record one or more addresses for a contact. Each address needs to be at a different location type (e.g. work, home, etc). One of the addresses can be marked as primary and will be used for any postal mailings that you do. You can explicitly choose which location will be primary for a particular person, or let it default to the first one entered.
You can share addresses between contacts. For example, you may need to keep information about individual contacts and the organisations where they work. When creating or editing the "work" address for an individual, check the "Share Address With" box. If their employer already exists in your database, you can select them from the quick search box that appears. Otherwise, you can create the employer's organisation record on the fly by selecting "New Organisation" from the "create new contact" drop-down. Shared addresses are synchronized in both directions - if one changes, the other will be automatically updated.
If a person pays you by credit card, the details used for Billing Address in credit card payments will be stored in the Billing location for the contact.
If you have a mapping provider enabled you can click on the map icon next to an address to see the location of a contact on a map.
Phone numbers
You can store multiple phone numbers for each contact. Phone numbers have locations (e.g. work, home, etc.) and types, e.g. landline, fax, mobile. Note that any phone numbers that you add as of type mobile will be available for sending SMS.
Email addresses
You can store multiple email addresses for each contact. One of these email addresses can be explicitly marked as the address which receives all bulk mailings such as e-newsletters and announcements (e.g. these are emails your organisation would send using the CiviMail component). Any bouncing emails are automatically marked as being on hold when sending emails via CiviMail. See the Email section for more information.
Communication preferences and privacy options
Communications preferences (i.e. methods of communication that are preferred by contacts) and privacy options (e.g. do not contact me via email) can be defined. Privacy options are respected when carrying out certain functions, e.g. mailing labels are not printed for contacts with the 'do not mail' privacy option, and emails are not sent to contacts with the 'do not email' privacy option.
Here is a brief explanation of each of the privacy options in the CiviCRM contact record:
- Do not phone - The end user has elected to not be contacted via telephone.
- Do not email - The end user has elected to not be contacted via email.
- Do not mail - The end user has elected to not be contacted via postal delivery (snail mail)
- Do not SMS - The end user has elected to not be contacted via text messaging service to their mobile device.
- Do no trade - The user has elected not to share their info with other organizations. (ie. you may not share or sell user's information to other parties)
- NO BULK EMAILS (User Opt Out) - This is set when a user selects the Opt Out action in a CiviMail Email.
Greetings and addressee fields
By default greetings and addressee fields are calculated based on the contacts name fields. For example the postal greeting for an individual called 'Jenny Soper' is 'Dear Jenny'.
The default greetings can be configured at a global level here: Administer CiviCRM > Communications > Email Greeting Formats or Postal Greeting Formats or Addressee Formats.
Different formats can also be selected for each contact and can also be customised on a contact per contact basis.
Demographics and deceased / closed contacts
For Individuals, you can record birth date, gender, if they are deceased and when they died.
Similarly, for Organizations or Households that do not exist anymore, you can record that they are "closed" by clicking to edit the block that contains Nickname and Legal Name.
Relationships tab
Relationships are connections between contact records in your database. Each connection can be named to describe the nature of the connection, and a contact may have many relationships to other contacts in the database. In the example below you can see a list of Current Relationships as well as a list of Inactive relationships.

You can read more about when it makes sense to use relationships in the relationships chapter of the organising your data section.
Activities tab
The Activities tab displays a list of all of your interactions with a contact, including all CiviCRM's built-in activities like event attendance, contributions, phone calls etc as well as any custom activities you may have added. It also allows you to record activities with contacts. Clicking on the icons at the top of the screen (Send an Email, Meeting, Phone call) will bring up a screen where you can enter those details. This tab will also show any custom activities that you've defined.

To find out more about activities please refer to the Activities section in this chapter.
Mailings tab
This is only visible if at Administer > CiviMail > CiviMail Component Settings you have unselected Enable CiviMail to create activites on delivery. In that case each bulk email is recorded on the mailings tab instead of the activities tab. This improves the speed at which the activies tab loads if your organisation sends bulk emails to large mailing lists.
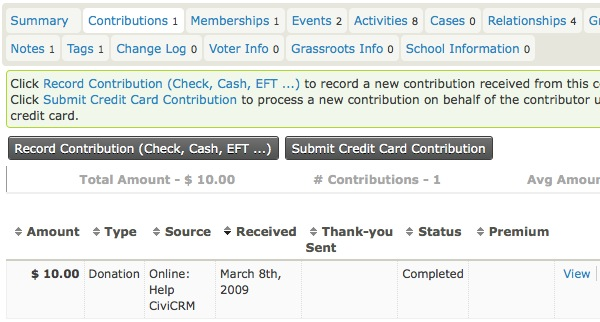
Contributions tab
The Contributions tab shows any financial contributions made by a contact, as well as a summary of the contribution activity of the contact (total amount of contributions over time, total number of contributions, and average amount of contributions).
The Contributions tab also allows you to record offline contributions using the Record Contribution button, or record a credit card transaction on behalf of the contact (useful if the contribution has been made by phone) using the Submit Credit Card Contribution button. Both of these buttons lead to forms that allow you to select the Financial Type in addition to the normal contribution information collected from public contribution pages.
Read more about Contributions, in the Contributions chapter of this book.
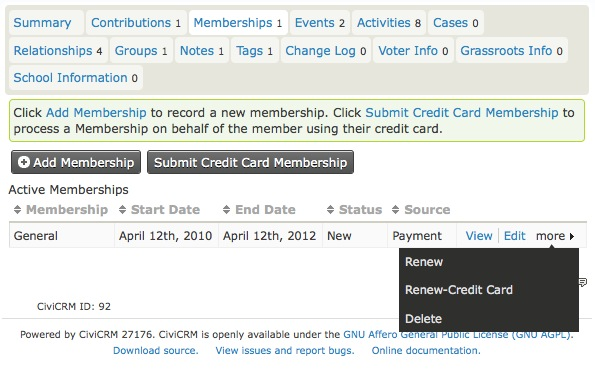
Memberships tab
This tab displays any memberships a contact has. From this tab you are able to add memberships and submit credit card payments for memberships that require a fee. You can also renew or delete memberships from the "more" link on each membership in the contact's existing memberships.
Read more about Memberships, in the Membership chapter of this book.
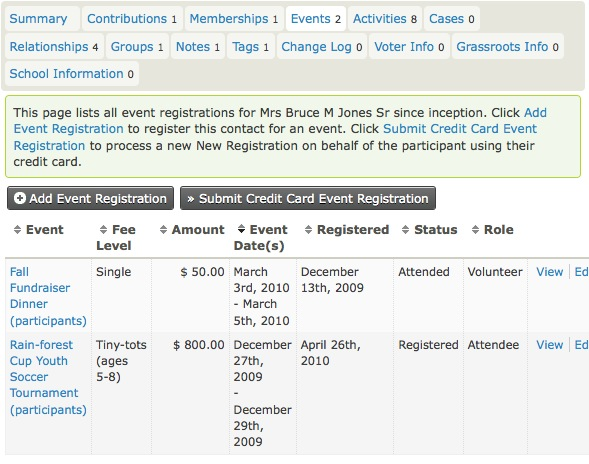
Events tab
The Events tab displays events related to this contact, for example events the contact has registered for, attended or volunteered at.
From this page you can register the contact for an event, and use the Submit Credit Card Event Registration button if the event requires payment. The related payment will then appear on the contact's Contributions tab in the first row.
You can also modify the event information as it relates to the contact by clicking the Edit link. For example, you can change the contact's event status from "registered" to "attended."
Read more about Events, in the Events chapter of this book.
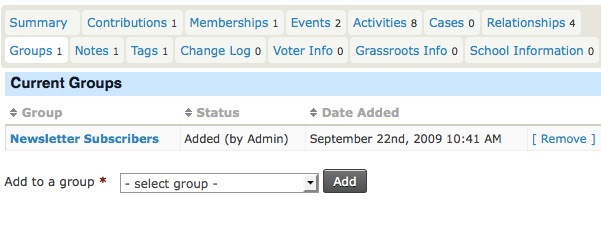
Groups tab
The Groups tab shows the groups that the contact belongs to. Groups can be used in a variety of ways including mailing lists and permissions (ACLs).
You can add and remove the contact from groups, and see a history of groups the contact has unsubscribed or been removed from.
The Status column displays who has added the contact to the group. Whether users can add themselves to a group is one of the settings you can configure when creating a group. When you set a group's visibility to "Public Listings" users can join via Profile forms. You may want to familiarise yourself with the discussion on using Profiles for mailing list sign-ups covered in a later section.
For more on this topic, please refer to the Groups and Tags section of the book.
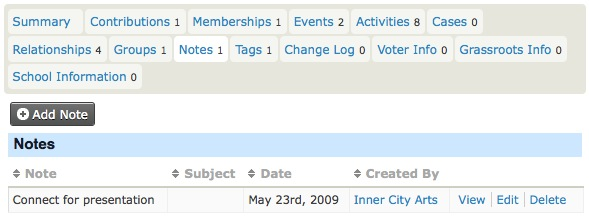
Notes tab
The Notes tab is a place where you can record random bits of information about a contact. Generally you would use custom fields for information you plan to collect about your contacts, but in some cases it may be useful to record additional, ad-hoc notes. Since this information is unstructured, you should be careful about using the Notes tab, unless you know that you or other people using your CiviCRM implementation will remember to look at that tab. When creating a Note, both the subject and the content are free-text fields (i.e. the subject field does not have to be chosen from predefined options).
You can specify "Author Only" privacy for a note. This means that only the person who wrote the note, or someone with "view all notes" permission (via your CMS) can view or edit it.
Tags tab
Tags are one way of categorising contacts in your database (other methods are Custom Data and Groups). You can configure which tags you wish to use for your organisation. You can search on tags and create Smart Groups based on them.
The tags next to Keywords are part of the Keywords Tagset. A Tagset is a specific grouping of tags that you can create. Tagsets are non-hierarchical, and you can create a new tag in a tagset simply by typing a new tag into the field. Existing tags that match what you type will also show up as a list from which you can select.

For more on this topic, please refer to the Groups and Tags section of the book.
Change Log tab
This tab gives limited information about changes made to a contact record. It shows the change date and who made the change, but not what was changed.

Tip
Administrators can use the Contact Logging Report to get detailed information on changes to contact records (who, what and when).
Adding contacts
The simplest way to add a single contact to CiviCRM is to use the navigation menu at the top of any non-public page. To create a new Individual, go to: Contacts > New Individual:

Note that the Contacts menu item allows you to create every kind of contact and contact sub-type.
All of the contact creation forms are similarly arranged, with basic information (name, email etc) at the top of the form and more specific fields below grouped by type or subject in accordions (such as address fields, communications preferences and any custom fields that you have added for the contact type).
For all contact types you can use the Check for Matching Contacts option to help avoid duplicate entries. After entering all of the information you have in this section, you can click on Check for Matching Contacts.
For adding an Individual record to the database, first name and last name OR email address are required. For adding an Organization or Household record to the database, just Organization/Household name is required. You can fill out as many of these fields as you like, and do not forget, you can always go back and make changes as needed by using the edit screen.
Useful things to know when adding contacts:
Address: You can add multiple addresses to a contact record. This allows you to store someone's home and work addresses, as well as a billing address if that's different.
You will see a checkbox here to allow you to share the address of either an existing contact, or create a new contact. If you select new contact, you will need to select which contact type you wish to create, and a pop up box will appear to add the new contact record. When a person uses another contact's address, that address can only be edited from the "master contact's" record.
The options available in the countries dropdown will depend on which ones you have made available at Administer > Localization > Languages, Currency, Locations under Available Countries.
There may be fields here that you do not need. Available address fields can be edited at Administer > Localization > Address settings. The "Address Name" field which can be used to label a particular address (for example "Summer Home") is hidden by default, but can be enabled from that screen.
Tags and Groups: Here you can specify which tags and groups to add your contact to. Please note that you may only add to existing groups and tags with existing tags. You can read more about creating tags and groups in the Groups and Tags chapter of this book.
Once you have filled out the form, you have the choice of three buttons to click:
- Save will save the contact record and take you to the contact screen.
- Save and New will save the contact and clear the form so that you can add another.
- Cancel will discard the entered information and return you to your CiviCRM dashboard.
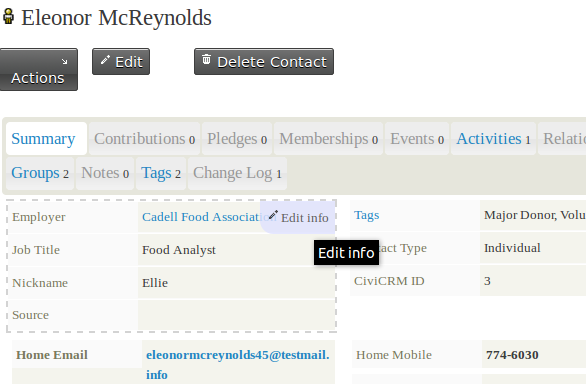
Editing contacts
Editing information on the summary screen is simple. Hovering in the upper right corner of the block that you wish to edit will bring up the Edit Info link. You can then edit the information directly in the summary screen.
If you need to edit a lot information for one particular contact, an alternative is to open the entire contact for editing by clicking on the edit button above the tabs.
Note that on the rare occasions that two separate admin users edit a contact at the same time (specifically that they both open the edit screen, then both save the contact), the second admin user will be notified of the first admin user's edit and be given the chance to manually 'merge' the edits.
Deleting contacts
At the top right there is a button to Delete the contact. When a contact is deleted, it does not disappear completely - instead it moves to the trash, where it can be recovered at a later date (using the search in trash feature of advanced search). See "searching" under the "working with your data" chapter for more information).
Deleted contacts are moved to the "trash" by default (and can be restored later if needed). There are a variety of ways to delete a contact:
- Single contact: open the contact's record and click the 'delete contact' button at the top of the page. Alternatively, run a search for the contact and, from the results list, look toward the end of the contact's row, click 'More' and select 'Delete Contact'.
- Multiple contacts: run an advanced search, check the boxes of each record you wish to delete (or select all with the checkbox in the header at the top) and in the 'actions' drop-down menu, choose 'Delete Contacts' to send the contacts to the trash (if enabled) or 'Delete Permanently'. A warning page will be displayed to verify your intention; simply click 'Delete' to continue or 'Cancel' to return to the previous screen.
Contact subtypes
In addition to the three default contact types (individuals, households and contacts), you can define additional contact types (sometimes referred to as contact subtypes) to suit your needs.
Each contact subtype that you define is based on one of the three core contact types. For example, 'Student' would based on the 'Individual' contact type, and 'Farm' could be based on the 'Organization' contact type, or perhaps 'Household' contact type, depending on your use case.
Contact types are very useful when you need to collect and display different sets of custom data for different types of contacts (e.g. you may wish to collect information on the subject area and qualifications of all teachers in your database but not be interested in collecting these for other individuals. To do this, you would create a contact type called Teacher, based on Individual and then create a custom data set that only extends Individuals of the type Teacher (see custom data for more information).
Note that the core contact types are mutually exclusive, i.e. a contact cannot be an organisation and an individual. However, contacts can be of more than one user-defined contact subtype, i.e. they could be a Teacher and a Parent, for example.
To edit existing contact types and and create new contact types go to Administer > Customize Data and Screens > Contact Types. Note that you cannot delete the inbuilt contact types but you can change their names and the images associated with them.
To add custom fields to specific contact subtypes, see the chapter on custom fields.
Customizing the view of contacts
After working with the contact editing and summary screens for a while, you may realise that there are sections and/or fields that aren't useful for your organisation. The good news is that you can easily hide some fields and sections. For example, if your organisation doesn't need to store demographics information, you can remove it by configuring the Site Preferences. Using an account with Administer CiviCRM privileges.
- Go to: Administer > Customize Data and Screens > Display Preferences.
- Clear the Demographics box under Editing Contacts.
- Click Save.
You can also use this screen to rearrange the order that the information is displayed in.
For further details see Customizing the user interface
Similarly, if you want to remove (or add) fields in the postal address section:
- Go to: Administer > Localization > Address Settings.
- Check or uncheck fields under Address Editing.
- Click Save.
If you think that some of the tabs are not useful and will not be used in your deployment, you can disable or enable specific tabs from Administer > Customize Data and Screens > Display Preferences. If you don't see some of the tabs described below, you may need to enable them. The visibility of some tabs is dependent on which components are enabled in your installation. For example, the Contributions tab will be hidden if the CiviContribute component is disable.