Permissions and access control
Permissions (and the related concept of access control lists, or ACLs) are collections of rules which define access to various areas of the system. In essence, you create roles for your site, give these roles permissions to do certain things, and assign the roles to certain people.
Permissions and ACLs allow you to grant access to:
- Different areas of CiviCRM (e.g. CiviContribute, CiviCase and CiviMail) to reflect the tasks the user is responsible for
- Entities within the system (like contacts, contributions, etc.), and how the user can interact or operate with them (e.g. view, edit, delete)
Since permissions define who can see and do what on your site, it is important, from a security perspective, that you understand them well. It is very easy to check a permissions box without fully understanding what it does. A site with badly configured permissions may inadvertently expose your contacts' data.
The difference between CMS permissions and CiviCRM ACLs
Permissions and ACLs are defined in two separate places: in the content management system (CMS) and in CiviCRM itself. Many organisations are able to do what they need to do with just CMS permissioning. Others need to use CiviCRM ACLs to provide more fine grained access control.
CMS permissions allow you to grant (or not grant) access to entire sections of CiviCRM to user roles, such as CiviMail, CiviEvent, etc. They also allow you to restrict the user's ability to view, edit, add and delete records such as contacts, events and contributions. However, this is an 'all or nothing' approach: you cannot differentiate between contacts who fall into different groups, for instance.
Native CiviCRM ACLs give more fine grained control, so, for example, you can limit access to view, edit, create, delete and search to :
- groups of contacts
- a profile (this is a collection of existing and/or custom fields, see "Profiles")
- a set of custom fields
- events (e.g. a user may access one event, but not others)
As a general rule, you should probably start with CMS permissions and if you can't do what you need to with these, look at using CiviCRM to enforce more granular access rights.
To clarify, here are two of examples of times when CiviCRM ACLs should be used instead of those in Drupal, Joomla! or WordPress:
- An organisation has a head office, and three regional offices spread across the country. The event director working from the central office must be able to view all events across every office, but the event coordinators reporting to the director and local to each regional office are only to have access to view and edit their own events. Since a CMS access control list would only be able to restrict access to view/edit/add/delete all or no events, a CiviCRM ACL must be used.
- Two sets of custom fields have been built, one for a team of employees working in Paris managing a group of volunteers, and the other collecting donor information in London. Each team should only be able to access data held in their own set of custom fields, however, a CMS access control list could only give them access to all of the custom information, or none of it. In this case any CMS rule controlling access to custom fields should be disabled, and a CiviCRM ACL used instead.
CMS permissions
All CMS have the same set of CiviCRM permissions, but each are found in different places, and differ slightly in appearance.
Permissions in Drupal
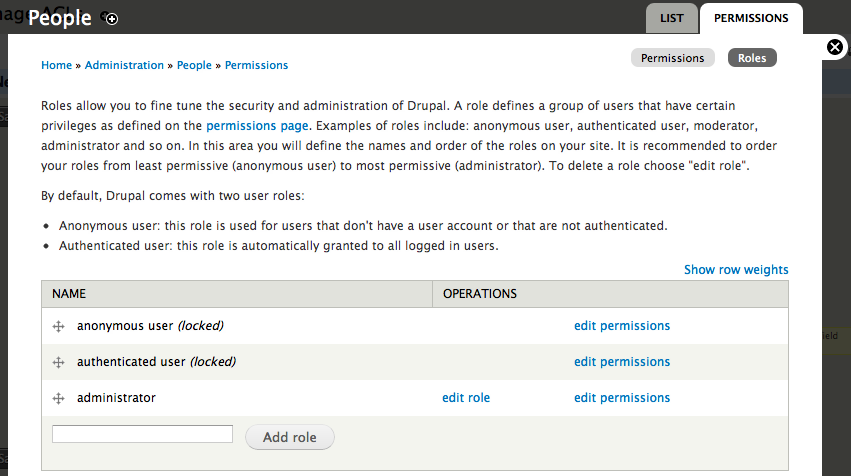
To access Drupal's permissions, go to the Drupal menu, choose the option People and click the Permissions tab in the top right corner of the pop-up window. Here you will find a long list of all possible operations/actions a user could perform in CiviCRM and Drupal, with columns for each existing role type. Checking an option in one of the columns will grant that role the ability to perform the action.
You may create new roles and edit all existing ones. To edit roles, while in the Permissions tab click the button Roles toward the top right of the page.
Roles can be assigned to users in the following ways:
- Open a user's contact record (a contact in CiviCRM with a user account), hit the Actions button at the top and select User Record from the menu. When the next screen appears, click the Edit tab (top right) and then scroll down to the section titled Roles; here you may change their level of access.
- As an administrator, go to the Drupal menu and select the option People. When the list of active users appears, click on the desired name to open their Drupal user profile, go to the Edit tab at the top-right of the page, and then scroll down to the Roles section.
Permissions in Joomla!
Permissions in Joomla! can be found as follows:
- Log into the Joomla! administrative portal
- Go to the Components menu and select CiviCRM from the list
- In CiviCRM's menu, navigate to Administer > User and Permissions > Permissions (Access Control)
- Click the option Joomla Access Control at the top of the list
Joomla! has a different method of assigning permissions, in that each user group (role) is either a parent or child to another user group, where child user groups (those lower in the table) inherit the permissions set for those above them. Therefore, when editing the permissions assigned to a user group in the table, you may choose between:
- Inherited: if the user group above was given this permission, it will also be able to perform the given action
- Allowed: users in this user group are allowed to perform the operation
- Denied: users in this user group cannot perform the action
Note that Joomla! has two additional permissions not used by Drupal or WordPress: Configure Joomla! ACL (user can configure Joomla! ACLs and is assigned all CiviCRM permissions) and Show CiviCRM Component (user can see CiviCRM in the Components list).

Finally, to assign one of these user groups to a user, or change their existing user group, ensure you are logged in as an administrator then do one of the following:
- Go to the user's contact record in CiviCRM, click the Action button and select the option User Record. A section called Assigned User Groups will be available to change roles.
- Within the Joomla! administrative portal, under the User menu click User Manager. All available users will be listed, and clicking on a name will open a screen with the option to change their account settings, including user group.
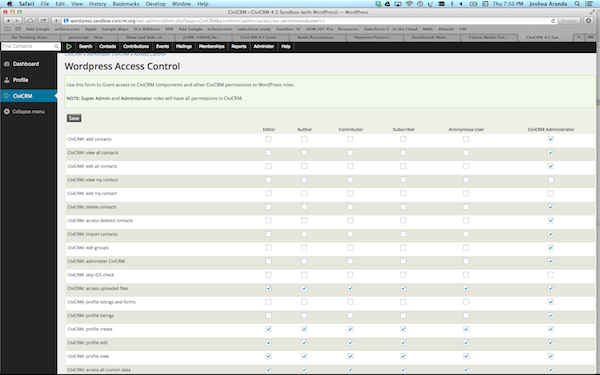
Access Control (Permissions) in WordPress
In CiviCRM go to Administer > User and Permissions > Permissions (Access Control). Select the WordPress Access Control link. Here you can adjust the CiviCRM settings for each of the predefined User Roles from WordPress.
Roles can be assigned to users in the following ways:
- Open a user's contact record (a contact in CiviCRM with a user account), hit the Actions button at the top and select User Record from the menu. This will open the Edit User screen where you can change their Role to change their level of access.
- Within the WordPress Site Admin area, select the Users menu item to see a list of all users. Clicking on a name will open the Edit User screen where you can change their Role to change their level of access.
Financial Type Permissions
By default, access to Contribution data is controlled by the access CiviContribute, edit contributions and delete in CiviContribute permissions, and these permissions apply to all contributions, regardless of financial type.
If you need more control, you can use the following steps to set different permissions for different contributions based on their financial type:
- Begin with CiviCRM installed within Drupal, Backdrop, or WordPress. (This feature is not yet available for Joomla.)
- Go to Administer > CiviContribute > CiviContribute Component Settings.
- Check the box to Enable Access Control by Financial Type.
- Edit your CMS permissions and see that CiviCRM has added a 'view', 'edit' and 'delete' permission for every financial type. Assign these permissions as needed.
Tip
You must grant the add and view permission for each financial type to the anonymous user role for visitors to be able to access your contribution pages.
For example, you may wish to use this feature to allow some users to manage event payments without being able to see any of the data about donations.
Anonymous and Authenticated roles
You will encounter both these role types as you work with the access controls. Although they may be named differently on different CMSes, the basic principle is the same.
The anonymous role (public in Joomla!) applies to all visitors to the website who have not logged in. This role will have the lowest level of permissions.
The default CiviCRM permissions for this role are set out below. Please note that the actual permissions set may vary depending on your CMS and how you installed CiviCRM so please check that they are set up as you want them.
| Permission | Description |
|---|---|
| CiviCRM: access all custom data | View all custom fields - i.e. see/enter information in custom data fields in forms |
| CiviCRM: access uploaded files | View / download files including images and photos |
| CiviCRM: profile create | Add data in a profile form |
| CiviCRM: profile edit | Edit data in a profile form |
| CiviCRM: profile view | View data in a profile |
| CiviEvent: register for events | Register for events on your website |
| CiviEvent: view event info | View event information pages |
| CiviEvent: view event participants | View the participants that have signed up to an event |
| CiviContribute: make online contributions | Make payments or donations through your website |
| CiviMail: access CiviMail subscribe/unsubscribe pages | Subscribe/unsubscribe from mailing lists |
| CiviMail: view public CiviMail content | View mailings on your website |
| CiviCampaign: sign CiviCRM Petition | Sign petitions (if CiviCampaign is enabled) |
The authenticated role (registered in Joomla, subscriber in WordPress) is applied to all visitors to the site that have logged in. This is the default role for all new user accounts, and cannot be deleted. By default CiviCRM permissions for this role are the same as those for the anonymous role.
You can alter the permissions for anonymous and authenticated users if you need to as the following common scenarios show.
Taking online contributions
If you only want contributions from logged in users you would remove the make online contributions permission from the "anonymous" or "public" role.
Viewing event info and registering for events
If view event info and register for events are enabled for the anonymous and authenticated roles then all visitors to your site will be able to register for any event. If you wish to give only specific users the ability to view or register for some events, you must use a CiviCRM ACL, allowing a role "view" access to events if they should only be able to view event information, and the "edit" permission if they can register. However for this to function, the CMS register for events permission must be disabled, as it will override these settings.
e.g. A charity holds occasional fundraising events for the public and separate evening dinners for some of its corporate donors. Any visitor to the website can register and participate in a fundraising event, however the dinners are private and must only be available to some of their donors. In this instance, CiviCRM ACLs should be used instead of the CMS permission register for events as they can specify the specific events each group of users can access.
Editing profile data in online forms
Profiles are collections of default and custom fields, and can be used in online forms to collect additional information from visitors, or build searchable directories (see "Profiles").
If you have a standalone profile in an online form used to search for and edit data in CiviCRM (e.g. not part of an event registration page), only authenticated users may edit. The permission profile edit can be given to the anonymous role, but visitors who are not logged in will still be unable to edit the data unless they have a checksum (a unique URL to one page where they may edit their own data; read "Everyday tasks" in the email section for more information). For checksum tokens to work, anonymous users must have the profile edit permission.
Collecting data from anonymous visitors using profiles
If you have built profiles to collect data from anonymous visitors through online forms (e.g. event registration pages, contribution pages and standalone profile forms), the permission profile create will need to be given to the "anonymous" role. Furthermore, should the profile contain any custom fields, an additional permission will need to be given, depending on the circumstances. Read "Accessing custom data" below.
Creating searchable directories for the public
Profiles can be used to build searchable directories; a form of search criteria able to gather a list of results from the database (e.g. finding organisations held in the database by location). If you would like to give a group of users access to search pages published on the website, check the profile listings permission for that role/user group.
Profile view
Where profiles have been embedded within online pages (e.g. to display an organisation's name, description and contact details from the database), the visitor must have the permission profile view to see it.
Using the "Profile listings and forms" permission
Caution
The "Profile listings and forms" permission is equivalent to granting
profile_view, profile_create, profile_edit and profile_listing.
This is a lot of permission and should be assigned carefully!
This access right should be assigned with care, and only to trusted roles. The permission grants access to:
- Add data through profiles in online forms
- Edit data displayed in standalone profiles on public pages, if the option is given (e.g. contact information)
- Use public searchable directories
Where possible, each of these access rights should be assigned to a role separately, not through this 'allow all actions' permission. "Profile listings and forms" is not enabled for the "anonymous" and "authenticated" roles by default.
Note that if this role were given to anonymous users, in order to edit data, the visitor must either be logged in or using a checksum token (see "Everyday tasks" in the section on email).
Accessing custom data
If custom data fields have been used on an online form or within profiles, the user will not be able to interact with it unless they have been given permission to view and/or edit custom data. There are two ways of assigning this ability:
- Enable the access all custom data permission against the roles you wish to give both view and edit access. If this were given to the "anonymous" role, for example, they would be able to view and edit all custom fields in online forms (e.g. custom data fields within a profile that has been incorporated into an event registration page). However, this is an 'all or nothing' approach.
- Alternatively, CiviCRM ACLs can be created to give roles access to only specific sets of custom data fields. Use this option when you want to give groups of users access to different sets of data, e.g. a team in Amsterdam may only have access to custom volunteer fields, while the head office in Scotland has access access to both custom volunteer fields and custom donor fields. Note that these ACLs will not function if the access all custom data permission is assigned.
Accessing uploaded files
Enable the access uploaded files permission for any role that needs to view images, photos and files attached to CiviCRM records and pages. Be sure to assign this permission to the "anonymous" role if you want visitors to see photos attached to contact records, personal campaign pages, documents intended for public consumption, etc.
Giving users the ability to view their contact dashboard
You can provide authenticated (logged in) users with access to a screen where they can review the mailing groups they have subscribed to, their contributions, memberships and event registrations (where applicable). Assign the access contact dashboard permission to roles whose users are to be given access to this feature. Do not enable this for the "anonymous" role.
Other CMS Roles
Each CMS also has other predefined roles giving varying amounts of access to CiviCRM. Again you can change the permissions granted to these roles but you must make sure that there is always one role (Administrator/Super Users/Admin) that has the ability to administer CiviCRM including managing access control.
You may also want to add additional roles to allow for very graduated access to CiviCRM functionality.
More information on CiviCRM permissions (access control options) including permissions required to perform certain back office functions can be found at http://wiki.civicrm.org/confluence/display/CRMDOC/Default+Permissions+and+Roles.
Native CiviCRM ACLs
CiviCRM ACLs are a more advanced and granular way of managing user access to records through contact groups, assigned to ACL roles. While an access control in the CMS can 'turn off' visibility of entire sections of CiviCRM, and determine whether a user can view/edit/delete/create data in the different areas of the system, they cannot sub-divide these rules into access to different record types. For example:
A charity based in Chicago has three regional offices, and needs to give its fundraising staff the ability to create and edit contact records for prospective donors. They have decided that the fundraising department in each office can only have access to its local contacts. While the permission add contacts can be granted to authenticated users in the CMS (Drupal, Joomla! or WordPress), if view all contacts and edit all contacts were also assigned in this way, there would be no way to differentiate between the three groups of donors (locations). This could only be achieved with a CiviCRM ACL.
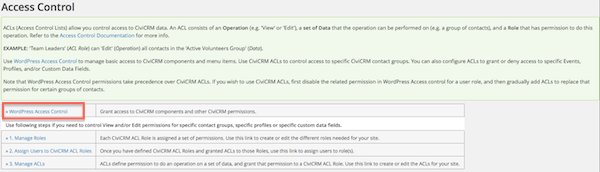
To begin, go to Administer > User and Permissions > Permissions (Access Control). This screen will link you to the CMS access control list, and the three steps to managing those native to CiviCRM.
Manage Roles
This is where you can create ACL roles. By default you will have "administrator" and "authenticated" (logged in), but only the administrator role may be edited; "authenticated" is a reserved role and core to the system.
Clicking "Add Acl Role" will present a screen for creating a new role with the following options:
- Label: this is the name of the role, and will be visible to users
- Description: create and format a description of the role
- Weight: give the role a number to determine its place in the list (e.g. "1" places the role at the top, while "20" might send it to the bottom; lower numbers appear before higher ones)
- Enabled?: is the role active or not? If you disable this option, functionality may cease to work for some users

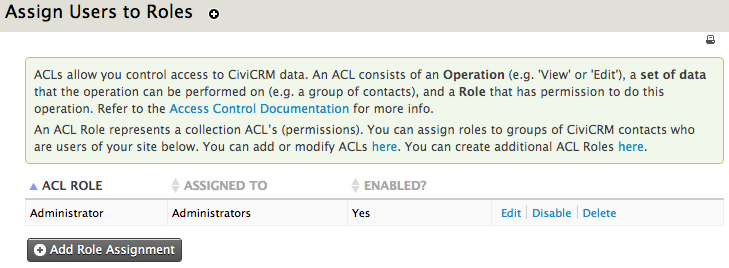
Assign Users to CiviCRM ACL Roles
Once the roles are configured, you can begin to assign them to users. In CiviCRM this is done in two steps:
First create an access control group for a selection of users that are to have the same level of access. There are multiple ways to do this, outlined in the chapter "Groups and tags".
The ACL contact group can now be assigned to a role. Click the second step on the access control menu screen ("Assign Users to CiviCRM ACL Roles") and hit "Add Role Assignment". Complete the following:
- ACL Role: select an available ACL role
- Assigned To: choose a contact group to assign to the role
- Enabled?: is this assignment active or not?
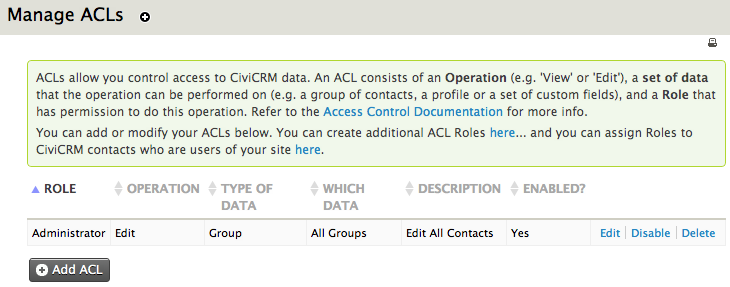
Manage ACLs
The third step is where the ACLs are finally created. They can be broken down into the following questions:
- Which role will have permission to perform this action?
- What is the action/operation? Is it the ability to view/edit/delete/create, etc?
- Which set of data can the action be carried out on?
To begin creating these ACLs, return to the Access Control screen (Administer > User and Permissions > Permissions...) and click "manage ACLs". A list of existing controls will be displayed, likely including one for administrators giving them permission to edit all contacts in the database. To add a new one, click "Add ACL" and fill in the following: - Description: write a clear description of what the ACL does
-
Role: choose a role to assign the ACL to from the drop-down list
-
Operation: select the action this role is allowed to perform (e.g. view, edit, create, delete...)
-
Type of Data: choose the data type the operation relates to:
- A group of contacts
- A profile
- A set of custom data fields
- Events
-
Group/Profile/Custom Data/Event: The label on this field is set by your selection in Type of Data. This is where you select the specific group of contacts, profile, custom data or event for this ACL
-
Enabled?: is the ACL active?