The Campaign Dashboard
Campaign Manager adds an extended campaign dashboard to CiviCRM.

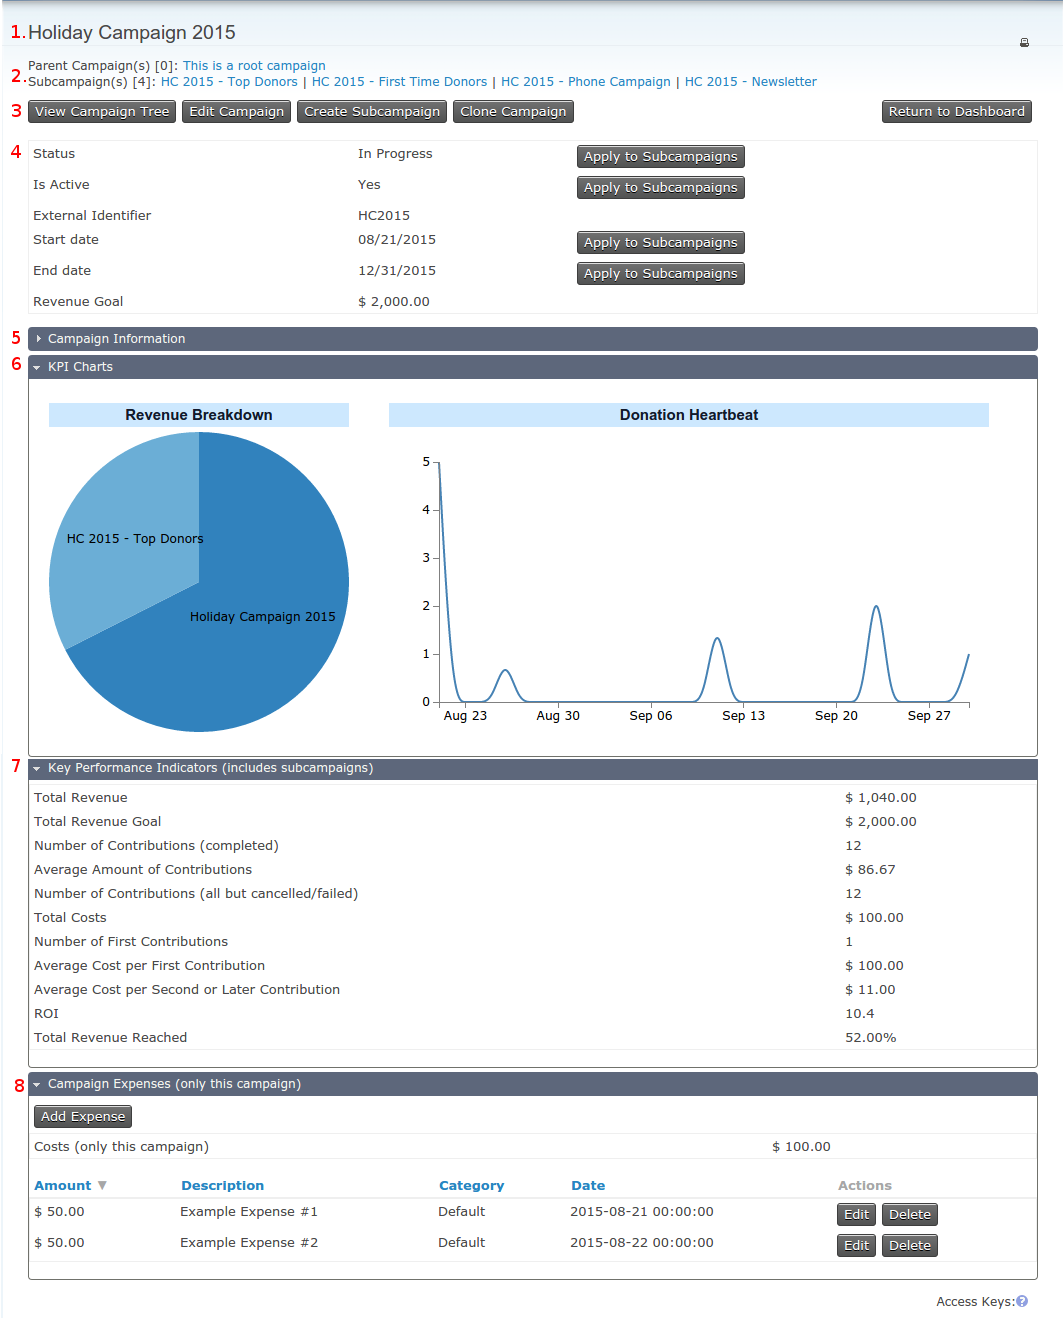
Here you can find all relevant information for a specific campaign:
- The campaign name
- Its parent- and sub-campaigns
- Buttons to
- View the Campaign Tree, a visualization of the campaign relationships
- Edit the current campaign
- Create a sub-campaign of the current one
- Clone the current campaign with or without all of its sub-campaigns (This keeps the relationship of all campaigns in a specific sub-tree and creates a copy of it.)
- The quick information panel, that shows campaign status information, like
- Campaign Status
- Whether it is active or disabled
- The external identifier
- Start- and end date of the campaign
- The revenue goal for this campaign
-
An "Apply to Subcampaigns"-Button (1), that applies the respective campaign attribute to all sub-campaigns. Be careful when using this as there is currently no option to reverse this operation. In case of doubt use the Clone Tool to create a copy of a campaign first.

- The "Return to Dashboard"-Button that lets you return to the standard campaign dashboard of CiviCRM
- The Campaign Information-Section (collapsed by default), that contains the
- Campaign Description
- Campaign Goals
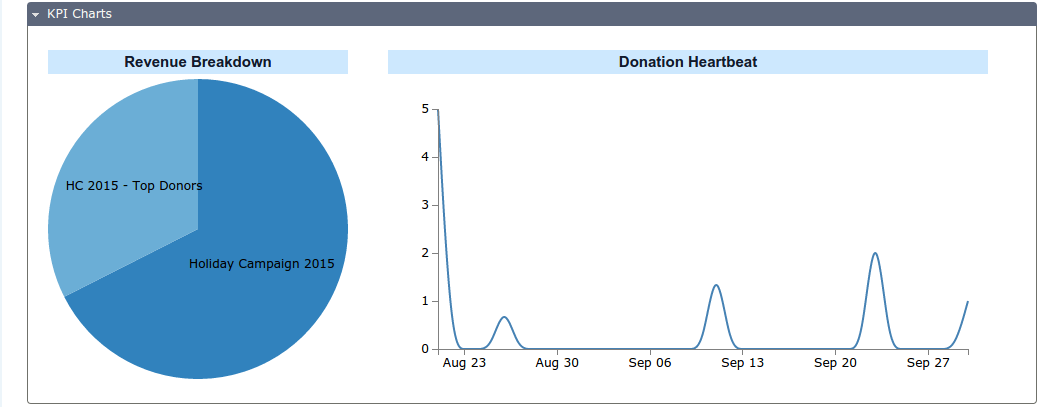
- The Key Performance Indicator Charts-Section, which shows visualizations for some KPIs
- The Key Performance Indicator-Section
- The Campaign Expense-Section
Campaign Tree

The Campaign Tree View is a visualization of the campaign hierarchy. It shows a campaign and all of its sub-campaings as an interactive tree structure. This view is zoomable, scrollable and supports drag-and-drop-editing of the tree.
- Left-clicking a node switches the tree view to the selected node
- Left-clicking a node while dragging enters the drag-and-drop mode. Drop the node on another one to make it a subcampaign of it. This also works with sub-trees. When selecting a sub-tree, only the selected node is visible, all other nodes are invisible until the operation is completed.
- Dragging while not clicking on a node will pan the currently visible tree.
- Scrolling in and out will zoom in or out of the tree view.
- Use the Reset View-button to reset the view to the default settings. This does not affect the tree structure in any way. Therefore you can not use this to undo changes made to the tree.
Tree Context Menu
- You can access a context menu with a right-click on a node in the tree view. This gives you the following options:

View Campaign
Use this option to quickly navigate to the dashboard of the selected campaign.
Edit Campaign
Use this option to quickly navigate to the edit page of the selected campaign.
Creating a subcampaign
Use this option to quickly create a new campaign that is a subcampaign of the selected node.
The Clone Tool

This tool enables you to quickly create copies of a single campaign or nested campaigns.
- Include subtree: Enabling this checkbox will create a copy of the currently selected campaign including all subcampaigns of it. Disabling it will only clone the current campaign.
- Title Match Pattern: When cloning a subset of campaigns Campaign-Manager
will scan the titles of all affected campaigns for this pattern and change all
occurrences with the Title Replacement Pattern.
- For example: The campaign "Holiday Campaign 2015" with a Title Match Pattern "/2015/" and a Title Replacement Pattern "2016" will change the Title of the clone to "Holiday Campaign 2016".
- Start Date Offset/End Date Offset: The start (or end-) date of all
affected campaigns will be offset by this value.
- Other possible valid values are: "+5 weeks", "12 day", "-7 weekdays", but it is recommended to use days.
Key Performance Indicators
This list of default Key Performance Indicators contains the following values of the current campaign (and partially sub campaigns):

- Total Revenue
- Total Revenue Goal
- Number of Contributions (completed)
- Average Amount of Contributions
- Number of Contributions (all but cancelled/failed)
- Total Costs: Sum of expenses connected with this campaign tree
- Number of First Contributions: Number of contributions of new donors
- Average Cost per First Contribution
- Average Cost per Second or Later Contribution
- ROI: Return on investment
- Total Revenue Reached: Revenue goal reached in percent
For developers: This list is extendable and can be fully customized by implementing a civicrm hook explained in detail below.
KPI Charts

This section contains a subset of all available KPIs that are additionally visualized to enable a quick overview of the campaign's status.
For developers: It is possible to change the behavior of this section (i.e. adding and removing KPIs from it or change the type of visualization) by implementing a civicrm hook explained in detail below.
Campaign Expenses

The campaign expenses interface shows all expenses associated to a specific campaign. It allows you to add new expenses or edit/delete existing ones.
Adding a new expense
To add a new expense click on the Add Expense-Button. The following dialog will appear:

Editing an expense
This works the same way as adding a new expense. Click on the Edit-Button of an existing expense to open the dialog shown above.
Deleting an expense
Click on the Delete-Button of an existing expense. A confirmation dialog will appear:

Selecting Continue deletes the expense. This cannot be undone.
Expense Categories
By default only the default category exists. If you need more that that add
more categories in CiviCRM via Administer → System Settings →
Option Groups → campaign_expense_types
Development and support resources
The issue tracker for this project can be found here.
Implementing custom KPIs
As mentioned above you can add custom KPIs, edit or remove existing ones by implementing the following hook:
hook_civicrm_campaignKpis ($campaign_id, &$kpi_array, $tree_level)
The $kpi_array consists kpi-elements that follow this schema:
$kpi_array["donation_heartbeat"] = array(
  "id" => "donation_heartbeat",
  "title" => "Donation Heartbeat",       // title shown in kpi list on the dashboard
  "kpi_type" => "hidden",                // "hidden", "money", "number" or "percentage"
  "vis_type" => "line_graph",            // "line_graph" or "pie_chart"
  "description" => "Donation Heartbeat", // short description, not used yet
  "value" => $all_contribs,              // value(s) of this KPI
  "link" => ""                           // link to advanced description, not used yet
 );